

The comprehensive guide to building a brick barbecue pit from the DIY and home improvement experts.
What would fall be without football? And what would football season be without the mouth-watering, smoky aroma of hot dogs and hamburgers sizzling on the grille? You know the kind: big fist-sized patties of ground beef that may just stop your heart, franks seared to perfection (just a little bit black), racks of ribs, juicy quarters of chickens, flame-broiled vegetables … I find myself daydreaming.
This season, kick off your culinary creations by building your own barbecue pit — a perfect project for the extreme do-it-yourselfer who doubles as a serious chef.
Get Cookin’
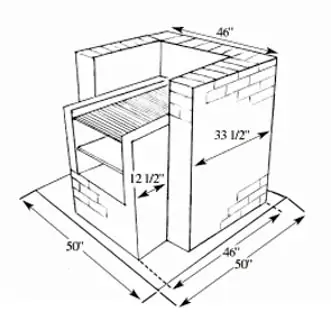
The first step to building a brick barbecue is to determine the pit’s location. You’ll want this relatively close to the house for the many inevitable trips to the kitchen while grilling, but keep in mind that it should be away from low-hanging branches and other fire hazards. First, dig the footings and construct wooden forms to shape the concrete. The pit excavation for the concrete foundation should measure at least 50-by-50 inches, and the concrete foundation should be 6 inches thick.
For the concrete base, “ready-mixed” concrete may be used or the concrete may be mixed on site. A recommended mix is 1 part Portland cement, 2 parts clean, dry sand and 2 1/2 parts gravel or crushed stone, by volume.
Mix the concrete in a wheelbarrow with a shovel or garden hoe. Thoroughly blend the ingredients before adding water. Use no more than six gallons of water per bag of cement. The yield of concrete will be approximately equal to the amount of gravel used. Compact the earth floor and place steel reinforcing rods in the bed. Criss-cross the bars in a grid pattern and elevate them with pieces of brick to center the reinforcement in the foundation. Then pour the concrete. Use a board to screed or strike off any high spots on the concrete surface. It’s also a good idea to let the concrete slope slightly toward the side where the pit’s opening will be built. Use a slope of about 1/8 inch per foot so that water will not be trapped inside the pit’s U-shaped brick walls. The concrete should begin to set within one-half hour. Cover the concrete with burlap or plastic for the first 48 hours.
For small foundations, such as that of a barbecue pit, companies such as Quikrete offer fiber-reinforced concrete, which eliminates the need for steel reinforcement in a slab-on-grade footer. The small fibers in the mix bond with cement, enhancing the strength of the concrete. If using this type of product, follow the manufacturer’s specifications.
Bricklayin’
Brick should never be laid “bone dry”; they should be damp but not wet. If the brick are too dry, the mortar you spread for each successive course dries out so fast you can’t get the brick layed and leveled before the mortar starts to harden. Dry brick is very thirsty, due to its porous nature, and it will quickly suck all the water out of the mortar as it is being spread. Pre-wetting the brick just prior to laying gives the surface a slippery quality that badly smears as you lay them. Your best bet would be to wet the brick one day prior to laying so the moisture is in the body of the brick, but the surface feels dry to the touch.
You’ll need some basic bricklaying tools, including a hammer, mason’s string, a few 10d nails, a trowel, a hand level, carpenter’s chalk and a broad-bladed cold chisel. The chisel, called a brick set, is used for cutting brick. A tap on the chisel with the hammer will score the brick along the line of cut. Do this on two surfaces of the brick. Then, pointing the chisel inward, strike a sharp blow with the hammer, and a clean break should result.
Before using any mortar, make a “dry run.” Draw the outline of the barbecue with chalk on the foundation slab, about 2 inches inward from the edge. When laying out dimensions of the pit floor, be sure to allow 1/2-inch mortar joints between the brick. Lay the first two courses dry to make sure the bond or pattern will work. If it does, the actual walls will be accurate.
Mix the mortar using 1 part mortar mix or masonry cement and 3 parts fine, clean sand, by volume. Add enough water to achieve a mortar consistency of soft mud. Mortar should slide easily from the shovel, but not run.
Mix small batches, one shovel at a time, not using a full bag (i.e., 1 shovel of cement and 3 shovels of sand). No more mortar should be mixed than can be used in two hours or the mix will harden. Should the mortar lose its plasticity before being used, remix it with a little fresh water.
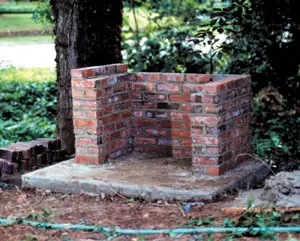
First lay the corners of the pit, stacking them three or four courses high. Make sure the bottom course is bonded to the slab with mortar. Then fill in the walls between the corners. As you proceed, laying course after course, lay 1/2 inch of mortar bed between each brick. Spread a bed joint for not more than three bricks at a time. Roughen the surface of the mortar by making a shallow furrow with the point of the trowel. Lay the brick on top and tap into place with a mortar trowel. Apply the “head” or vertical joint by spreading one end of brick with mortar. Make sure all joints are completely filled with mortar to ensure a watertight barbecue. Proceed in this manner for the remaining courses of the pit, frequently using a hand level to ensure the brick is even and plumb.
Frequently use a hand level to make sure the brick is even and plumb. As you lay each course, scrape off excess mortar from the joints.

It’s a good idea to let the concrete base slope slightly toward the side of the pit’s opening. This will allow drainage from the hearth.
As you lay the brick, scrape off any excess mortar from the joints. Tooling is done at the same time to seal the joints by shaping and compressing the mortar. For tooling, use a short length of pipe, slightly larger in diameter than the thickness of the joints. Work the pipe over the joint first vertically then horizontally to achieve a concave joint. A secret of good brickwork is not to move a brick once it is in place, so take great care when laying the brick the first time.
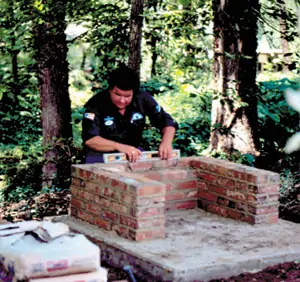
Top off the walls of the barbecue with solid bricks, and remove any crumbs of mortar with a soft hand brush.
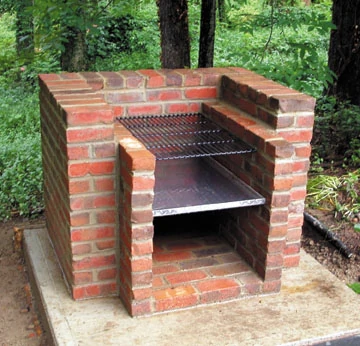
The dimensions of brick barbecue pits vary from builder to builder. The pit’s height is often constructed to a height customized for the builder (or cook). Keep in mind that the hearth, or floor, of the barbecue should be built wide enough to house a grille and charcoal pan, available at most home-improvement centers. When constructing the inner walls of the hearth, apply 4-inch rebar rods into the fresh bed joints to support the grille and pan at whatever height you feel would be comfortable for cooking.
Once the mortar sets, you’re ready to whip up a feast fit for football season. Bon appetit.
Editor’s Note: Thanks to Bryan Light, director of Technical Services for the Southern Brick Institute, for providing information and materials for this article. For more information, visit www.gobrick.com.
