

Here’s a look at a few simple homemade tools and jigs that can prove useful on all sorts of DIY projects. A “jig” is an accessory used in woodworking or metalworking that controls the movement or location of a tool. Most jigs are templates or guides to boost the performance of a tool, often custom-built to add precision or ease-of-use to a particular job. The term “jig” is a broad one, because it can apply to virtually any creation, whether store-bought or shop-built, that can make your job easier. There are tons of woodworking books with pages upon pages of jigs you can build for drill presses, table saws, routers and router tables, circular saws and more.
Over the years I’ve built a few that I use for a wide array of projects—jobs you’ll face when working with anything from sheet goods to trim carpentry. Included here are four simple jigs that you can make at home and use for a wide variety of DIY tasks.
Circle Cutter for the Router
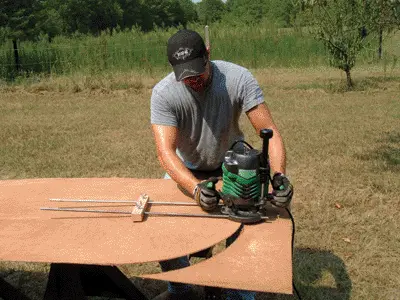
From constructing an arch to creating a table top, you will occasionally find the need to cut a large circle in plywood. This can involve precisely measuring and scribing a large circular line and then carefully following that line with the blade of a jigsaw. This can be time-consuming and tricky if you don’t have firm control of the saw (or your tape measure). However, once you’ve constructed the router jig shown, you’ll have a new tool ready to guide your router around an axis, cutting the exact radius that you locked into the jig.
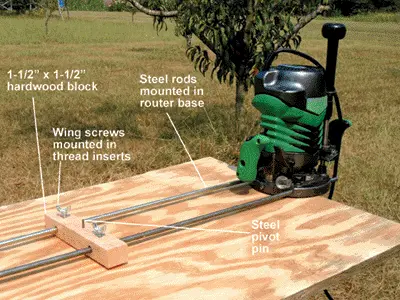
This circle-cutting jig is a simple design in which the router is guided by two 36-inch steel rods that pivot on a pin inside a simple wood brace. I picked up all the materials at the local big-box store, with the exception of the screw insert kit that I found at an auto parts shop.
The wood brace is made of an 8-1/4-inch block of 2-by-2 oak or other hardwood. The block is custom-fit for my router, so you may need to alter it to fit your own—what matters is that it spans the width of the router base. First insert the steel rods into the slots in the router base that usually hold an edge guide. I used 3/8-inch rods so the thumb screws in the router base would tighten against them securely. Some smaller routers may require 1/4-inch rods. Square up the rods so each is protruding an equal distance from the router and lock them in place with the thumb screws. Center the wood block against the rods and mark the location where their ends should penetrate the block at 90 degrees. Drill two holes through the block slightly larger than the size of the rods.

Mark locations for the threaded 1/4-inch (20) inserts on the top of the block, centered directly above the rod holes. Drill these holes into the rod’s “tunnel” but not through the entire block. Tap threads into the holes using the tool included with the insert kit. Then screw down the inserts. The 1/4-inch wing screws (or plastic knobs) are screwed into these inserts to tighten down against the rods, locking the wood block in place.
In the center of the top of the block, pre-drill a hole and drive in a 1/8-inch steel rod, cut 1-3/4-inch long and ground to a point. This is the pivot point of the jig.
To set the radius of your circle, simply measure from the center pin to the cutting edge of your router bit. Adjust the circle guide accordingly, and lock everything together with the wing screws and router base. Use the whole assembly like a large compass, which can cut almost 72 inches in diameter.
Straight-edge Guide for the Circ Saw

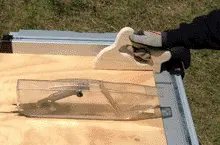
Large, 4-by-8-foot sheets of plywood can be a hassle to handle, especially if you’re working by yourself. Cutting them to size is no picnic either. When rip-cutting a sheet of plywood lengthwise, a straight-edge guide for your circular saw can take some of the headache out of this task. I’ve gotten a lot of use from the homemade version shown, which only takes a few minutes to assemble. 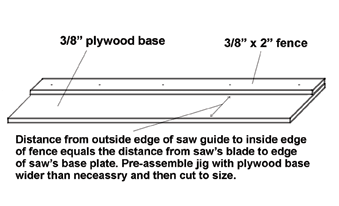
The saw guide consists of two very straight boards, and I used 3/8-inch plywood for each piece. Each board is 52 inches long. The top piece is a 2-inch-wide strip, which serves as a fence, clamped flush to one side of the base piece. Fasten the two pieces with wood screws and a little glue. Be sure not to drive the screws through the bottom of the base piece.

The width of the base that is exposed beneath the fence must be wider than the base plate of the circular saw. Then, run the circular saw over the entire assembly with the base plate flush against the fence, cutting away the excess plywood base. This customizes the saw guide to that particular circ saw (circular saws vary in size, so the guide will probably only fit the saw used to create it). To use, just align the edge of the saw guide’s base with the marked cutlines on a sheet, clamp the guide securely and run the saw down its length, holding the saw’s base plate firmly against the top fence.
Easy-Grip Push Stick
A push stick is one of the simplest jigs or accessories you can make, but one you’ll use every time you pull out the table saw. A good push stick should provide plenty of control of the workpiece while keeping your fingers safely away from the blade as you feed the work over the cutting edge. Some push sticks push only from behind the workpiece, but this can cause some materials to rise and/or buckle over the blade. A better design, such as the homemade model shown, allows you to push the workpiece from behind as well as from above, holding it down securely against the table.
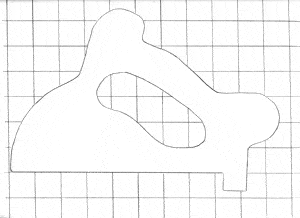
I made the first push stick from a scrap of 1-by-8 No. 1 pine. The handle is closed at both ends so it won’t easily break off. Simply draw the design on the workpiece as shown in the grid. Cut it out with a jigsaw, and then use a router with 1/4-inch round-over bit to ease the edges of the handle for a comfortable grip. That’s all there is to it, but this thing gets used every time my table saw gets powered up.

Thin-Rip Push Stick

The thin-rip push block is ideal for
ripping narrow pieces.
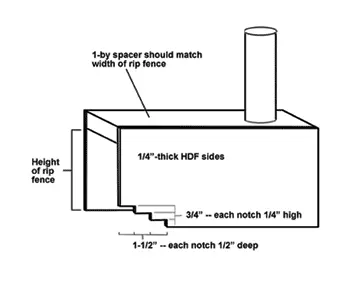
The next push stick came from some instructions I found in a book titled, 120 Shop-tested Tips & Techniques, edited by Terry Strohman. I’m not sure if this is Strohman’s original design, as there was no specific author listed. But I cannot take credit for the idea, and it’s a good one. When making very narrow rip-cuts on the table saw, it can be difficult to guide the work accurately because you should never use your bare hands. Trouble is—most push sticks are too large.
Customize the thin-rip block
to fit the height of your table
saw’s rip fence.
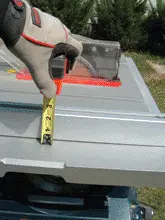
The thin-rip push block shown should be custom-built to fit your particular rip fence, so dimensions will vary. It functions like a three-sided sleeve that rides atop the rip fence. The push block is 7 inches long. The two sides are cut from 1/4-inch high-density fiberboard (HDF) and bridged by a 1-by spacer (scrap pine, in my case). The spacer should be cut to match the width of the rip fence. The sides should be cut to match the height of the rip fence plus the 3/4-inch thickness of the spacer. (Make sure the sides are cut high enough that the spacer clears any bolts on top of the rip fence.) The hardboard sides are glued flush against the top edge of the spacer. The handle is made from a 3/4-inch dowel, cut 4-1/2 inches long and glued onto the rear top of the push block.
The sides are made from HDF and the spacer from 1″ pine. Drill a hole for the handle and glue a dowel in place for a steady grip.
This thin-rip block is a simple design, but here’s an extra feature that adds to its performance: stair-step notches that fit stock of varying thickness. On the side piece that faces the blade, use a jigsaw to cut three successive notches as shown in the diagram. (Do this before assembling the block.) Each step is 1/2-inch deep and varies in height by 1/4 inch. This means the side of the push block can “bite” downward on the workpiece, from thin 1/4-inch stock up to thicker 3/4-inch stock, while also pushing from behind. To use, just set the thin-rip block over the fence with the corresponding notch over the workpiece. Push the stock forward into the blade, holding the work firmly against the rip fence with a scrap of wood. For more information on the thin-rip push block and other woodworking jigs, visit www.woodsmith.com.
