

By Monte Burch
Butcher-block kitchen countertops have traditionally been very popular and these days are often used as companion tops with other materials, such as solid-surface tops. In addition to their aesthetic appearance, they can receive hot pans without damage. You can make up your own butcher-block countertop, or the same technique can be used to create cutting boards, or a top for a roll-around cart. The steps in creating the top are fairly easy, but the project does require some special tools, especially for the larger size tops. The top shown is actually one of two tops, with one placed on either side of a kitchen stove. This allows placing hot pans or dishes directly from the stove or oven on the countertop to cool.

Butcher block tops are traditionally made of hard maple. The first step is to saw the maple into strips.

The strips are then crosscut into random lengths.
First Steps To Building A Butchers Block
First step is to obtain the wood. Traditionally hard maple is used, because it’s extremely hard and has dense wood grain. Because of the shipping weight, it’s best to obtain the wood locally. It is also nice to be able to select the pieces you desire. If you have a planer, you can cut the cost by purchasing un-surfaced lumber and running it through the planer. Regardless, it’s important the surface be extremely smooth or you’ll have glue-up problems. These tops are made up of lumber glued face to face, and the lumber must first be ripped into the widths needed to create the thickness desired. You should add about 1/4 inch to the width. This allows for removing any unevenness in the glue-up process.

A gluing platform must be created using a piece of stock 1/4 inch narrower than the top to be glued up, covered with waxed paper, and the strips first dry laid in place.
In this case the top was first glued in two half sections.
The top shown was constructed in two sections, and then the two sections were glued together. This allows for smoothing and surfacing both halves, and then simply sanding down the joint once they are glued together.
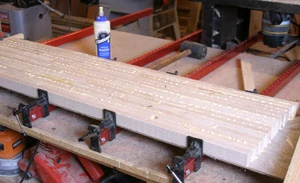
Hard maple can be difficult to rip. In fact, some of the pieces I used featured uneven grain that shut-down even a 2-horsepower table saw when used with a planer or fine-toothed blade. I used a bandsaw to “resaw” the pieces into rough size, and then ran them over a jointer to achieve a more even “face.” Butcher blocks are also traditionally constructed of random length pieces. I used a full length piece to begin and another one to end each half. This allowed for more even and easier clamping of the pieces, with the longer pieces holding the shorter ones tightly together.
Glue and Clamp
Bar clamps are used to clamp the pieces together for glue-up. In order to hold the short pieces flat, a support board must first be positioned on the bars. This board should be approximately 1/4 inch narrower than the finished glued-up assembly. Position bar clamps in place on a smooth, flat surface and then lay the support board in place. Cover the board with a sheet of waxed paper. Use C-clamps to clamp a strip of wood to one end of the support board. Make sure it is square with the support board edges.

After all strips are coated with glue, the top is covered with waxed paper and the assembly clamped securely together.

The glued-up halves are smoothed. The best tool is a drum sander. The Craftsman Drum Sander shown will take an 18-inch-wide board, or sand a 36-inch-wide piece of stock.
Cut the first full-length front piece and lay it on the board, fitting it against the front of the bar clamps and against the wood strip clamped to the support board end. Then cut the random length pieces, positioning each in place against each other and against the preceding pieces. The joints should overlap at random lengths, but by at least 3 inches. Once you have all pieces dry-laid in place, including the last full-length piece, remove the last two lengths and lay them aside. Then shift all the remaining pieces to the back edges of the clamps to allow clamping room.

A belt sander can also be used to cut away the glue lines and sand the top and bottom surfaces smooth.

The top shown had a rounded corner that was cut on the front half using a bandsaw with a support roller on the outfeed end.
Waterproof or water-resistant glue, such as Titebond II or III should be used. They are FDA approved for indirect contact with cutting boards. Make sure all faces are clean of sawdust and everything is ready. You should work fairly fast, in order to clamp up before the glue sets. Start with the section joining the first or full length piece and apply a fairly heavy bead of glue to its back side and to the ends of each random-length piece. Position the pieces in place, and then continue with each length until you have glue applied to the entire section, including the last full-length piece. Begin applying pressure with the clamps, applying evenly and making sure the joints are tight, even and flat. A second end board can be placed on the opposite end and clamped to squeeze the end joints of the random lengths together as well. Wipe away any excess glue from the top surface and allow the assembly to set at least 24 hours.

The edge of the rounded corner was then sanded smooth with a disc sander.

The two halves are then clamped together. In order to clamp the end with the corner removed, the bandsawed corner piece is dry-clamped in place to provide clamping support.
Smooth It Up
The next step is to smooth the glued-up surface, and this can be done in several ways. The problem is the glue lines will dull many tools. If you have lots of time on your hands, a hand smoothing plane can be used in the traditional manner, but the smoothing will dull the plane, requiring frequent sharpening. A belt sander can also be used with coarse paper, followed by finer papers, then followed with a finish sander. You can also use the belt sander to sand away the glue lines, and then run the assembly through a planer. Running the glued-up piece through a planer without first sanding the glue lines will create nicks in the planer blades. Some planers like the WoodMaster have optional sanding drums that can be interchanged for this step.

The entire top is then sanded using the drum sander.
The ultimate tool for these projects is a drum sander such as the Craftsman Professional 18-inch Drum Sander. If you plan on building several tops, it can save a lot of time and work. Maximum sanding capacity is 18-by-36-by-5 inches, which makes it easy to sand the 24-inch-wide kitchen countertop shown.

The Craftsman drum sander also has a roller and support on the top, making it easy to manhandle large pieces such as the countertop form the out–feed back to the in–feed table.
Regardless of the method used, completely sand and smooth both top and bottom sides. Then inspect for any open joints. The top must be made completely waterproof so water can’t run down into the cabinet below. Refill any cracks with glue, allow to set, then sand down smooth.

The top and bottom front and end edges of the countertop are rounded using a 1/2-inch rounding bit in a router.
Because one end of the top shown was cut in a radius, this curve was first laid out and the section with the curve was cut. This can be done with a jigsaw or with a bandsaw with an off-feed support. The two sections are then glued together, and this joint sanded smooth. Final step is to sand the edge smooth, then use a rounding bit in a router to round both the top and bottom edges. The top shown was to be fitted under the edges of ceramic tile, already in place so the back edge was routed to create a rabbet for the fit.

The top is sanded smooth with progressively finer grits of sandpaper.

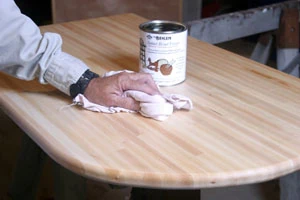
Salad bowl finish is applied with a soft cloth. The finish is smoothed between coats with 4/0 fine steel wool.
Last step is to apply the finish. I used H. Behlen Salad Bowl Finish. This is a nontoxic and food-safe cured finish. First sand the wood to 320-grit smoothness. Remove all dust. Apply the finish with a lint-free white cloth in a thin, uniform coat. Allow 6 hours drying time and then lightly scuff-sand with 400-grit sandpaper and recoat. Allow 24 hours after the last coat and then rub with a nylon mesh pad or 4/0 steel wool. Allow 72 hours curing time, and then wash the surface prior to food contact.
