

Using PVC Jamb Extension for an alternative to interior window trim.
By Kathy Ziprik
Want a straighter and more maintenance-free window jamb? Then follow the steps taken by contractor Steve Roth.
“When I went to renovate an 1800s house, I found that the old walls were not level,” says Roth. “They were so imperfect that I had to frame in interior walls to straighten them. Creating a thicker, more even wall solved one problem, but presented a new dilemma: how do I frame out the interior of the windows?”
Roth found his solution by creating jamb extensions made of PVC. Along with being maintenance free, the PVC resists moisture and adds a more complete finished look to the interior of the window.
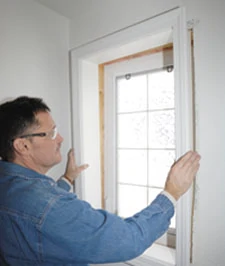
“The jamb extender covers the framing material and what you’re attaching the casing to,” says Roth. “This simple box frame extends the window framing out to the interior wall surface and adds to the overall design of the room.”
Roth chose PVC instead of wood for the jamb extension for several reasons. “These days it’s difficult to find clear pine that’s not warped or knotted,” says Roth. “The PVC I purchased from Fypon was perfect. Each piece is 100 percent usable with no knots, splits or warping. The 1-inch thickness of the PVC board made it easier to nail the casing at the final step. And, most importantly, the PVC complements the vinyl on the frame’s window.
“Moisture isn’t a problem with PVC either. Some contractors take drywall and simply return it to the window. That’s a plain look and the drywall can soak up moisture, making it a problem sometimes in less than a year. Not so with the PVC … it resists condensation and has an extensive maintenance-free lifespan.”
Throughout the house, Roth created a variety of PVC jamb extenders—some reaching up to 12 inches in depth. To create the PVC jamb extensions, Roth followed several simple steps.

Step 1—Clean up the area where the jamb extender will be installed and prep out the space.

Step 2—Measure the opening space to determine the width of the jamb extension needed. Cut the boards on a table saw to create the box. For this project, the wall space was 3-1/2 inches in depth. Roth recommends cutting the boards and assembling the unit on a workbench instead of nailing directly to the window in order to control the length, width and squareness of the jamb extender.

Step 3—Round-over the sharp edges on the inside corner of the constructed box with a router.

Step 4—Once the box is constructed, attach the Fypon PVC casing to the box area.

Step 5—Fit the jamb extender into the opening to test for accuracy of fit. The jamb extender should fill in the entire area and extend out from the window framing to lie flush with the interior wall surface.

Step 6—Ensure that the jamb extender is plumb and level in the opening. Nail through the jamb extender into the framing. Finally, nail through the PVC casing like a nail flange into the wall. Finish by filling in nail holes. Now you have a secure jamb extension that defies moisture while adding a touch of class to the room.

