

By Larry Walton
Careful planning pays off in a fence that looks good for years to come.
There’s more to planning a picket fence than just cracking open a beer and digging post holes, which occasionally looks to be the preferred method in my neighborhood.
Living in a historic landmark, as our little town is designated, gives me plenty of opportunity to observe how to and how not to build a picket fence. In their great wisdom and “historicalness,” the powers that be in our diminutive burg canonized picket fences as one of the two acceptable fence types within the bounds of their pre-modern jurisdiction. How to build the picket fences, however, was left to the homeowners with mixed results.
You might be surprised at the number of ways a collection of neighbors can make fences. Some designs have obvious issues such as pickets that are too wide or too narrow and spaces that are too spacey or overly tight. Other problems are less obvious and it takes some study to determine what about the fence is not quite right. Examining the relative merits of a neighbor’s fence design has its dangers, which is why I’ve done the work—so you can rank your neighborhood fences while designing a better alternative.

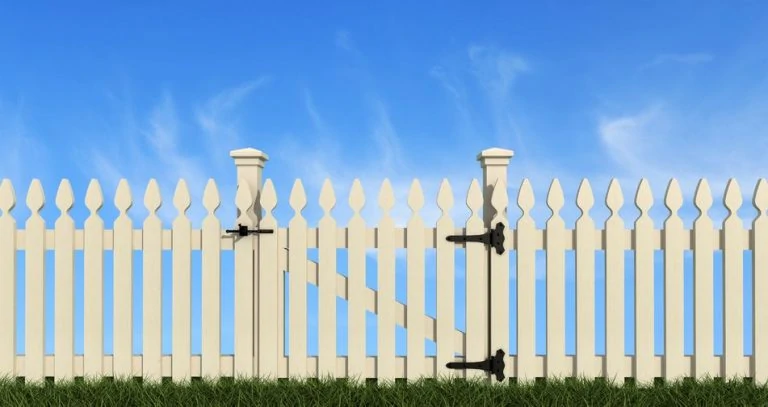
Perhaps the best thing I’ve learned from my neighbors is to plan your fence so either the posts are camouflaged or accentuated by making them a part of the picket pattern. All too often, picket fence builders seem to ignore the fact that the posts affect the look of the fence. Unlike a more solid treatment of fence boards, picket fence posts are visible. You must either incorporate the posts into the look of the design or hide them by keeping them short and setting them back from the rail face.
Post Your Plan
If you choose to make your posts part of the look of your fence, you need to give attention to spacing the posts evenly on any given run of your layout. For example, if you choose a post spacing of eight feet and the last section ends up being six feet in length, adjust the spacing of all of the posts to fit the pattern equally.

Divide the total run by the desired post spacing to get the number of fence sections in the run. Next, divide the total run by the number of fence sections to get the spacing. You may need to adjust the number of fence sections to get closer to your desired spacing. Here’s an example:
Total run: 85 feet
Desired section length: 8 feet
85/8=10.625
85/11=7.73 or 7’8-3/4”
Treat each fence section on each side of a gate opening as a separate section of fence with an evenly spaced fence layout. Place a stake on the ground at each post location to test your spacing and make any adjustments as needed before digging your post holes.


The best picket fence designs that incorporate posts as part of the look set the rails so the outside face of the pickets are flush with or set back slightly from the outside of the fence posts. Setting the rails too far forward creates a problem in the look of the fence. Some fence builders compound this problem by trying to align a picket in front of each post. The better solution is to allow the post to stand boldly at the front of the design with the picket layout going on between the posts.
Once the posts and rails have been set, treat each section of the fence between posts as a separate section with consistent picket spacing as close as possible to the width of a picket. I like 2-3/4 in. as a picket width with a 2-3/4-in. space. But within each section between posts, you may need to adjust the spacing by 1/16 in. or so to get the spacing to work out evenly within the section.


As you are working on your picket spacing, keep the same spacing between the last picket in each section and the post. When these spaces are much different from the picket spacing “in the field,” it can be quite noticeable.
When one of your posts is a bit out of plumb (not perfectly vertical), make slight adjustments to the picket spacing spread over several pickets to help hide the flaw. Whether crowding the spacing slightly or providing a little more gap at either the top or the bottom, spread the adjustment over a large portion of the layout to make it indiscernible.


Secret Structure
If you want a clean, pickets-only look to your fence, you can conceal the posts by mounting the rails on the outside of the post faces and cutting them off flush to the top rail. There are several advantages to this design. First, post spacing is not as critical because they are not seen as part of the layout. The spacing between posts can vary as long as you give attention to the length of the span for rail strength.
The second advantage is that no special hardware or mortises in the posts are required. The rails are attached with simple fasteners such as deck screws or lag bolts.


Too often picket fence builders don’t know what to do about the posts. One solution is to hide the post by mounting the rails on the outside and ignoring the post locations by continuing the regular picket layout over the posts.Thirdly, the posts can be shorter, saving materials. As long as the set post is slightly above the desired top rail height, it’s all you need above ground. Proper in-ground penetration is still important.
The biggest mistake I see when fence builders use this design is when they try to mount the rails between the fence posts. This brings the posts forward in the layout and fills some of the gaps between the pickets, making the posts much more noticeable. When done right, this design presents an uninterrupted line of pickets and the posts remain unseen from most angles.


In the hidden-post design, the fence rails are mounted on the outside of the post and are joined together on the post.

Side Note
Prefab Panels
A properly built and installed picket fence can define property lines and decorate a home’s landscape, but building from scratch can take a lot of time, tools and labor. Prefabricated fencing sections, which come in a variety of sizes and styles—including picket, stockade and square spindle—make it easier for homeowners to install their own fence. However, keep in mind that the prefab panels must be stair-stepped and do not follow the contour of the land.
Follow the Contour
Ideally, your fence should follow the contour of the land. An easy way to see this is that the bottom rails run parallel to the ground under it. While there are a few cases where keeping a fence section level is desired (close proximity to a building, for example), most of the time it is best to follow the lay of the land. This does several things for your design including keeping picket lengths and post heights consistent. As a general rule, use your level only to keep posts plumb. Set rail height by measuring up from the bottom of the post.
Pick Your Pickets
Preferring a traditional look, I rip my pickets 2-3/4-in. wide and cut 45-degree chamfers to a point. As you can see, this is not the only way to go. Varying picket length alone can have a dramatic effect and changing the cut at the top can distinguish your fence from others in the neighborhood.


