

By Matt Weber
EHT has reported on Fypon’s miterless crown moulding system in the past, and how it saves time by eliminating miter cuts or coped joints. But how much time does it save? Well, I had a recent opportunity to install the system in a simple 9-1/2-by-11-foot square room, and this time I clocked the process.
I should preface this by explaining that this time frame won’t apply to every job. By using full-length sticks of moulding, I was able to run a piece from one corner to the other without joining two sticks in the middle (typically using supplementary miters called scarfing, although with urethane moulding you can actually join two sticks with a straight 90-degree butt joint, along with some nails and poly-based adhesive). Eliminating these extra cuts obviously saves time.
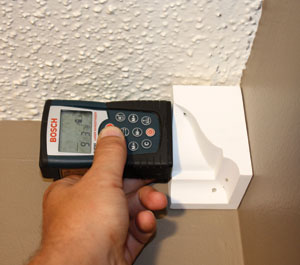
I also do not account for the time spent gathering tools to set up your work area, nor do I account for drying times (for caulk, spackle, paint, etc). And, finally, I had the advantage of using a pneumatic nailer, as well as a laser range finder (also called a distance-meter), which greatly sped up the process of measuring my moulding lengths—beats the heck out of a tape measure in these situations. These tools can be a little pricey for the occasional DIY’er, but if you do a lot of moulding installation (or building of any sort), they’re a very worthwhile investment. Word of warning: If purchasing a distance-meter, select a laser-based unit like the Bosch Model DLR165K and completely avoid a sonar-based unit, which will give you a different misreading every time. From my experience, the sonar-based tools are basically useless.
While I’m fairly well-versed in installing standard wood crown, I’ve never timed such an installation. I was too busy cutting miters—often re-cutting miters—or coping inside corner joints with a coping saw and wood file. Standard installation can be a very time-consuming and labor-intensive chore that’s rife with surprise obstacles, such as out-of-square corners. Installing standard moulding in similar sized rooms can easily take from dawn to dusk. The miterless system simplifies things greatly, and in turn, speeds up the job. Here’s how it went:
Step by Step
Although the moulding comes pre-primed, throw a finish-coat on the moulding prior to installation, this eliminates time spent masking off the walls with tape. In the end, you’ll only need to touch-up paint. Time spent pre-painting: approx. 15 minutes.
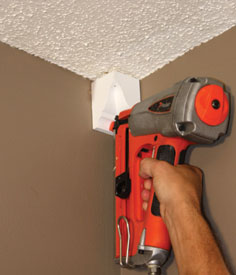
Installing the corner blocks is a super-simple job. Simply apply a polyurethane-based construction adhesive to each side of the block that will contact the wall and nail in place. Using an air-nailer, I installed all four inside corner blocks in roughly 5 minutes.
Next, use a stud finder to mark the stud locations so you’ll know where to nail. Time spent finding studs: approx. 10 minutes.

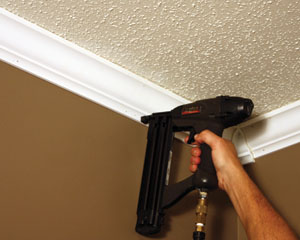
Then, using the distance-meter, I was able to measure each moulding length, then cut it on my chop saw and nail it in place in about 7-1/2 minutes each. The square cuts are the key to the system, so if you can measure and cut a board, you can successfully install this system. (Add about 1/4 inch to each measurement, and you’ll find the urethane moulding will “snap” into place). That equates to approximately 30 minutes to install all four moulding strips. If you’re using a tape measure, you can expect it to take more time.
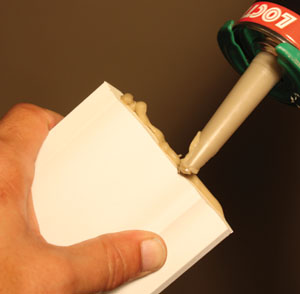
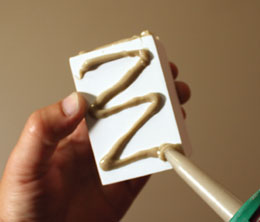
Also of note, the light weight and flexibility of the urethane makes installation go faster. I was working alone, and even without an assistant to lift the far end of moulding into place, the material bends, and was light enough to temporarily pinch in place between the corner blocks as I ran the nailer down its length, fastening flush to the wall. Apply adhesive to each end of the moulding where it meets the corner blocks.
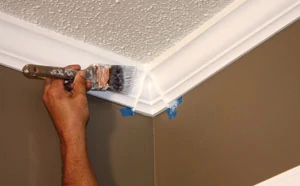
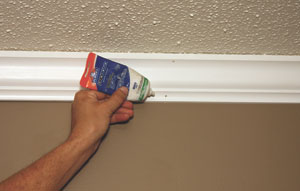
Unfortunately, the final phase is not much fun, and I’m afraid even Fypon can’t help us here. Caulking joints, filling nail holes, sanding down and applying touch-up paint are necessary evils for any crown-moulding system, if you want a truly finished look. Excluding drying times, I spent roughly an hour of actual worktime completing these tasks. However, I was working around a rather odd obstacle—a “hardened” textured ceiling. In many cases, installers can actually lay down popcorn texture along the edge of the ceiling with a damp sponge that melts the texture to flatten it for a flush fit. This ceiling had unfortunately been encased in several layers of oil-based paint and primer, giving it a hard, waterproof shell. I had to disguise the rough joint with more caulking than would otherwise be required, which took extra time.
Even with that hurdle, according to my trusty iPhone stop-watch, I only spent approximately 2 hours of actual hands-on time with the installation. Believe me, that’s fast. Learn more about the Fypon line of products at www.fypon.com.
