


Give your house the classic look of hardwood with laminate flooring that fastens together seamlessly, without the mess of glue. The floorboards simply snap together using a tongue-and-groove system. The interlocking planks create a strong, tight joint that secures the flooring from wall to wall. The result is a sharp, new upgrade to the room — the look of real wood with the many advantages of laminate. And the quick installation time makes adding a new laminate floor ideal for the weekend warrior.
Laminate flooring is manufactured from fiberboard planks covered with decorative laminate sheeting and a clear plastic wear layer. One of the benefits of laminate flooring is the wide variety of wood appearances available. Choose from the look of traditional oak, cherry, walnut, beech or many other options. Some manufacturers even offer the look of stone. And many new laminate flooring lines show remarkable attention to detail with the textures of the top surface. Available is a wide range of ultra-realistic textures that look and feel like real wood, including worn, rustic looks and high-gloss finishes.
The benefits of laminate don’t stop with the look and feel of the surface. These products are usually installed over a foam-cushion underlayment. This cushion provides resiliency so the planks absorb shock and provide a natural sound. This also means the floor is a little easier on your feet.
Durability is another key feature. Many laminate flooring products are impervious to most stains and very resistant to scratches. The boards are prefinished at the factory and often feature a built-in edge sealant that protects against moisture absorption. Some laminate flooring manufacturers even offer a lifetime wall-to-wall warranty against wear-through, stains, fading and water damage from everyday spills and damp mopping.
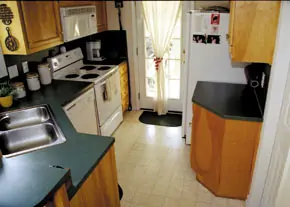
Before
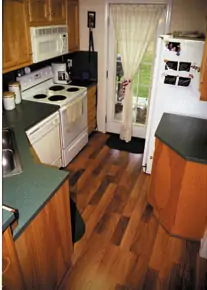
After
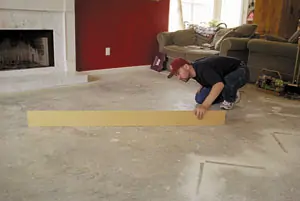
First Prep the Subfloor
Your first step is to lay out a floor plan. Sketch the room on paper and mark the dimensions. Calculate the square footage you’ll need with help from a dealer or manufacturer. You’ll need to order more flooring than the minimum amount to cover the square footage of the room. The extra flooring will account for unusable cut planks, as well as providing some extra material if damaged planks need to be replaced in the future. Also make a note of the different transitions in the room where the laminate will meet other types of flooring or exterior doors. The home store where you purchase the flooring will usually have transition moldings for these areas.
Bryan Hallman of Birmingham, Alabama, recently installed the new laminate floor shown in this article. For his kitchen, dining room and living room he selected Pergo Signature flooring, available exclusively at Lowe’s, and completed the project over the course of two weekends, spending the majority of his time preparing the floor.
“Make sure to allow yourself plenty of time and be prepared for it to take longer than you expected,” says Hallman of the floor project. “You’ll spend more time doing prep work than actually laying down planks. Pulling up old flooring, carpet, carpet pads and tack strips took up the better part of a whole day.”
Laminate can be installed over most flooring surfaces, but always remove carpeting and remove any wood flooring that is installed over concrete. Then make sure the subfloor is level. It is critical that laminate planks fit together correctly to ensure an even finished surface and a seamless appearance. As a result, most manufacturers recommend no more than a 3/16-inch difference in height between any two points in a circle with a 20-foot diameter. If the floor isn’t this level, you’ll need to fill low spots or grind down high spots before installing the flooring.
An 8-foot straightedge laid across the subfloor works well for detecting areas of the floor that aren’t level. Building paper can be used to fill low spots less than 1/4-inch deep, but you’ll need a Portland cement-based leveling compound to fill deeper depressions.
Damp floors present another problem for installation. Make sure the subsurface is dry. Check the moisture content of concrete floors by taping the edges of a 2-foot polyethylene square over the concrete.
After 24 hours, if no signs of moisture buildup or discoloration appear beneath the plastic, the floor is probably dry enough.
Also, remove any existing quarter-round along the edges of the walls. Because the flooring will expand and contract due to changes in humidity, the planks aren’t installed tightly against the walls of any room. You’ll need to leave a 1/4-inch gap around the edges of the flooring to allow for the expansion, and once the flooring is completely installed, the quarter-round can be reinstalled over the edges to conceal the gap.
Once your subfloor has been prepared and cleaned for installation, undercut the doorjambs and casing to allow room for the thickness of the new flooring. A pull saw works for this job, enabling you to get close to the floor to make the cuts. Electric jamb saws are also available to quicken the process.
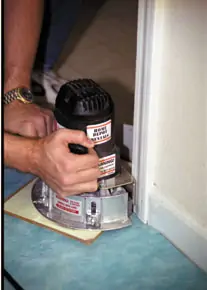
Determine the required depth of cut by stacking a scrap of flooring on top of a piece of foam-cushion underlayment and using it as a saw guide, representing a small, workable sample of the final installed floor. Leave an additional 1/4-inch of space concealed beneath the doorframe to allow expansion. Use a hammer and chisel or screwdriver to pry out pieces of the cut jamb and casing.
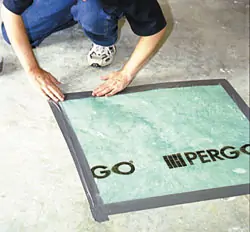
Laying the Laminate
On concrete subfloors, you must use 6-millimeter polyethylene film as a moisture barrier. Create an 8-inch overlap to join sheets of film when covering the subfloor. The film is needed over all subfloors that contain concrete, even if the concrete is covered with vinyl, linoleum tile or other type of flooring.
All laminate floors also require a foam underlayment to provide extra comfort and noise reduction. The Pergo Signature flooring shown in this project actually has an underlayment attached to the underside of each plank. But with a new family member expected in just a couple of months, Hallman opted to install an additional underlayment beneath the planks to ensure an even quieter step.
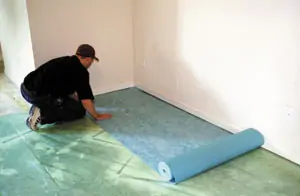
Cover the subfloor with underlayment, lapping it up the baseboards or walls by about 2 inches and securing the edges with masking tape. As you progress across the room, butt the edges of underlayment sheets together. Taping the seams may help prevent the sheets from shifting.
Before beginning the planks, measure the width of the room to make sure the last row of flooring will be at least 2 inches wide. Divide the width of the room by the width of the exposed face of the flooring. The remaining number will be the width of the last row. If the last row is less than 2 inches, cut the first row of boards narrower to allow more room for the last.
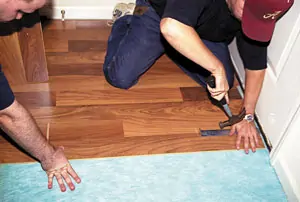
Assemble the first row of planks with the tongue side toward the starting wall. Insert the tongue into the groove of the end joints and rotate the plank downward. Keep the planks aligned and the joints closed. Cut the last plank as necessary to fit against the opposite wall using a table saw or a miter saw. Remove the tongue on the end of the first plank, and remove the tongue along the length of all the planks against the starting wall. If the starting wall is uneven, mark the contour of the wall on the planks and cut along the pencil line.
Then cut the first plank of the second row to 32 inches in length, and loosely lay several more full-sized planks to complete the second row.
At a slight angle, insert the tongue of plank 2 into the groove of plank 1 until the laminate edges meet, and then press downward until the joint locks (see diagram below for plank layout). There should be no gaps at the joints.
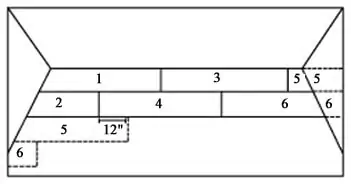
Join the end of plank 1 to the end of plank 3, keeping the ends perfectly aligned. Join the end of plank 4 to the end of plank 2.
There will be a gap on the long joint between planks 3 and 4. Raise plank 4 approximately 1 inch from the floor and press against the long edge of the plank until the laminate edges meet with plank 3. Press downward on plank 4 until the joint locks. Use these methods to complete the first and second row, and then slide the two assembled rows to the starting wall. Maintain the required 1/4-inch expansion space againast the wall with plastic shims. Use pieces cut from the opposite wall to begin the next row, always providing a distance of at least 12 inches between the end joints from one row to the next.
Continue installing the remainder of the floor in this manner all the way to the far wall. Complete the floor by cutting the last row to the correct width to fit against the wall, accounting for the 1/4-inch of expansion space.
Installation Tips
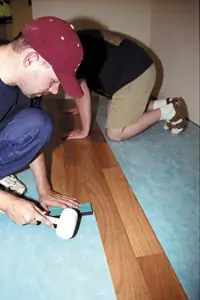
Pergo and many other manufacturers offer special laminate-flooring installation tools. The tools used for this project included plastic shims, a pull bar and a tapping block, which proved to be a huge help during the installation.
Use the pull bar when there isn’t enough space to manually raise a plank at the end of a row. With the plank flat on the floor, align the tongue of the pull bar into the groove of the end joint, and tap with a hammer until the joint closes.
 (Pull bar)
Use the tapping block to tap in the long joint. These tools come in handy when working against walls or installing notched planks beneath undercut doorjambs.
 (Tapping block)
And when cutting laminate planks, use a saw blade with fine teeth to minimize chipping. The blade should also cut down into the laminate rather than up. This means you should generally cut the planks upside-down when using a powered circular saw.

When installing laminate floors around pipes, use a jigsaw to notch the planks leaving a 1/4-inch expansion space around the pipes. Use glue to join the cut pieces. A temporary weight, like a brick resting on a scrap of underlayment, might prove useful to hold down the planks when gluing cut edges.
Once the flooring is installed, trim away any exposed underlayment or poly film from the edges, and reinstall baseboards, shoe molding or quarter-round to conceal the expansion space at the edges of the floor.

Final Thoughts
Laminate flooring, while attractive and durable, can still be damaged. If the fiberboard core of the planks is subjected to extreme moisture, it can swell and buckle. For this reason, laminate may not be the best flooring option for bathrooms or basements that are prone to leaks.
But virtually any other floor that isn’t subjected to excessive moisture will be a good candidate for laminate. And if damage does occur, the problem planks can be cut out of the floor and replaced with new ones — a simple repair job that can usually be completed in two hours. Try that with traditional hardwoods.
“I love the new flooring,” says Hallman. “It looks great in our home. It really opens the place up and gives it a rich look. And I’m not really a handy guy. If I can do this, most anyone can. I’m not saying it was easy, but if a guy who didn’t own a single tool five years ago can knock this out in a couple of weekends, how hard can it be?”

Tool Tips for Glue-Free Floors
Having just completed a new laminate flooring project, Bryan Hallman of Birmingham, Alabama, offers a few tips not found in your instruction manual. “Make sure you have the right tools,” says Hallman. “If your local area has a tool-rental place, you may find some of these available for just a few dollars an hour.”
1. Electric doorjamb saw: “Do yourself a favor and borrow or rent a powered jamb saw. I had to saw doorjambs on both sides of 12 doorways. I did four with a manual pull saw. I thought my arm would fall off if I did another. Then I rented a power saw and did the other eight in just a matter of minutes.”
2. Electric finish-nail gun: “Nailing all the molding by hand with a hammer could take hours. I rented an electric nail gun. It cost $18.00 for 4 hours, but saved a lot of time.”
3. Miter saw: “Miter saws work great for all of your cutting needs. They’ll really come in handy when you have to cut angles in planks and molding.”
4. Knee pads: “I know they look silly, but they’re cheap and after a few hours on your knees on a concrete floor, you won’t care how silly they look.” Be careful with hard plastic pads, though. They may trap a sand particle and scratch some the new flooring. You might also fold up an old blanket for knee protection.
