


Ceiling fans are both functional and decorative. They are particularly useful in the summer, since they effectively reduce energy usage while creating a cool breeze. They can also be used in the winter to gently pull heated air away from the ceiling where it tends to collect. Light kits can be added to increase the usefulness of many ceiling fans. A wide range of both fan and light kit styles is available, providing choices that will contribute to the beauty of any room. This how-to provides general instructions for installing a ceiling fan and should give you a feel for what is involved. Remember, however, to always consult the manufacturer’s instructions during actual installation.
What Size Fan Do You Need?
Use a 36″ diameter ceiling fan if the largest room dimension is 12′ or less.
Use a 42″ diameter ceiling fan if the largest room dimension is 12′ to 15′.
Use a 52″ diameter ceiling fan if the largest room dimension is 15′ to 18′.
Tools & Materials
Ceiling Fan Kit Ceiling Fan Outlet Box
Outlet Box (ceiling or “paddle” fan Step Ladder
installation approved) Philips and Slotted Screwdriver
Wire Nuts Wire Cutters
Downrod (optional) Electrical Tester
Expandable Cross Brace (optional) Adjustable Wrench
Light Bulbs (if fan has lights) Pliers
Ceiling Medallion (optional) Goggles
Electrical Tape Dust Mask

Before You Begin
To ensure that your fan is securely mounted to the ceiling and for your safety during installation, read all of the instructions packed with your fan. Since ceiling fans are usually used to replace existing light fixtures, the wiring to the fan should already be complete. Installation is not difficult, and only requires that you pay attention to the instructions included with the fan. If additional wiring must be done to install your fan and you are not familiar with wiring, consult a professional electrician. All wiring must conform to local and national codes.
When working with electricity always:
- Turn off the power.
- Test the wires to ensure the power is off.
- Lock the panel box, so no one can accidentally turn the power back on while you are working.
- Check with local authorities to see if a permit is required.
- Have your work checked by an inspector.
- Wear eye goggles and a dust mask.
- To avoid overloading the circuit, consult a licensed electrician.
Read all instructions and safety information completely. To reduce the risk of fire or electric shock, do not use the fan with any solid-state speed control device or variable speed switch unless specifically designed for use with a ceiling fan. Do not mount the ceiling fan to a plastic electrical box. Use a metal box securely fastened to the building structure.

Mounting Options
Fan blades must be mounted at least seven feet above the floor. For maximum efficiency, they should not have any obstruction within 24″ of the blade tips.
An appropriate junction or outlet box securely attached to the building structure is required. Replace the old box with one labeled as approved for ceiling fans or ceiling suspended “paddle” fan installation. The box and its support must be able to support the moving weight of the fan. Use the installation hardware recommended by the junction box manufacturer. Fans of over 35 pounds, with or without accessories, require additional support independent of the outlet box.
Secure the new box to a brace between ceiling joists. If there is no 2″ x 4″ wood brace between the joists but you have access to the framing through the attic, add a brace. Otherwise, install an expandable metal ceiling fan hanger bar. These may be positioned either from the attic or from below the ceiling, through the rough opening. Secure the box to the bracket with a U-bolt.
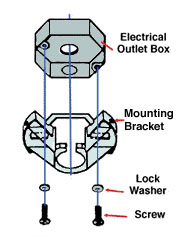
Installation of a Mounting Bracket
- Remove the fan motor screws. These screws will be used later to secure the blade arms to the motor.
- Remove the mounting bracket from the fan canopy.
- Secure the mounting bracket to the ceiling electrical box with mounting screws and lock washers. If the fan comes with a J-hook, install the mounting bracket with the J-hook towards the floor. The hook will support the weight of the fan motor housing for a hands-free wiring installation.
- Pull the electrical wires through the center hole of the mounting bracket.

Downrod Installation
Install the downrod into the mount with the ball end toward the ceiling.
Thread the lead wires from the motor (black, white and blue) through both the canopy and downrod. Take extra care not to pull on electrical wires.
Insert the downrod into the collar yoke and rotate until the holes match. Insert the connector pin through the holes, and secure with a cotter pin. Be careful not to damage or cut the fan wires. Bend the two legs of the cotter pin to ensure that the connector pin does not slip out.
Affix the hanger and downrod to the motor assembly by tightening the setscrew on the side of the downrod. Some fans have two setscrews and some have lock nuts for the setscrews.
Insert the ball into the hanger bracket. The tab opposite the hanger bracket opening should fit into the slot on the ball. Make the appropriate wire connections.
After the connections are made and the wires are carefully tucked into the outlet box, make sure the tab in the bottom of the hanger bracket is seated in the groove of the hanger ball. Slide the canopy up the hanger bracket and permanently attach it with the supplied screws.
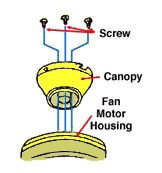
Close Mount Installation
Some fans allow mounting without the use of a downrod. This type of mount places the fan closer to the ceiling.
Remove the larger screws and lock washers from the top of the decorative fan motor housing.
Three Ways to Make Electrical Connections
Determine the hot and common wires by color: black is hot for the fan, blue is hot for the light kit, white is common for the fan and light kit, and green is ground. In all cases, make sure that all exposed wiring is secured inside wire nuts. Once wiring is complete, gently push wires into the electrical box.
View the diagrams for three methods of making electrical connections:
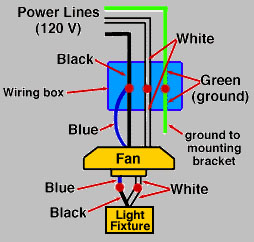
Fan and light controlled by pull chains

Light controlled by a light switch and fan controlled by pull chain
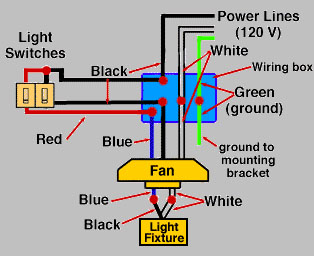
Fan and light controlled by independent wall switches
Attaching Fan Blades
Mount each blade bracket to a fan blade using the screws and washers supplied. Start all screws before tightening, then tighten each. Repeat for the remaining blades.
Follow the same process to mount each blade/bracket assembly to the fan. Make sure all screws are tightened securely.
Installing a Light Kit
If your fan comes with a light kit, it may already be wired and in place requiring only that you install the bulbs and globes. In some instances, however, you may need to wire the light kit yourself. Do this as follows.
Remove the switch housing cover plate from the fan.
Remove the plug from the center of the cover plate.
Feed the light kit wires (black and white) through the holes in the cover plate and screw the plate tightly to the light kit to prevent it from vibrating loose.
Locate two wires within the switch housing labeled “for light” (white and blue). Connect them to the light kit wires with wire nuts—white to white and blue to black. Secure the connections with electrical tape to prevent the wire nuts from vibrating loose during operation.
Carefully push wires back into the switch housing, and attach the light kit to the switch housing with the provided screws.
Editor’s Note: This article is courtesy of Lowe’s.
