

By Mark Clement
Fences are game-changers-for both homeowners and their neighbors. Here’s an alternative to the traditional wooden fence.
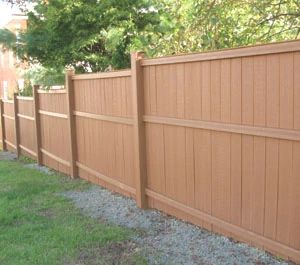
An alternative to an all-wood fence is one built from composite material, taking a cue from recent trends in the deck-building industry. The material featured in this article is called FenceScape, and it’s actually manufactured by TimberTech, a popular manufacturer of composite and PVC decking. Like synthetic decking, this composite fence material offers two major selling points: longevity and low-maintenance.
And, the benefits of composite material don’t end there. With its integrated color, no painting, staining or sealing is required. Importantly, this means no repainting or re-staining down the road. The material won’t split, warp, crack, splinter or succumb to termite damage. Furthermore, FenceScape features UV-inhibiting pigments so fading will be minimal.
The fence boards feature a natural wood pattern along with the same versatility of design as real wood. It works like wood, requiring no special tools or fasteners, and the fence can follow the contour of the terrain for safe containment of the family pet.
My FenceScape project is a 6 foot, three-rail privacy fence running 18 panels long. It strikes a line between three urban back yards. Each end-panel swoops to an elegant and friendly finish.
Step 1: Layout
I mapped this fence run from control-post to a stake because it ended at an imaginary line between two houses, but I wanted the string to run all the way to the property line to ensure accuracy.

Clement Carpentry Tip: Use a carpenters pencil as a spool to play out the string. If you plan to re-use the string, roll it back up carefully.

Because FenceScape posts are hollow I used the fence parts for layout; not the U-jig I usually employ with wood fences. To mark the post-hole centers, I dropped brightly colored kid’s driveway chalk into the center of the post cut-off that I was using as a template.
Step 2: Posts & Rails
Install post heights wild. You can trim them to size later.

I rented a Dingo because I can maneuver the Dingo’s auger to pinpoint layout. This is a huge time-saver compared to manually digging the post holes.


Since I used a 12-inch auger there’s fudge factor to shift the post. Before setting the post, tamp the soft earth in the bottom of the hole with a digging bar.

The hollow posts are easier to move than solid posts. Once I got them located and plumb, pouring in 4 inches of gravel traps them in place.

Using FenceScape’s powder-coated brackets, I fastened the bottom rails on layout—on the high post, 8 inches up from grade. I pocket the rail, level it over and install the other end on the low-side post. The top rails come next—66 inches up from the bottom of the bottom rail. Use a rafter square and combination to square to layout the rail bracket location then install the bracket. Installing the top rail further secures the posts for the application of concrete, which I mix and pour from a wheelbarrow—quickly spraying off any over-pour.
Once the concrete is dry I backfill and tamp the holes, compacting the earth every 8 inches or so.
Next: Post cuts. I stepped these posts 4 inches above the top rail on the high side, marked and cut them with an 8-1/4-inch worm drive.

Step 3: Middle Rails and Pickets
I installed the middle rail off-center—30 inches above the bottom rail—for a cool look. The FenceScape 2-by rails remain rigid via an internal steel mesh but they cut easily with standard circ saw blades. Take note: They’re crowned—or bent—so eye-ball them and install the crown up, like an arch. Store the rails as flat as possible before installing.

While the FenceScape manufacturer recommends using screws, 1/2-inch crown staples, 1-1/2-inch ring shank nails or screws, I selected screws. I liked Grip-Rite’s 1-5/8 inch composite screw which eliminates the “mushrooming” common with fasteners in composite material, and it blends with the FenceScape’s color. It worked for the brackets, too, with the washer-head set flat. Undeniably, however, using staples would save hours.

When installing the pickets, or “slats,” I gang-cut them all at once. I typically employ a 2×4 spacer under my slats to allow a 1-1/2-inch weed-whacker gap—this is something I like as a homeowner and something my inspector likes to see, too.
Because the posts are proud of the rails, you have to install the first two slats to fit. Then install the rest wild—until the last two. Again, because of the posts, they are cut to fit. The last slat gets ripped to fit.

When it’s time to trim the wild boards, you can gang-cut the slats from either side of the fence.
Step 4: Trim Pieces
For a completed look, FenceScape says you can pop their post caps on with a finish nailer, but I found them a little too brittle. A few dabs of Phenoseal on the underside is actually easier anyway, then just lay them on.

The FenceScape system also features slat and rail caps. Trim the slat tops with FenceScape’s nominal 1×4 piece, then cover that and the rail with a second 1×4.

Layout Note: The rails were 96 inches, but the 1×4 stock is shorter. Double-check these elements against each other before building for tighter tolerances in the end.

Step 5: Swoop On In
For a decorative arc, plotting the cutline is a snap. After setting my last post—a 48 incher—and slats, all I do is flex some 1×4 between two points on the high and low side, eye-ball the most graceful curve, then trace it. Note: I start the arc one full, square board inward from the high side to give the saw room to travel. I install an angle brace to support the slats then set my circ saw about 3/4 inch depth of cut and follow the line.
The result is a cool-looking fence that will last years with minimal upkeep.

Tools
If you think you’ll only be using a few carpentry tools—make sure your landscape stuff is gassed up, anyway. I couldn’t get by without my chainsaw, string trimmer, pruners, recip saw, gasoline-powered blower and two different rakes—and remodeling tools like a recip saw and cordless chipping hammer to zap out some asphalt that was paved past the property line. And, a buried concrete blob needed to be chipped away to make room for a new post.


