

If you’re looking to dress up an ordinary room, think about installing crown molding (also spelled moulding). Very few additions make a visual impact like crown molding, which gives a subtle yet elegant design element to any space. And with the proper tools and set up, installation can be easy.
While wood is a common choice for crown molding, urethane is also a popular material. For a recent project we installed Fypon urethane crown molding, which is lightweight, flexible and looks like solid wood. It also comes pre-primed, simplifying the painting process.
Set-Up for the Project
As with any project, the ease of completing a crown molding job is determined by the set-up of the tools. First, installing crown molding is a two-person job. It helps to have extra hands when placing the molding precisely on the wall. Second, you want to set up your tools and materials in the general area where the molding is being installed. In this project, we were initially faced with setting up shop in a garage, which meant going up and down stairs for each cut and adjustment. We could see that this was going to be time consuming and labor-intensive, especially working with 12-foot lengths, so we moved our work site to the upstairs living area.
We put down a plastic tarp and brought in the miter saw. Working with urethane molding is less messy than wood, so clean-up was simple. We saved several hours by working in the general area of the installation, as we could quickly make cuts and adjustments as needed.
Other tools you need for installing crown molding include: a pneumatic nailer; corrosion-resistant finishing nails; utility knife; tape measure; caulk gun with high-quality adhesive; pencil and wet rags.
Prepare the Miter Saw
Cutting crown molding is all about measurements and angles. Most cuts are made at 45-degree angles, but sometimes you will need to adjust the angle for corners that are not exactly 90 degrees. Once you determine the angles of your room, you can set up the miter saw to properly cut the molding.
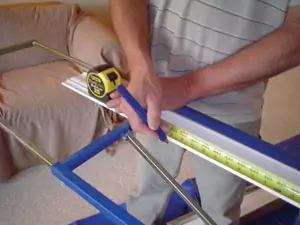
Measure the Lengths
To get measurements for the crown molding, measure each wall length at ceiling height from corner to corner. The length will be the long points for the molding when cutting inside corners at a 45-degree angle. If you have an outside corner, the measurement from the wall to the corner will be the short point for the molding on the angle.
Having a pencil and paper handy is another good way to keep track of the cuts you will need to make.

Mark the cutline.
Measure and prepare the cut.
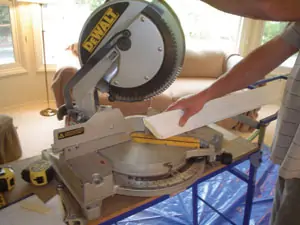
Cutting the Molding
When you have the measurements for the room, begin cutting the molding to length. We cut the crown molding in position on the saw, meaning the molding is set on the saw at the same angle it will be installed on the wall and ceiling. Position the molding on the saw upside down and backwards for the best cuts. To help alleviate any confusion with the cuts, make slash marks on the molding indicating the direction of the cut. It also helps to visualize how the piece will fit when installed, with the saw base acting as the ceiling and the fence representing the wall.
As mentioned earlier, it can be difficult to distinguish between left-hand cuts and right-hand cuts, so remember to check twice before cutting. More than once we lost sight of which way the cut was supposed to go. And with nearly 400 feet to install for this project, it got confusing. A good rule to follow is if you are cutting an inside corner on your right-hand side, turn the saw blade to the left. For a left-hand corner, move the blade back to the right.
To minimize the effects of expansion and contraction of the molding over time, you want to install the molding as tightly as possible. Fypon recommends cutting the molding 1/4-inch longer on each 10-foot length to ensure a snug fit and create a small amount of tension when installing the pieces. For non-corner seams, use straight butt joints or the factory cuts rather than angled cuts.
With crown molding, properly fitting outside corners can be more challenging than inside corners, because the angles are reversed and the corners are often the most visible in a room and need to be nearly perfect to look good. There’s an easy formula to remember with this process also: To cut outside right-hand corners, turn the saw blade to the right so the long point is the opposite of an inside corner. For outside left-hand corners, make sure the saw blade is turned to the left. If you do the cuts correctly, the outside corners will truly show off the visual design features of crown molding.
Cut the miter.
Coping
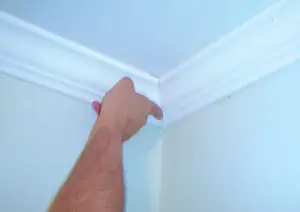
When the molding pieces are cut, hold them to position to test for length and fit. Because not every corner will be exactly 90 degrees, you might need to cope the ends of the molding for a better fit.
Coping is removing material from the thickness of the molding so that it fits better with the adjoining molding. With urethane, you can use a standard utility knife to shave off the material. Keep removing material until the corners fit as tight as possible. A coping saw is also a recommended tool for making these fine adjustments.
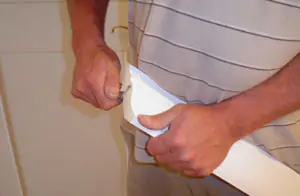
Cope the joint to fit.
Installation
To install the urethane molding, first apply beads of top-quality urethane construction adhesive along the entire top and bottom surfaces that will contact the wall and ceiling. Be sure to apply adhesive on all joints as well. Start with one corner and press the molding into place. Then swing the other corner into position so the molding is bowed slightly in the middle. After securing the corners, press the rest of the molding into place along the surface and fasten with non-corrosive nails every 16 inches along the top and bottom edges of the molding. Because there is adhesive on the molding, this method is also cleaner and prevents the adhesive from contacting other parts of the wall or ceiling. If you do get adhesive in areas where you do not want it, or if it seeps out from behind the molding, use a wet rag to immediately wipe it clean. If the adhesive leaks out during the drying process, use a utility knife to score the material and remove it after it has dried.
For best results, we wore latex gloves to keep fingerprints off the white molding and adhesive off our hands.
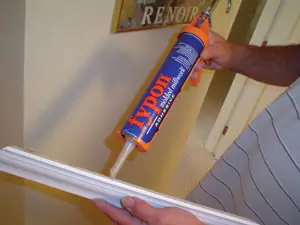
Apply adhesive.
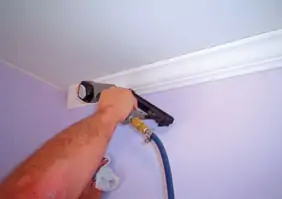
Nail in place.
Finishing Touches
Before installing the molding, we painted it to match the ceiling color. That way we could just touch up nail holes and gaps upon completion of the installation.
For any gaps in the joints and to fill in nail holes, use a good premium spackle. We used Dap Fast & Final, which is light and can fill gaps and holes easily. After the spackle dries, lightly sand the areas and touch up with paint to finish the job.
Finish with caulk.
Check Out More EHT Crown Moulding Stories
For a Look at How to Install Basic Crown Molding, click here.
For a look at Professional Cutting Advice for crown molding, click here.
For 13 Pro Tips for Crown Molding and Trim, click here.
For a Look at All Types of Molding, from Crown to Base and even Elaborate Built-up Profiles, click here.
