

By Larry Walton, Photos by Brian Monroe
How to use manufactured stone to create a beautiful fireplace façade.
There’s no denying that home decor goes through style cycles much like clothing fashion. Lately we’ve been seeing a lot more stone applied on walls, columns, water features and fireplaces. There are few things that speak rugged substance like a rock fireplace with a rough sawn mantle.
Back in the day (seriously, it was in the seventies), I worked as a hod carrier for a mason and I can tell you that a rock fireplace was no small project. It involved plenty of heavy lifting.
An old school masonry fireplace is a substantial structure, much of which you cannot see. The footing for such a fireplace begins in the ground under or alongside the house, and extends up through the floor or against an exterior wall. It is built block-by-block with a fire-brick lined fire box and a clay flu encased in block and covered with stone right up through the roofline. It’s a massive undertaking.
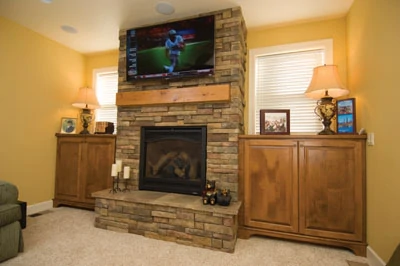
You can achieve much the same look on the interior with a zero-clearance gas fireplace and manufactured stone veneer. Because this type of masonry is a relatively thin veneer produced in molds to look like real stone, it is lightweight and doesn’t require a footing for support. It can be applied over a wood-framed structure with only a few tools.
There are a number of rock-like patterns available in both drystack (mortar-less) and mortar-joint applications. Because so much of the look involves texture, it’s well worth a trip to the local masonry supply company to see and experience the options available.
Like many home-improvement projects, surface preparation is a big part of the job. The framing should be in good shape for a masonry structure with studs spaced 16″ o.c. and rigid sheathing of gypsum wall board, plywood, OSB, concrete board or fiber board.

Over the sheathing goes a layer of vapor barrier, such as roofing felt or house warp. Over the vapor barrier is a layer of self-furred, corrosion-resistant lathe. Next comes a scratch coat of mortar, and finally the manufactured stone veneer adhered with mortar.
Installation Details
My friend Brian Monroe recently installed manufactured stone veneer using the drystack method on a fireplace interior. Here’s how he got job done:

Monroe was ahead of the game in preparing for this fireplace project. The fireplace framing included a block-out to mount the flat screen, a pre-installed mantel, room for the rock next to the window trim and extra-wide cabinet stiles on the fireplace side of the cabinets.

Before beginning the stone install, he tested the various rock sizes to see how they would affect the layout at critical transitions such as the cabinet tops, hearth elevation and mantel location. It’s best to think ahead about these things to avoid problems associated with courses (rows) of stone coming out at odd intervals. The stone pattern used on this project made this part of the layout easier because of the variety of thicknesses intended to break up horizontal lines, which can also serve to help match key elevations.

Monroe used roofing felt as a vapor barrier. Vapor barriers are not just for exterior applications. They also serve to keep moisture from the mortar out of the sheathing, which prevents water damage and extends the working time of the mortar.

After the roofing felt was in place, Brian installed stucco screed as a trim around the firebox.


Next came the lathe, which overlapped the stucco screed and was trimmed to fit using tin snips. Monroe used roofing staples to fasten the lathe to the substrate. Short returns in the lathe can be shaped around the corner with a hammer, while longer returns are pre-bent before installing.


Monroe added a 1/2-in. strip of wood to the floor around the bottom of the hearth, which elevates the first course of stone enough to tuck the carpet. This is much easier than trimming and tucking carpet to stone set directly on the floor.

Organizing the contents of several boxes of stone is an important step. This reveals the mix of available stone sizes, shapes and colors to determine which pieces need to be used as the pattern progresses.

Monroe used an electric drill with mixer attachment to mix the mortar in a 5-gallon bucket. He also added cement color to the mix. Although drystack stone veneer projects should appear to use no mortar, he knows from experience that some of the setting mortar that adheres the stone to the wall will be visible. This is especially true of a fireplace face, where flash photography is often used for family photos. Standard gray mortar really shows up in flash photos.

Monroe began the installation process by applying a scratch coat of mortar to the lathe, but only in part of the project. Although it’s common practice to scratch coat the entire project and let it dry, he prefers to coat the lathe just ahead of installing the stone, which eliminates the need to re-wet the scratch coat.


Monroe began with a single corner on the hearth and then started adding stones in both directions. In addition to the scratch coat on the lathe, he butters the back of each stone with mortar before installing it. After buttering the back of each stone, he carefully pressed them into place.
Once stone laying has started, the goal is to break up the pattern with the available stone shapes and colors. In general, horizontal lines should not extend uninterrupted for more than five feet, and vertical joint lines should reach no higher than two small stones or one large stone. Also in the mix in this pattern was a variety of stone depth (front to back) and of stone color.
Corner stones should be applied by alternating long and short returns from course to course. In other words, if the long leg of a corner piece extends across the hearth face on the first row, turn the corner on the second row so the long leg extends back toward the wall and the short leg is on the face of the hearth.

Because the rows are built from the corners toward the center, Monroe had to measure the gap where the last two stones would fit. In the case of the photograph shown, the remaining gap is 16-1/8 inches. Two stones of 8-1/16 inches would be ideal, but it’s likely that one stone will need to be cut to fit.
Here’s an important tip: Cut the shallower of the two stones so the end of the thicker stone will cover the cut end of the other stone. Of course, where the pattern returns back to the wall or a cabinet, cut the end that will be covered by the wall or cabinet.

Monroe used an angle grinder equipped with a diamond blade to cut most of the stone for this project. When the elevations of the stones didn’t quite match up, he used a temporary shim of folded roofing felt, which can be removed when the mortar dries.
SIDE NOTE 1
Rock on Rock
In applications where the manufactured stone will be applied over existing concrete or masonry, such as cinder block or brick, the stone veneer can usually be applied with mortar only—with no need for lathe or vapor barrier.
SIDE NOTE 2
Name that Stone
This project features manufactured stone veneer, a product which is cast in molds made to look like natural rock. Because the application is a veneer, the corners are designed to make the rock appear thicker than it is. This must be kept in mind when designing and building the structure over which the veneer will be installed, because much of the bulk that gives the end product its robust appearance is supplied by the structure behind the stone.
When selecting a product, keep in mind that manufactured stone veneer is sometimes called Adhered Masonry Veneer or Precast Stone Veneer.
