


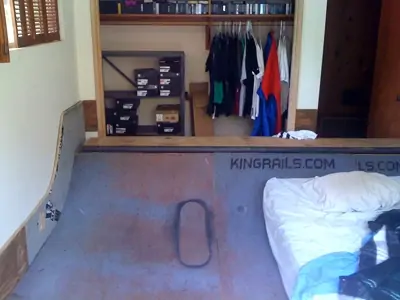
How to turn your bedroom into a shredroom:
Step 1. Determine the useable square footage for the ramp. In this case, our ramp foot print is 10′ x 12′ 10”(I don’t like things that are 13’s) with a 98” tall ceiling.
Step 2. Develop your wood count/ cut list. I chose to make this ramp 21” tall so that a 6’1” dude can skate it without hitting his head on the roof(unless he’s getting super gnarly).
If you space your 2×4’s every 8” than you will need approximately 10 2×4’s per quarter. For this ramp, I chose to make (2) 5′ wide quarters per side giving a total of (4). By making (2) per side it was easier to maneuver them into place and all I had to do was screw them together with a few 3” screws. Another reason to do (2) quarters per side is because running 10′ 2x4s on the tranny’s can cause a flex in the middle of the ramp at the coping and could make the coping stick out too far or not enough.
A deck should have at least 21” on it so you can do disasters and boardslides, but given this space, I could only afford to do one of my decks at that size, the other was 14”. I chose to do this because on a ramp like this, compromises have to be made and while the decks are very important, so is the flatbottom. The flatbottom on this ramp came out to just over 54” and every little bit helps. With a flatbottom that small the walls come up quick.
- Cut list—(8) 3×4 plywood 21” tall transitions with a 4′ radius
- (50) 2x4x58 1/2”-ribs
- (2)2x4x54”-flatbottom
- (5)2x4x117”-flatbottom
- (2) 3/8” plywood x 36”x96”-sheeting
- (1)3/8” plywood x 48×96-sheeting
- (2)3/8” plywood x 36×24-sheeting
- (1)21”x 96×3/4 plywood-deck
- (1)21”x24”x3/4 plywood-deck
- (1)14”x96”x3/4 plywood-deck
- (1)14”x24”x3/4 plywood-deck
- (2)1/4” x48x96 masonite or other ramp surface-final layer
- (2)1/4”x30x48 masonite-final layer
- (1)1/4”x24x96 masonite-final layer
- (1)1/4”x30x24 masonite-final layer
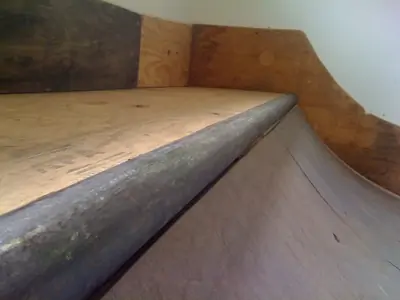
- (2) 2”id schedule 40 black pipe-coping
Step 3. Cutting. I recommend cutting the transitions first. There are many methods to drawing a nice radius, I chose to use two 2×4’s. if you stack one on top of the other and flush the ends, you can measure up to the size circle you want to make. This ramp has a 4′ radius and so I measured up to 4′ and put a 3” screw into both of them. Now I can pivit the top 2×4 off the bottom one and it will give it a proper arc, making sure that the bottom 2×4 doesn’t move. Now I place the radius maker on the short end of a full sheet of ¾ plywood and make my arc. I make sure to measure up 3 ½ inches from the bottom of the plywood to make the proper space for the flatbottom, and while holding a pencil firmly in the center of the bottom of the top 2×4, I extend my arc to the height that I want. For this ramp I chose a final height of 21”, and with my deck measurements, I connect the lines. When notching the transition for the coping cut a 1 5/8” inch square where the transition meets the deck.
Step 3. Cutting. I recommend cutting the transitions first. There are many methods to drawing a nice radius, I chose to use two 2×4’s. if you stack one on top of the other and flush the ends, you can measure up to the size circle you want to make. This ramp has a 4′ radius and so I measured up to 4′ and put a 3” screw into both of them. Now I can pivit the top 2×4 off the bottom one and it will give it a proper arc, making sure that the bottom 2×4 doesn’t move. Now I place the radius maker on the short end of a full sheet of ¾ plywood and make my arc. I make sure to measure up 3 ½ inches from the bottom of the plywood to make the proper space for the flatbottom, and while holding a pencil firmly in the center of the bottom of the top 2×4, I extend my arc to the height that I want. For this ramp I chose a final height of 21”, and with my deck measurements, I connect the lines. When notching the transition for the coping cut a 1 5/8” inch square where the transition meets the deck.
Now that you have your transitions cut, it’s time to cut your 2×4 ribs. I recommend cutting ribs and framing your quarters before you cut your 3/8” plywood sheeting just in case something turned out longer or shorter than you expected.
** build tip—when cutting transitions always remember to extend the blade of your circular saw just past the thickness of the wood, no more than a 1/16”. If your blade is too deep you won’t be able to get the arc that you want. If the transition is too tight, you can always use a jig saw, but your cut won’t be as straight.
Step 4. Framing. Now that you have your transitions and 2×4’s cut it’s time to put it together. Make a clean stack with your transitions and mark every 8” for your 2×4’s. draw a line down all of them so they are the same. i use screws most of the time, so I like to set 2 screws per line so it’s easier to frame. If you set your screws, it will be easier to frame the ramp with only one person as narrow quarters like these can go together pretty easy. Make sure the 2×4’s are skinny side up because that is stronger than laying them flat. When you get to the top where the 1 5/8” inch square is for the coping, line the 2×4’s up on the edges flush.
Step 5. Flatbottom. Now that your quarters are framed and screwed together, it’s time to determine your final size for the flatbottom. My flatbottom came to 54” x 120”. So with the pieces I cut I built a square that size. When it was done I set it in place and screwed it to the bottom 2×4 of each quarter with (3) 3” screws.
Step 6. Sheeting. It’s now time to sheet the ramp with 3/8” plywood. Take one more measure to make sure everything came out the right size and start laying the pieces down. Start at the top of the transition and go flush with the top 2×4 and sheet it down to the bottom 2×4. Normally I recommend cutting the plywood to fit each quarter, but this is a shredroom and the budget it tight. So overlap the ply into the other quarter and using 1 5/8” drywall screws(because it’s inside), start at the top of the ply and put a screw in every 2×4 12” apart. If this were a serious ramp I would use 2 layers of 3/8” ply, but since it’s not going to get the impact of big ollies and things like that it doesn’t need the extra layer.
Step 7. The coping. Perhaps one of the most important parts of the ramp(aside from the transitions, sheeting and decks), is very easy to get wrong. 2” id schedule 40 black pipe, not galvanized and not plastic is the ideal ramp coping. The thick wall insure a good grind and the no galvanized means no soft spots that make the coping stick. I like to see no more than a 3/8” bump on the inside of the ramp as well as on the deck. That bump allows for tons of tricks and makes life good. Don’t go less than ¼ inch bump and not more than 3/8 inch. The best way to attach coping is to weld ½” bolts to the back of it and drill a hole through the 2×4 behind it and bolt it on, but another way is to drill a 3/8” hole on one side and a 3/16” hole straight through on the other. A ramp this size would only require one hole per quarter giving you 2 holes per coping centered on each quarter. Attach with a 3” wood screw using an extension bit.
Step 8. The decks. Using ¾” plywood cut to fit the decks. Where the coping meets the deck, cut the whole edge at a 20 degree angle so it doesn’t leave a gap where the coping meets the deck. This is a good time to make some quick adjustments to the coping as the deck can push it out or pull it in a little to make the perfect bump.
Step 9. The final layer… masonite (which I don’t recommend because it’s not great for skateboarding, but it’s way cheaper than a real ramp surface and since it’s indoors you can get away with it. But check www.ramparmor.com or www.skatelite.com to see for yourself). Make sure that every hole is countersunk enough so screw heads will be flush. Using 1 5/8” drywall screws, try and over lap any plywood seams with the final surface to add more strength. Hit every 2×4 like with the first layer. Vaccum the area and get rid of all the slippery dust, paint it and get ready for shred!
Editor’s Note: “Built to Shred” is the world’s first build-and-ride sports show featuring top skateboarders, BMXers, FMXers and surfers. For more information on host Jeff King and built to Shred, visit www.fuel.tv.
