

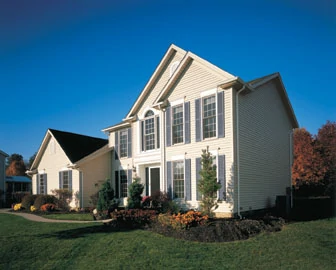
Before getting started, it’s important to review several rules of thumb for proper vinyl siding installation to ensure a job well done.
Prepare the walls. A flat, level wall surface is critical to install vinyl siding. In new construction, avoid using green lumber as the underlayment. Keep in mind that siding can only be as straight and stable as what lies under it. Install flashing before applying the siding. Also, a weather-resistant barrier should be applied to the house prior to installing the siding. Effective weather-resistant barrier systems will shed the water initially, control moisture flow by capillary and diffusion action, and minimize absorption into the wall structure. The weather-resistant barrier system should consist of a continuous weather-resistant material and properly integrated flashing around all penetrations and where vinyl siding interfaces with other building products such as brick, stone or stucco.
Start with the accessories. Before the siding itself can be hung, a number of accessories must be installed first, including starter strips, corner posts, window flashing, trim, and J-channels over the roof lines. In order for the siding to be installed properly in a level fashion, the starter strip at the bottom of the wall must be level. Determine the lowest point of the wall that will be sided; from that point, measure up 1/4 inch less than the width of the starter strip and partially drive a nail at one corner. Attach a chalkline; go to the next corner and pull the line taut. Make sure the line is level by using a line level or a 4-foot level. Snap the chalkline and repeat the procedure around the entire house.
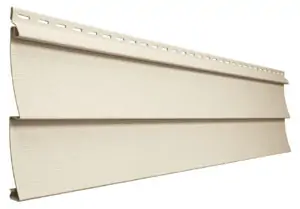
Installed panels must move freely from side to side. Vinyl siding can expand and contract 1/2 inch or more over a 12-foot, 6-inch length with changes in temperature. Whether using a nail, screw, or staple to fasten the siding, make sure the panels are fully locked along the length of the bottom, but do not force them up tight when fastening. Do not drive the head of the fastener tightly against the siding nail hem. Allow 1/32-inch clearance (the thickness of a dime) between the fastener head and the vinyl. Tight nailing, screwing or stapling will cause the vinyl siding to buckle with changes in temperature. When fastening, start in the center of the panel and work toward the ends. Center the fasteners in the slots to permit expansion and contraction of the siding. Drive fasteners straight and level. Space the fasteners a maximum of 16 inches apart for the horizontal siding panels, every 12 inches for the vertical siding panels and every 8 to 10 inches for the accessories. Leave a minimum of 1/4 inch clearance at all openings and stops to allow for normal expansion and contraction. When installing in temperatures below 40 degrees F, increase minimum clearance to 3/8 inch.
When cutting vinyl siding, follow these guidelines: Safety goggles are always recommended for all cutting and nailing operations. As on any construction job, use proper safety equipment and follow safe construction practices. With a circular saw, install the fine-toothed blade backwards on the saw for a smoother, cleaner cut, especially in cold weather. Cut slowly. Do not attempt to cut materials other than vinyl with a reversed direction saw blade. When using tin snips, avoid closing the blades completely at the end of a stroke for a neater, cleaner cut. When using a utility knife or scoring tool, score the vinyl face up with medium pressure and snap it in half. It is not necessary to cut all the way through the vinyl.
Re-side it right. When re-siding, nail down loose boards of existing siding, and replace any rotten ones. Do not install vinyl siding over rotting wood. Scrape off loose caulk and re-caulk around windows, doors, and other areas to protect from moisture penetration. Remove all protrusions such as gutters, downspouts and light fixtures. Check all walls for evenness and install furring strips where necessary. When installing furring strips, take appropriate measures to establish a smooth, continuous surface. Removing uneven original siding may be necessary.
Siding varies, so follow instructions. The installation of specific products may differ in details from the instructions given in this article. Always follow the manufacturer’s instructions, using parts specified by the manufacturer, to ensure proper installation.
The information for this article was provided by the Vinyl Siding Institute. For more information on vinyl siding, including a free, downloadable PDF installation manual complete with details and diagrams, visit www.vinylsiding.org.
SIDE NOTE
Certified Siding Helps to Ensure Longevity
When selecting from the wide variety of durable, attractive and affordable vinyl siding products, choose certified vinyl siding to ensure that your home will maintain its durability and beauty for years to come. Do-it-yourselfers and siding contractors can identify certified products by looking for the certification label or logo on vinyl siding cartons, brochures and websites. Homeowners can also request that their builders or remodelers only use vinyl siding certified through VSI’s program.
Through the Vinyl Siding Institute’s Vinyl Siding Product Certification Program, manufacturers certify that vinyl siding products meet or exceed the industry standard ASTM D3679 for performance by undergoing a series of rigorous tests and inspections. As an additional demonstration of vinyl siding quality, manufacturers can also certify specific product colors under ASTM D6864.
An accredited, third-party quality control agency conducts twice yearly, unannounced inspections and additional
tests to evaluate vinyl siding products for color retention, weatherability, windload, impact-resistance, expansion and shrinkage, surface distortion, and length, width and thickness verification.
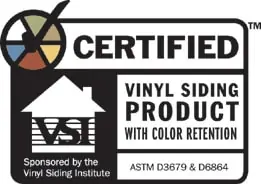
Certified vinyl siding has always been available in a variety of attractive colors, and now its colors can be certified to last with VSI’s new “color retention” certification, which ensures the vinyl siding you select will resist major color changes in a variety of climates. Look for VSI’s label or logo for colors that have been independently verified to pass the rigorous weather and time testing requirements of ASTM D6864.
