

By Matt Weber
How to Install a Touch-Activated Kitchen Faucet
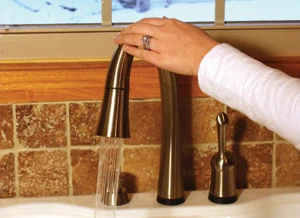
For an avid cook, the advantages of a touch-activated faucet should be immediately apparent. Imagine your hands are covered with pizza dough or cake icing. You need to wash up, but that means spreading the mess all over the faucet handles. With a touch-activated faucet you can use your forearm, elbow, or that one remaining clean finger to simply tap the faucet anywhere on the spout or handle, which turns on the water without causing a mess. When preparing raw chicken or other foods that carry potentially harmful bacteria, a touch-activated faucet reduces the likelihood of cross-contamination from messy hands or taint-ed faucet handles, providing a safer, healthier environment for food prep.

Touch-activated faucets also turn off with a simple tap of the hand, giving the user time to focus on tasks such as washing a dish. To turn back on the water for rinsing, a simple tap reactivates the same water volume and temperature that you’ve been using.
The faucet shown in this article is the single-lever Pilar Touch pull-down kitchen faucet from Delta, and its Touch2O Technology operates via a battery pack that activates a solenoid when you touch the faucet. You may also use the handle just as you would operate any standard faucet.

Faucet Installation
The installation instructions detailed here are specific to a top-mount cast iron sink, but the Pilar faucet can also be installed in an under-mount application or onto thin stainless steel sinks using a stabilizer plate that comes with the faucet kit. Refer to the manufacturer’s instructions for your particular circumstance.

First, assemble the spout by attaching the gasket to the spout shank, inserting the shank through the sink hole and securing it with an insulating disk and a mounting nut, which screws over the shank. Make sure the light at the bottom of the spout base—which indicates that power is live on the solenoid—is facing forward. Tighten the spout to the sink by cinching up a couple of jack screws in the mounting nut.

Next, install the valve assembly, which includes the handle and three tubes: the hot and cold water lines, as well as the valve outlet that interfaces with the solenoid. Slip the gasket onto the vale/handle base, then slide all the tubes down into the sink hole. The bottom of the valve/handle includes a long bolt extending downward from the handle that a crescent-shaped bracket fits over. Its crescent shape allows space for the three tubes. The bracket is secured to the bolt using a special deep-well wrench that is included with the faucet kit. Note:If the mounting surface is rough or uneven when installing either the handle or the spout, you may need to add a bead of silicone sealant beneath the gasket.

The solenoid assembly slides from beneath the sink onto the valve outlet (the short tube hanging from valve assembly). Make sure the tube is firmly engaged into the mouth of the solenoid and secure it in place with the small, metal retaining clip that inserts into a couple of thin slots on the solenoid inlet.


Next, install the pull-down hose, which gives the user the flexibility to extend reach of the water spray to cover the full range of the sink. To do this, insert the plastic hose guide onto the end of the hose, which serves as a convex nose to avoid snags when feeding the hose through the metal spout. Even with the hose guide it took a little patience and a few attempts to successfully guide the hose all the way out the shank bottom without catching on an obstruction. Once accomplished, remove the hose guide and connect it to the bottom of the solenoid with the special cylindrical clip.
Wire Connections
With the major components installed, it’s time to wire everything up. First connect the wire on the solenoid assembly to the metal shank of the spout—it simply clamps onto the base with a circular clip. Next, remove the plastic cap from the wire hanging from the shank (leading to the on/off power light on the spout). Connect the shank wire to the corresponding wire extending from the solenoid. No tools are required; the wires connect with a simple snap-together connection.

Then, mount the battery box by attaching a couple of adhesive Velcro strips. The manufacturer recommends mounting the box as close to the floor as possible. Connect the remaining wire from the solenoid to the battery box. I realize that in print all these wiring connections may sound confusing, but they each have different types of connectors so there’s no risk of confusing one wire for another. It’s actually very simple.

Water Line Connections
One important difference between the Delta Pilar touch-op faucet and a standard faucet is the inclusion of two small check valves that must be installed between the faucet’s hot and cold water lines and the supply stop valves of your house. These two-part components include a small ferrule that inserts into the supply stops, followed by a slightly larger check valve that screws over the ferrule. Make sure all fittings and connections are free of debris. The water lines of the faucet then simply screw over the ends of the check valves. Hand-tighten these connections, then tighten an additional turn with a wrench—but do not over-tighten.

Soap Dispenser Installation
The new Delta faucet was being installed on a sink with three holes, but it only actually requires two holes to house the spout and valve/handle assembly. For this reason we chose a model that includes a soap dispenser to fill that third hole. It installs simply with a pump and gasket above the sink threaded into a body beneath the sink that stores the soap. The soap dispenser requires no wires or further connections. It provides a handy place to keep detergent and gives a finished look to the entire installation.

Sprayer Installation and Operation
Install batteries in the battery box and turn on the faucet wide open for both hot and cold lines to flush out any debris. Then, pull out the hose assembly from the spout and screw on the sprayer head. Check all connections for leaks, and the new faucet should be ready for operation.
Although this is only a brief overview of the installation, the manufacturer supplies very detailed instructions and even a step-by-step installation video to clarify any questions. Despite the extra steps involved when compared to a normal faucet install, it’s a fairly straightforward procedure that took only about an hour. The result is a handsome new sink that adds to the décor, convenience and functionality of today’s modern kitchen.
