

Replacing a faucet not only adds to the décor, but many of the latest models conserve water for lower utility bills.
Faucets for kitchens and bathrooms are the unsung focal point of the room. All the activity in bathrooms and kitchens revolve around the sink, and the faucet is the sink’s crowning jewel. An old, malfunctioning faucet may provide a good reason for replacement, but upgrading the interior décor may be another. The stylish designs and modern metallic finishes of many new faucets offer not only superior performance and water conservation, but also add dramatic visual impact to the room. Choose from such finishes as chrome, brushed nickel or oil-rubbed bronze in sleek contemporary designs or more conventional styling for traditional appeal.
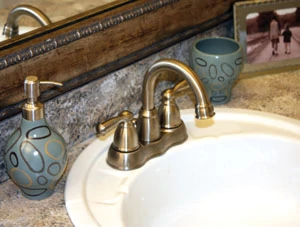
Replacing a faucet is a fairly straightforward procedure, but the cramped spaces and lack of easy visibility beneath a sink can lead to confusion for first-timers. Recently, the EHT staff replaced a couple of faucets and took the opportunity to shoot the installation steps in our well-lit workshop to illustrate the details. Here’s how it went.
Step by Step


Side Note 1
Saving Water at the Tap
According to the U.S. Environmental Protection Agency, if we turn off the tap while brushing our teeth, an average household can save as much as 3,000 gallons per year. There are also products that will help save water when the tap is turned on. Similar to the DOE’s Energy Star program, the EPA’s WaterSense-labeled faucets and faucet accessories (such as aerators) are high-performing, water-efficient fixtures that will help you reduce water use in your home and save money on water bills. WaterSense-labeled bathroom sink faucets and accessories can reduce a sink’s water flow by 30 percent or more without sacrificing performance. All products bearing the WaterSense label complete a third-party certification process that includes independent laboratory testing to ensure they meet EPA criteria. By installing WaterSense-labeled bathroom sink faucets or faucet accessories, an average household can save more than 500 gallons each year. Also, since these water savings will reduce demands on water heaters, households will also save energy. Learn more at www.epa.gov/watersense.
Side Note 2

No-Pain Drains
As long as you’re tinkering with the sink’s plumbing, consider installing a no-clog drain system. The PermaFlow never-clog drain is engineered to eliminate the need for secondary maintenance products and procedures such as plunging, dangerous drain cleaners, messy drain disassembly, and associated health, safety and environmental concerns. PermaFlow’s unique shape increases water turbulence to minimize routine buildup. It is GreenSpec listed and has a patented, easy-turn wiper that acts as an in-line drain cleaner and clears the clog to improve flow, reduce buildup and save water. Since chemicals are not required, gray water can be used for recycling. PermaFlow is also transparent for a quick diagnosis of potential problems. The wiper assists in locating and retrieving valuables such as jewelry through the sink, and also provides a bypass option for water flow through the upper chamber in case of emergency. For more information, call 1-877-265-9777 or visit www.pfwaterworks.com.
