

By Clint C. Thomas, Esq.
Photography by Zoe Thomas
Window glass breaks. It breaks for a variety of reasons. Broken windows can be the result of storm damage, a careless child with a ball, vandalism, or as is often the case with rental property, the result of rough living. Fortunately, many window glass repairs can be performed by the homeowner with a minimal amount of effort.
Aluminum or vinyl, double-pane windows are best repaired by removing whichever section of the window has the break and taking that entire part to a glass shop. Older, more traditional windows are a do-it-yourselfer’s dream. They are made with a single piece of glass that is held in place with glazier’s points and then sealed with window glazing. The frames are usually made from wood and have a rabbet cut into them that creates a channel for the glass to rest in.
The first step in replacing a broken window is to remove all of the broken glass from the frame. Always wear safety glasses and heavy gloves when removing glass. Unlike automobile glass and commercial plate glass windows, residential window glass is not tempered. This means that when it breaks it leaves very sharp, jagged edges that can easily sever a limb. Therefore, extreme caution should be exercised when removing broken panes.
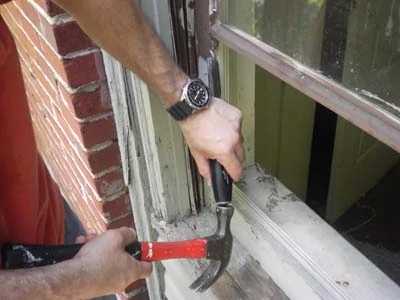
After the majority of the glass is removed from the window frame, there will still be small pieces held in place by the old window glazing around the two sides and along the bottom edge. Sometimes these pieces can be lifted out just by simply pulling on them. However, oftentimes they are held fast in place by the old glazing. If this is the case, carefully use a stiff putty knife, flat-blade screwdriver or wood chisel to chip the old glazing out of the rabbet. Make sure that you wear safety glasses so you don’t have a small piece of glass fly into your eye!
The best technique for removing old window glazing is to run your tool of choice between the bottom edge of the glazing and the top edge of the rabbet. Be sure to work parallel to the rabbet that you are cleaning off.
With the two sides of the window frame off and the bottom edge cleaned, you may now be wondering why you don’t have to do the same thing along the top edge. Most traditional windows were made with a rabbet around the two sides and on the bottom, but not on the top. This is because a groove is actually cut into the top edge that the piece of glass will slide into, holding the top edge securely in place. It is important to remember that this groove exists when measuring for the new piece of glass because approximately 1/4 in. of the new pane will slide into this groove.
The next step is the most critical and that is measuring for the new window pane. Unlike wood that can be easily trimmed or sanded, glass is not amenable to minor adjustments. Glass work is an exact science. It either fits, or you have to cut another piece. The use of the word “cut” is actually a misnomer. Glass is not cut in the traditional sense that wood is cut. Glass is scored and then snapped into two pieces similar to how ceramic tiles are sometimes “cut”.


Therefore, when measuring for the new window pane, take the measurements from the middle of each rabbet. If the measurements fall short then the glass won’t fit in the window but if the measurement is too large then the same is true yet again. To be safe, try and leave 1/8-in. of space on all sides as a fudge factor.
The vertical measurement is much easier because the groove in the top of the frame is usually at least 1/4 in. deep. The vertical measurement can be obtained by measuring from the bottom rabbet up to the top of the frame and then by adding about 1/8 to 1/4 in., depending upon the depth of the groove.

After the new glass has been cut it can be easily put into place by sliding the top edge into the groove far enough to allow the bottom edge of the new piece of glass to sit flush with the rabbet in the bottom of the frame. Even though the top groove will hold the glass in place, it is a good idea to keep a hand on it, too, because if the bottom edge of the glass were to slip off the bottom rabbet then the entire piece of glass would drop out of the window and break.

The new pane should be secured in place by using glazier’s points. Push these into the window frame with you finger far enough to hold them in place and then use a flat-blade screwdriver and hammer to gently tap them into place. Remember to be very careful with the hammer so you don’t inadvertently hit the new glass. I prefer to use a 1-in. wood chisel and push the glazier’s points into place without a hammer, or you can invest in a glazier’s tool that is designed for this specific job. Two glazier’s points are recommended along each side and two more along the bottom edge to hold the glass in place.

Window glazing provides the weather-proofing and also provides a secondary fastening method to keep the glass from rattling with the wind. Glazing can now be purchased in a tube like silicone and can also come in a can. The tube version is the most convenient to use, especially if the tube is manufactured with a slanted tip that serves as an applicator.
If you elect to use the type that is found in a can, the best way to apply it is to roll a small piece into a ball the size of a ping-pong ball and then, starting in one corner, roll it along the rabbet toward the other corner while applying moderate downward pressure.
Regardless of which type is used, it will be necessary to then smooth out the glazing with a putty knife, but do not smooth it flat. Glazing should be set at a 45-degree angle to the window glass so water can run off it. If the glazing is applied flat (90 degrees) to the window glass, water can possibly run behind it and rot the window.


The final step is to paint the glazing after it has been allowed to dry in accordance with the manufacturer’s recommendations, which is usually 24 or 48 hours.
If traditional window glazing cannot be located, weather-resistant caulk or silicone can be used in a pinch as a temporary fix, but glazing is still the preferred application.
Other Window Related Articles
