

Keep your siding in shape for good looks and weather protection.
Regardless of the type and material, siding requires maintenance and occasional repairs. Some of these are simple, others a bit more complicated. First, it’s a good idea to thoroughly inspect your siding once a year. The best time to do this is in the winter when many of the shrubs around your house have less foliage. Look for blistered, loose or peeling paint, warped boards, cracks, shrunken caulking, broken vinyl, dents in aluminum, as well as any evidence of termites. Prune back shrubs that have grown closer than 2 feet to the house. Pull down, cut and treat any vines clinging to the house with herbicides.

Routine Cleaning. The one maintenance chore for all types of siding is cleaning. Mold and mildew are common problems on any type of siding. This is most common on the north side of buildings, where there is insufficient sunlight. Wet the siding and then scrub with a mixture of household detergent, tri-sodium-phosphate (TSP) and water. A long-handled scrub brush, such as one used for cleaning boats or automobiles, can make this chore easier. Then, lightly power-wash the siding to flush away the cleaner and the loosened materials.


Mold and mildew can also be caused by a too-tight structure that doesn’t allow the siding to “breath.” Peeling and blistering paint can also be caused by a lack of breathing. As warm, moist vapor from the house flows through the walls, it reaches the cold siding and condenses. Install vents in the siding to remedy this problem. Several different types of vents are available. They should be located between the studs and about 6 inches below the ceiling level. Holes are drilled in the siding for the vent installation. Wait about a month for the moisture to escape and the siding to dry out, then scrape the peeling or blistered area and repaint. In addition to cleaning, different siding materials also have specific maintenance and repair chores. Following are tips for each type of siding.

Wood Siding.The type of maintenance and repair depends on the finish applied to the siding. Natural finished sidings, such as Western Red Cedar, usually require regular applications of a protective oil finish maintaining the original color. This can be applied with a brush, roller or best with a small hand-pumped pressure sprayer.

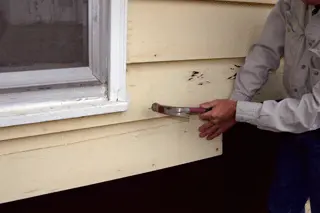
Peeling, flaking or blistering paint requires removing the old paint in the area. A paint scraper, vibrating sander, or combination of paint heat gun and paint scraper can be used to remove the problem paint. Do not use a blow torch to heat the paint, because the flame can go into a crack in the siding and cause a fire. Before cleaning off old paint, drive any popped nails back in place. After cleaning, fill any cracks with wood putty such as Durham’s Rock Hard Water Putty. Prime the area and repaint. One problem is paint also chalks and fades over time, and you may need to paint an entire side of the house to blend the colors.


Breaks, cracks, warped and loose siding boards are also common problems. Clapboard or beveled siding occasionally comes loose at joints and warps or twists. Remove the old nails, clean and sand any joints that are too tight. Then add caulking such as DAP Sidewinder and fasten the siding back in place with exterior self-starting screws in predrilled holes. Set the screws slightly below the wood surface and putty over them.

Another clapboard problem is a split. Carefully pry the split apart, squeeze exterior glue such as Titebond III in place and wedge or clamp the crack together. Anchor the split parts back in place with screws. For a hole in the siding, clean out the hole with a small chisel, fill with wood putty, allow to dry and sand smooth.

In some cases sections of wood or hardboard clapboard or bevel siding may be deteriorated to the point it needs to be replaced. Cut the siding board on both sides of the damage. Start with a backsaw and finish the cut with a wide, sharp chisel. Pull out the nails in the board overlapping the damaged board. Use a chisel to split out the damaged board, and carefully pry out the top edge from the overlapping board. Be careful not to damage the building felt, sheathing or the surrounding siding boards. Cut the replacement siding board to fit, and then drive it up in place so the bottom edge aligns with the surrounding boards. Fasten in place with screws, then caulk and fill cracks and over the screw heads with wood putty.

In some cases you may not be able to purchase older siding shapes or styles. If you have a woodworking shop and a planer/moulder such as the Woodmaster Planer/Moulder, you can run your own replacement siding to match the existing siding. The company has a wide variety of moulding knife patterns and can also create knives to duplicate any style siding or trim. For instance in one of our remodeling jobs; we could not purchase siding wide enough to match the old siding. One of the most common problems with board-and-batten or vertical siding of individual boards is a split. Or, plywood siding may have damage caused by an accident. Pry off the battens, and then pull out the nails holding the siding to the studs. Use a block of wood to protect the wood surface from damage during the prying. Remove the defective board or plywood section, and fasten a replacement section in place with stainless steel or other non-corrosive nails. Reinstall the battens.
Aluminum Siding.Aluminum is one of the most maintenance-free sidings, but it can be damaged. Dents and cracks are the most common problems. To repair a dent, fit a self-tapping metal screw with washers or a rubber ferrule. Drill a starting hole in the center of the dent, fasten the screw in place, then use a pair of sturdy vice-grip type pliers to pull and straighten out the dent. Remove the screw and squeeze a bit of plastic aluminum in the hole. Then file and sand smooth. Add a bit of touch-up paint. A crack can be filled in and smoothed in the same manner. Replacing a badly damaged piece of siding usually requires removing the corner caps, prying up the overlapping siding and removing the holding nails. In many instances you will have to start at the top of the siding and remove pieces down to the damaged piece.

Vinyl Siding. Vinyl siding is almost maintenance-free. It does not dent or need repainting, but it can be damaged easily, especially in cold weather. Remove the corner blocks and, starting at the top, remove succeeding pieces until you reach the damaged piece. You probably should number the pieces as you remove them so you can easily replace them in order. Remove the damaged piece and replace with a new one. Make sure the siding pieces interlock properly. Don’t drive the siding nails or screws in tightly, but leave a slight space for expansion and contraction of the siding. In some instances the color of the replacement siding may be a bit different, but will usually weather to blend in.

Another common problem with vinyl siding is a cracked or broken corner post. The old post can be removed and replaced, but you will need to loosen and pry out the ends of all siding pieces to get at the corner-post fasteners. A simpler solution is to cut the flanges off a replacement corner post, slip it over the damaged corner post and fasten in place with pop-rivets. Then paint the rivet heads to match the siding.

Other Siding Materials
Brick siding may require an occasional coating with masonry waterproofer. And, if badly deteriorated, may need the joints tuck-pointed. Cracks and holes in stucco siding can be repaired with a special mortar such as Quikrete Stucco Crack Repair. Follow product directions, then paint to match.
