

By Mark Clement
How to replace a roof on an old house—once and for good.
This old house remodeling challenge is to replace a roof on an old house, make it look great, make it last and not to bust the budget.
Here’s the scenario: I was working on a 135-year old, Georgian style home with a cross-gable dormer and 10 pitch. The homeowner wishes to replace the roof with something more consistent with the home’s pedigree and a better fit for the neighborhood. The home is both a residence and an investment (part of it is an apartment), so in an effort to keep long-term costs down, the homeowner wants a roof that he’ll never have to think about again, other than to enjoy looking at it. Finally, the homeowner has a reasonable, but not huge, project budget.
The answer for this job is a blend of products and techniques that’ll keep cost down while bringing quality and beauty way up.

Color
“What color would you like?”
Until marrying my wife Theresa, a home designer, this was always one of the most daunting elements of a roof project. After all, there’s a lot at stake considering you’re about to cover the one of the biggest and most readily visible surfaces of your home. Get the color wrong, and you get a lot of color wrong. Then, you spend time either being unhappy with your roof or trying not to notice it.
It’s easy to go black, but black is hot. White or light color helps keep the roof system cooler but it doesn’t always work with the area, house or surroundings. And, in an asphalt shingle, it’s not that much cooler. Plus, in our area at least, lots of asphalt-type shingles streak—massively. It seems the lighter the color the, the more pronounced the streaking. What I’ve done in the past is gotten a sample board from the roofing supplier and handed it off to the homeowner to let them decide.
On this roof, we agreed DaVinci Roofscapes Bellaforte Slates would meet the homeowner’ triumvirate of needs (looks, durability and budget). And because Bellafortes are color blends—not a monochrome—you can customize this to match your siding, environment, history of the home and other things. What’s more, DaVinci has a color expert that’ll work directly with you to help you make the choice that works best for your house. Seriously, you send in pictures—to a real person. Or, if you’re color-confident, then you, your architect or designer can work directly in the company’s online color studio.
Tear Off
Sometimes I wish I wasn’t an old house carpenter. Everything—and it seems like everything—is a challenge. Of course, challenges are the forge of opportunity to find better, easier, faster ways to do hard jobs.
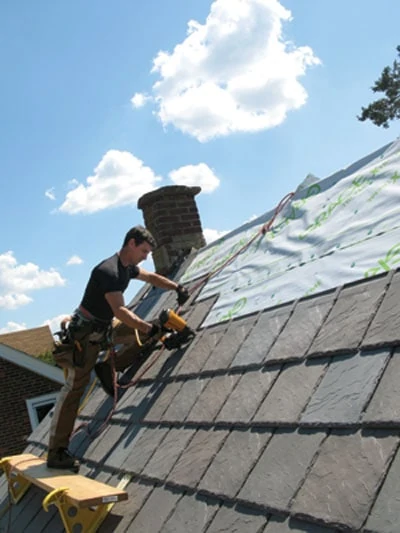
In this case, our first challenge was walking the roof. On an 8-pitch you need walk boards to keep tools from sliding off and to rest because it is barely walkable. However, you can move around and sit in one location (say, to flash a chimney) without sliding down. This was a 10-pitch and gravity would have none of that, so I chose to use rock climbing gear instead of my typical safety harness. I geared up with a rappelling harness and ascender/descender. It worked great for enabling me to hold myself still in one place. Along with the carabiners I bought, I used the Miller Fall Protection bracket from my safety harness as an anchor point.
The next challenge was how and where to drop the old two-course, three-tab shingles around the property. Turns out the only thing near the main house on this project is other houses and the front sidewalk. The driveway is in the back. And even if you could fit a dumpster back there, the homeowner didn’t want it for fear of finding it filled up with someone else’s trash in the morning or damaging his new driveway.

In this case, new meets old to form a solution that makes sense. We strategically positioned Waste Management Bagsters around the property so that shingles could be dropped as usual, but instead of trucking them across the homeowner’s new blue grass in a wheelbarrow, we could load them in a Bagster near to the location they were thrown to the ground. After tear-off the Waste Management truck would circle the property and hoist the bags from their location with the truck’s crane (as long as they were within 16 feet of the street, which they were). Awesome. And, we could deploy them as we needed them, so there was no risk of them magically filling overnight, and there was no risk of driveway damage from a roll-off. Bottom line: lots to like about Bagsters.

Once topside, we scored the roof with a circ saw so we could always have a clean break during shingle removal. Rain was a threat almost every day on this project.


Underlayment
In our area, a peel-and-stick type bituminous membrane is required at the eaves. The Bellaforte slates also require it up the gable ends. And since this is a cross-gable roof (house is shaped like a T in plan-view) there are two valleys. We applied Grace Ice and Water Shield to all these areas along with an aluminum flashing bent in a “w” in the valleys.


On the rest of the roof deck we used Grace Tri-Flex Xtreme synthetic underlayment instead of tarpaper. On a steep roof pitch like this, it delivered several advantages. It is incredibly tear-resistant (stapled, 30# tarpaper would have torn under our feet in some locations) and secondly it is grippier than typical tarpaper so we could move around and snap lines much easier. You do have to cap-nail it, which takes some time if you don’t have a cap nailer, but it is worth it.

Bellaforte Slates
One look at Bellaforte tiles from DaVinciRoofcapes and you can see they’re not a typical shingle or slate product. It is a synthetic product that presents remarkable realism. The detail is authentic even when viewed up close on the roof.

From an installation standpoint, they also diverge from run-of-the-mill shingles. Bellaforte slates interlock somewhat like engineered “click together” floors. Along with a rib on the back, these features deliver several advantages. They nail down fast—requiring just three nails per shingle compared with 4-6 for an asphalt shingle. The rib on the back registers the second course off the first course, so getting off layout is hard while staying on layout is pretty easy. This speeds up installation and increases accuracy.
To install them, you snap layout lines across the roof. Install starters, then install Bellafortes offset from the starters. I like to offset them about every 6 inches for a random pattern that delivers maximum nail coverage.
What’s also good about the interlocking nature of the tiles is that if you do get off layout, you can flare the tiles to nudge the course back into alignment. Or, on this house, the roof deck undulated; some rafters sagged and bellied over the years—in some cases by inches. Because we could flare the shingles, we could follow the contour and stay on layout.

The uniform size means there’s no time spent selecting and sorting slates. Just grab and go. At the end of a run, snap a line and cut with a cordless circ saw. Or, cut individually, which worked better in this case (the barge rafter was not straight … not even close.)

Finally, pre-formed end caps and ridge caps give the roof a unique texture and shadow line. Both from far away on the two-story house and up close on the one-story garage, they deliver an awesome look.
Flashing, Cleanup and Next Year
Flashing details with Bellaforte are typical. While I see a lot of asphalt roofs with cap shingles nailed over aluminum flashing to hide the flashing where they meet the house (say, where a porch meets a sidewall), I don’t do that. My flashing, whether it’s a chimney or porch intersection, overlays the top course of shingles. I do fasten the leading edge of the flashing to the shingles then dab the fastener with caulk.
While roofing and associated cleanup will never be easy, it is easier with Bellaforte. The waste material is lightweight and, from my experience, there is less of it to dispose.
As for a year from now, there are no shingle granules to gob up the Yankee gutter on this house and run out the downspouts onto the sidewalk and yard. The material will shed leaves from the massive sycamore tree overhead, and it won’t pick up stains or other damage.
Finally, I used snow guards hold the snow off the gutter.
Editor’s note: Mark Clement is host of MyFixitUpLife. Visit www.myfixituplife.com.
SIDE NOTE
Streaking Issues
Asphalt shingles can develop long, unsightly streaks on the surface. I noticed it one day driving my daughter to school. House after house—whether fancy, modest, middle of the road, trees, no trees, sun or shade. It was incredible. Once I noticed it, I couldn’t avoid noticing it.
I checked with DaVinciRoofscapes, the manufacturer of the tiles we used in this project, to see what the deal is. The company explains it this way: The streaking is black algae. Asphalt shingle manufacturers use a CaCo3 (calcium carbonate) as a filler. It is very inexpensive and it appears the algae feeds off it. The remedy is to install copper or zinc strips at the peak above the streaking. As water runs over the metal strip it changes the chemical properties of the water and it cleans the algae.
There are other remedies as well, including pressure-washing at the lowest setting with a caustic product called Shingle Shield. I know from working on asphalt roofs for other projects (like installing windows, painting, etc.) that I am not in love with this solution. Lots of walking around on shingle roofs—never mind pressure-washing—is simply not good for the asphalt granules.
Some asphalt shingle manufacturers produce a product with trace amounts of copper in them for an additional cost. This also seems to be an effective way to prevent the algae if used on the initial installation. For the record, Bellaforte Slates will not streak with algae. –M.C.
