

Replacing old, leaky windows with new gas-filled, multi-paned units is a top project among homeowners with a keen eye on energy efficiency. Although saving energy is a great reason for an upgrade, it’s not the only one. The larger a window, the more sunlight can enter and brighten the home. Furthermore, windows provide an exit in case of emergency, and the small, elevated windows in this home motivated the homeowner to enlarge them as a safer means of escape for his kids in case of fire.
Increasing the size of the windows was no easy task. The front of the house had a brick façade, which had to be partially demolished to elongate the rough openings and then reconstructed. The sides and rear of the house were sided with EIFS (Exterior Insulation & Finish System), which required an entirely different procedure for enlarging the window openings. And finally, one of the windows—a double unit with continuous head and sill—was wider than the original, which meant we not only had to remove the lower wall to elongate the window, but we had to blow out the king studs and reframe a new header to accommodate the span.
Here’s what we encountered on the project, and how we overcame it.
Brick Wall Breakdown
We began work on the windows in the brick wall. After removing the panes, we pried up the aluminum frame and cut it with a recip saw to remove it from the framing and brick.

Any time you’re penetrating a wall, first locate all plumbing and electrical lines and safely disconnect them.

To dismantle the wall we used the Allsaw AS170 brick and mortar saw from Arbortech (www.as170.com). This tool is worth highlighting because it saved us hours of labor. It features dual reciprocating mortar blades that plunge into the mortar joint and rip away the bonding between the bricks. Two different blade sizes allowed us to cut both the long horizontal and shorter head joints to remove the brick intact—which we needed to rebuild the wall later. The AS170 provided a swift and organized way to open the wall without having to resort to the grueling chore of chipping with a hammer and chisel.

We then removed the house wrap and used a flush-cut Rotozip to cut the wood sheathing in the lower portion of the wall to the dimension of the new rough opening (R.O.). We were keeping the existing header in position, and extending the height of the new windows downward. The R.O. of a window should provide 1/4 in. of space— but no more than 1/2 in.—around the perimeter of the window unit.

Next, we removed the fiberglass insulation and old sill plate, and cut down the cripple studs to mount the new sill. Level and plumb the sill plate, and double-check that the height between sill plate and header is the correct R.O. dimension for the new window. Fasten the sill with framing nails.

To flash the window to divert water, we used aluminum-backed butyl flashing tape, which sticks right to the framing for easy installation. Flashing combined with properly installed house wrap helps creates a water management system to preserve the integrity of the window and surrounding wall.

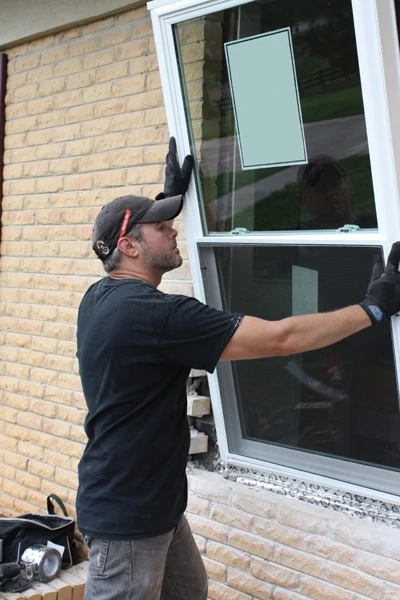
To install the window, position shims along the sill to create a 1/4-in. gap between the sill plate and window frame to allow for fluctuations in the building material and the window. Then tilt the window unit into the R.O. Square up the window and make sure it is level and plumb. Use shims as necessary to hold the window in position. Follow the manufacturer’s instructions carefully regarding fastener location. We recommend a corrosion-resistant fastener with a minimum head size of 5/16 in. that’s long enough to penetrate a structural framing member by at least an inch.
Once the window is fastened and flashed, insulate between the window and the rough opening with a bead of low-expansion polyurethane foam sealant. Make sure the sealant is specified for Window and Doors, because the wrong product can expand too much and warp the frame of the window. The foam helps to create a seal that lowers the risk of water and air infiltration.

Once the windows were installed, we had to reconstruct the wall using the old brick. The job first required chipping away all the old mortar from the bricks with a hammer and cold chisel. We mixed up some new mortar and re-laid the brick from bottom up. To help hold the ledge in place while the mortar dried, we erected a temporary brace made of scrap 2x4s. When it was necessary to cut a brick, we used a wet saw equipped with a diamond-grit blade (although a hammer and brick set will also work). We replaced the brick around the window perimeter, aligning them with the edges of the undisturbed brick from the upper half of the opening.

The final phase for the bricked-in windows was to install mitered brick moulding around the edge. The trim was followed with a liberal application of waterproof sealant.
EIFS: A Different Approach
EIFS siding systems are often called “synthetic stucco.” When installed over wood sheathing, these systems usually consist of a layer of insulation board followed by a layer of reinforcing mesh that is embedded in an adhesive base coat of synthetic product. The base coat is followed with a finish coat that gives the siding its color and usually a stucco-like texture.
When disturbing an EIFS-sided wall, it’s best to proceed cautiously because it’s difficult to make repairs look natural.

We carefully extended the side lines of the existing R.O. downward using a 4-ft. level and a carpenter’s pencil.

I then used a Bosch Multi-X oscillating tool with a masonry blade to follow the cut lines of the new R.O., cutting through the outer layers of EIFS and into the insulating layer, which in this case was 3/4-in. Styrofoam. Once cut, the EIFS layers pulled away easily.

I then used a recip saw equipped with a new Milwaukee Flush-Cut Blade to cut away the sheathing flush with the edge of the EIFS. Next came removal of the old window, sill plate and cripple studs.
Once you’ve reconstructed the new R.O., apply flashing and shims as necessary to achieve the 1/4-in. expansion gap around all sides of the opening.

For the side and rear windows, the homeowner wanted to dress out the new units with an enhanced trim package to provide a classier look and conceal any accidental damage to the surrounding stucco-like finish. To achieve this double-decker trim approach, we ordered the new Brickmould 600 series from Simonton Windows. These are actually new-construction windows, rather than typical replacement windows. This means they have a nailing flange that is typically fastened inside the wall and then covered with sheathing/siding. However, the Brickmould 600s also come complete with brick mould trim already attached at the factory. By combining the pre-attached brick mould with some additional 1×4 PVC casing, we were able to use the nailing flange to fasten the window to the framing while concealing the flange with the casing. This combination provided a good decorative design for our project, even if using new-construction windows in this fashion is somewhat unorthodox.
WARNING: Installing new-construction windows using this method requires a nearby overhang to divert rainwater away from the top flange. In our case, the roof ledge located immediately above the window would shed water. Otherwise, only upgrade your home with replacement windows.

To check that the window is square, measure the frame diagonally. Measure from the top left corner of the frame to the bottom right corner, and from the top right to bottom left. If the measurements are equal, the window is square.

We ran a continuous bead of sealant (roughly 1/2-in. thick) around the inside perimeter of the mounting flange (aligned with pre-punched holes). Since we were fastening the flange through the EIFS, we used 3-in. non-corrosive fasteners to bite solidly into the structural framing.
The window was completed by adding the mitered 1×4 PVC casement over the flange and inside the groove behind the brick moulding.
Tear Down the Walls
Our final replacement window posed the challenge of being not only longer, but 79-1/2-in. wide, which was wider than the existing R.O. This new wrinkle required us to open up the walls to expand the king studs that framed each side of the window, which in turn required us to construct a new header. This required major demolition with a recip saw, a couple of pry bars and nail-pulling pliers. We cut away the interior drywall with a utility knife.

Suffice it to say that when a DIY’er is faced with cutting the framing of a load-bearing wall, it’s advisable to consult a structural engineer on how to proceed. At the very least the job requires building a temporary brace wall to support the ceiling while the existing studs and header are removed and rebuilt. The temporary wall must be built wide enough to span across the house studs that will remain on both sides of the area to be removed. Build it roughly 3 ft. parallel to the existing wall to allow some room to work.

A header is doubled 2x material above the window that distributes the weight of the structural framing above. The header is supported by the trimmer studs (see diagram). Always make the header exactly as thick as the door frame—for instance, two 2×4 boards sandwiching 1/2-in. plywood or rigid foam sheeting cut to the same dimensions.

The size of the header will be determined by the span of the window, and whether or not it is a load-bearing wall. Assuming you’re using a species of wood at least as strong as No. 2 Douglas fir, a doubled 2×4 (4×4) is adequate for a load-bearing opening of 48 in. or less. The required header size increases as the span gets wider, and our 80-in. R.O. required a 4×8 header.
Here are some common span sizes for windows and doors:
| Lumber Size | Species | Min. grade | Max. span |
| 4×4 | Spruce, Pine, Fir | No. 2 | 48″ |
| 4×6 | SPF | No. 2 | 72″ |
| 4×8 | SPF | No. 2 | 96″ |
| 4×10 | SPF | No. 2 | 10′ |
| 4×12 | SPF | No. 2 | 12′ |
After we rebuilt the wall with the new header, studs and sill plate, we replaced the window in the same manner that we did with the other EIFS walls of the home. Once the job was complete, the difference was dramatic. The homeowner enjoys the expanded bedroom view and the warm sunlight the windows bring into the house. Plus, the double-hung, Low-E/argon-filled windows are more energy efficient, easier to clean and easier to open in case of emergency.

