

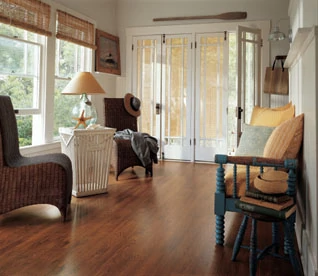
Last summer we bought a rental house that was built in the ‘50s. The carpet was thrashed and needed to be replaced, but we were hoping that the hardwood floors underneath were in good enough condition to refinish. You can find hints about the presence of hardwood floors by looking in closets or pulling up the corners of the carpet to see what’s underneath. You can also talk with neighbors whose houses may have been built at the same time by the same builder to get an idea about materials used in the original design.
We decided there was enough evidence for the existence of hardwood floors throughout to proceed with optimism. Two rooms into the unveiling, and so far so good. But then we hit a rough spot.
After taking up the carpet and pad in the southwest bedroom we discovered a 40-square-foot area of water-damaged flooring. Oak usually turns black when it gets wet, but this flooring was even beyond that stage. It had buckled, separated and was even showing signs of dry-rot. This had been a long-term water issue.
After a brief discussion about sweeping this problem under the rug by re-carpeting the room, we decided that the floor was too uneven even for this. It was time to replace some hardwood. Although this was not the worst thing that could happen, it did slow down the refinishing project.
The biggest challenge to replacing flooring is to interlace the new section into the old. Of course, if the damaged area is very large, you may be better off removing all of the flooring in the entire room. Good flooring can be recycled if the original installers went light on the fasteners and it can be removed without destroying it.
Here’s how to bring your buried treasure to light:

Step 1: Look for clues that your house may have existing hardwood floors. Sometimes the first indication can be found in a closet.
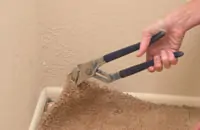
Step 2: Use a pair of pliers to grab some carpet pile and pull it back.
Step 3: With the carpet pulled back, pull back the pad to see what’s underneath. You can do this in each room to get a feel for the extent of the hardwood. If you just take a little peek, the carpet can usually be rolled back into place with no harm done.
Step 4: Once you’ve decided to remove the carpet, it’s a good idea to cut it at the hallway to make it more manageable. Grab the pile with some pliers and pull upward so your utility knife cannot reach the hardwood floor underneath. You want to minimize damage to the hardwood because very soon you will be trying to fix the various forms of damage the floor has sustained over the years.
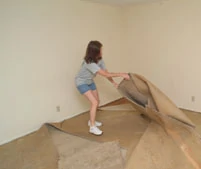
Step 5: Pull the carpet back toward the center of the room. This can be kind of a dirty job so you should ask your wife to do it while you take photos.
Step 6: Most carpet pads are installed in strips, so you can usually roll it up for removal. It should pull away from the staples as you roll. Pulling back the pad to reveal hardwood flooring that has been buried for years can be pretty exciting.
Step 7: After removing the carpet and pad, you’ll need to battle with the tack strip and those staples that were holding down the pad. Tools for this part of the job include knee pads, hammer, stiff-blade putty knife, flat bar, scraper, hand brush and push broom.

Step 8: With a good grip on the flat end of your flat bar, drive the claws of the curved end under the tack strip. Watch the angle of the claws because you don’t want to gouge the floor. If the tack strip is too tight to get the bar started, then use the putty knife to begin.

Step 9: Pry up on the tack strip. Don’t worry about breaking it or trying to get it out in one piece. Some of the nails will pull easier than others.
Step 10: I find using the Hyde scraper is a quick way to pull the pad staples. Some of the staples will break off. These staples will need to be set into the wood using a nail set. You’ll need to look carefully to find the broken off legs of these staples.
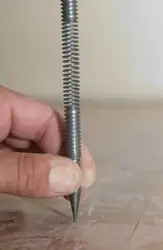
Step 11: Use a nail set to set all of the fasteners that cannot be pulled. A handy version of this tool for this job is a spring set, which delivers a high velocity strike without a lot of mass. No hammer is necessary to use this type of nail set.
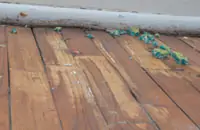
Step 12: Chances are pretty good that you will uncover some damaged floor areas. In our case we got into some water-damaged flooring, which needed to be replaced.

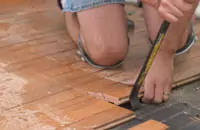
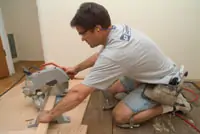
Step 13: When you are going to take out a section of floor, you’ll need to cut across the boards just outside of the damaged area. Set the depth of cut on your circular saw so it just gets through the flooring but not into the sub deck.

Step 14: As you cut across the boards, keep a good grip on the saw and wear eye protection. Because the boards were blind-nailed through the tongue you won’t know when you are going to hit a nail.
Step 15: With the board cut you can pull them out without affecting the good part of the floor.
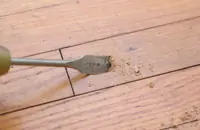
Step 16: Each board that has a saw cut will need to be removed. Because they are locked in with tongue and groove, you will need to take them out by sliding them toward the void left by the removed flooring. Start by drilling a pocket at 45 degrees with a 3/4-inch spade bit.

Step 17: Place the end of a bar or large punch in the pocket. We used a cat’s paw.
Step 18: Strike the bar to drive the piece of flooring toward the void until you can get at the end of the board with a hammer. Be careful not to damage the adjacent boards.

Step 19: Remove all the boards in the affected area down to the subfloor and thoroughly clean out all debris.
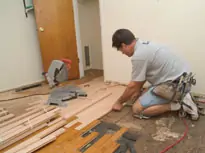
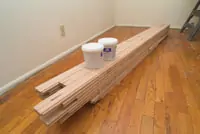
Step 20: Start installing the new hardwood row by row with the first piece matching into the existing floor.
Step 21: Since you will be working with random length boards, make sure that connecting head joints do not line up with joints on the adjacent row of boards.
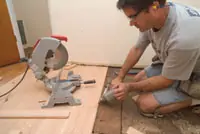
Step 22: Because you will be making lots of cuts, it’s a good idea to keep the saw right where you are working. Make cuts only on the wall end of the last piece in each row.
Step 23: Use a finish nailer to blind nail the boards at an angle where the tongue meets the edge of the board. Specialty flooring nailers are available for this job, which tighten the boards and drive a nail at the same time with the blow of a hammer.
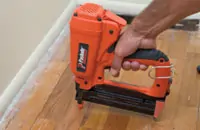
Step 24: Finish nailers can also be used to “face nail” (nail through the exposed face of the board) in areas next to walls where the gun cannot be angled into the tongue. Identify any loose boards in the floor and nail those as well.
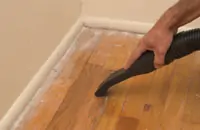
Step 25: When all of the replacement boards are installed, all loose boards have been nailed, and the carpet tack strips and nails have been removed, thoroughly vacuum the entire floor with a powerful shop vac. The goal here is to remove dust and debris from the nail holes, joints and cracks so these areas can be filled with putty.
Step 26: Apply some quality latex putty over the entire floor surface. Note: this may be done after rough sanding the floor as well.
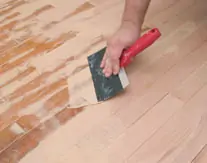
Step 27: A drywall taping knife makes a good tool for applying latex putty. Apply enough pressure to bend the blade and force putty into the cracks and nail holes. Excess putty can be scraped off the top surface and forced into cracks and joints as you go, which conserves putty and reduces sanding.
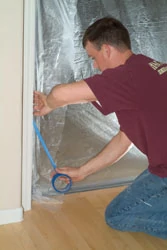
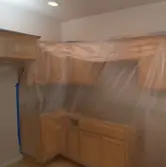
Step 28: Before you begin any sanding, make sure you seal off any areas where you don’t want dust. The reality is that fine dust will probably get into every corner of the house, but this does not mean you can just throw caution to the wind and leave rooms unprotected. A good job of masking and sealing can eliminate most of the dust issues and make cleanup much easier.
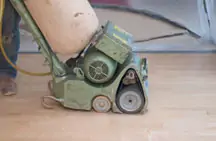
Step 29: Use a drum sander to sand the main part of the floor. Whether you are sanding off old floor finish or starting with new raw wood, you need to start with a coarse-grit paper to get the rough sanding done.
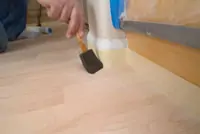
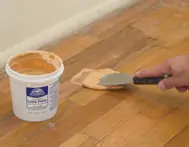
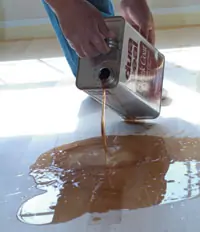
Step 30: After the floors are sanded and vacuumed again, apply a sanding sealer, which is really the first coat of finish. Use a sponge brush along the edges first. Here’s one of those cool things you see the pros do that makes good sense. Simply pour the sanding sealer onto the floor. Spread it with a T-bar applicator. Keep movements smooth, coverage even and don’t overwork the product. Spread it and leave it.

Getting Board Yet?
Most home-improvement centers ell traditional hardwood flooring. You’ll need to determine the species of wood and the grade. Grades change over the decades, so you really need to observe how the floor looks. Is there a variation in wood color? Are there knots in some of the boards?
Know Your Sanders
When you are ready to rent the floor drum sander, plan to rent an edge sander as well. If your floor area has cabinets with toe kicks, make sure you get a sander with a low profile at the sanding disk so it will fit under the toe kicks.

Make sure you know how to change the paper on both sanders. You will be changing paper as the grit wears off, as the grit fills with old floor finish, or when you are done with a complete pass with one grit number to graduate to a finer grit.

Usually, wherever you rent your sander will supply the paper as well. They can make grit suggestions for the type of project you are doing. If possible, take more paper than you think you might need and return what you don’t use.
Who Was that Masked Man?
A roll of painter’s plastic (which is quite thin at .30 to .50 mil) can make life easier after the sanding is done. Common sizes of painters plastic are 12-by-400 feet or 9-by-400 feet. And wide easy-release tape is more expensive than standard masking tape, but well worth the cost.
Cabinets can be covered with plastic as well. Don’t just drape the plastic over the cabinets. Completely seal all edges with tape.
Air flow is a big factor when you are trying to keep sanding dust to a minimum. A tunnel of painters plastic can be made when access through a non-hardwood floor area is necessary. Use fans to keep a flow of air moving away from rooms you are trying to protect.


Hardwood vs Laminate
So… you’re ready to update your home, and you’ve decided that a new wood floor is the option for you. But how do you choose between hardwoods and laminates? When making your flooring decisions, it’s important to know the differences between the products available so you’ll be happy with your decision for years to come. The major difference between hardwood floors and laminates is simple: One is solid wood, and one is engineered wood.
Quality laminates are composed of high-density fiberboard. The top layer is actually a photographic image of wood that has a very durable protective finish on it. Laminates are less expensive than wood floors because they are not true solid wood floors. Some laminate products also “click” together without fasteners for easy, DIY-friendly installation. However, unlike solid hardwood, laminate floors cannot be refinished, and will need to be replaced when they begin to show wear. Both wood and laminates are beautiful products that are easy to maintain, but in the long run, real wood floors will have more staying power because of the refinishing aspect.
—EHT Staff
