

By Matt Weber
Here’s a case study of repainting one home’s interior to spruce up the décor and eliminate nicotine damage.
After buying a house, it’s common for new homeowners to update the interior with a fresh coat of paint. Color and décor help give the home a personal touch. However, when repainting my new house, my wife and I got more than we bargained for.
The fact that the previous homeowner had a respirator in tow when she signed the contract should have warned me what I was about to encounter: Every inch of the interior was filmed with nicotine. The lady who had lived in the house for the previous thirty years had been an avid smoker. Not only is that habit bad for your lungs, it’s also bad for your house, creating an odor and a dirty, sepia tone over the entire interior. For example, there were several large, pale squares on the wall surface—these were places where pictures had protected the paint from cigarette smoke, so they remained several shades lighter than the rest of the damaged wall. We could wipe a paper towel over a window pane and come away with brown filth all over the towel. The whole house was fairly disgusting due solely to smoke damage.
To eliminate the odor and filth, we decided to prime and paint the complete interior of the house, ceilings and all … every square inch. It turned out to be a very big job. Here’s how it went.

Wall Repair
Inspect the walls closely for damage, because little dents and dings have a funny way of showing up much more evidently after you’ve coated the wall in paint. Almost every wall will have imperfections from nail holes, furniture damage, cracking wall joints and more. If you’re about to paint then take the opportunity to use vinyl spackling to fill all holes or cracks, allow it to dry and then sand flush with the wall.
For minor imperfections, we used a new spackling product called Jig-a-patch. The product is basically spackle in a spray can. Just shake the can, aim the nozzle at the damaged area, and spray. Spraying the spackle eliminates the hassle of dipping it out with a putty knife. After about two minutes the spackle stiffens and you can spread it flat. Jig-a-patch includes a putty knife and a pad of sandpaper in the can, so the three components come as a self-contained kit. After the spackle dries, just use the abrasive pad to sand it smooth, then you’re ready to prime. The product proved to be a real time-saver.

Prime Time
To eliminate any signs of nicotine damage, we needed a strong primer. And we needed it to do more than just prime the walls for the best topcoat color. We also needed our primer to block stains and seal odors. We opted for Kilz Complete (www.kilz.com), which is a powerful oil-based product that is specifically formulated to block odors, smoke, water and more.

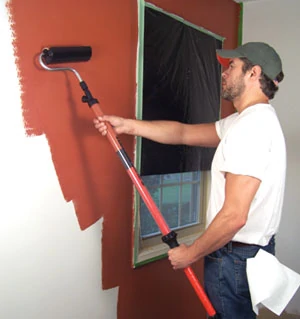
A good rule of thumb when painting and priming is to always start at the top. In our case, this meant the ceiling. Ours was covered with popcorn-style, sprayed-on acoustical texture. Painting acoustical texture is usually very difficult, because the texture tends to crumble off the ceiling while you paint it. Under normal circumstances, we would have chosen to remove the ceiling texture altogether by dampening it with water and scraping off the melted texture with a trowel. However, the ceilings of this house had already been painted by someone in the past. Being encased in a coat of hardened paint meant that re-priming and repainting them would be easier than usual, while removing the texture would be more difficult than normal. We chose to repaint, using a long-handled roller with a very thick nap or pile on the roller cover, which works the paint thoroughly into the relief of the ceiling surface.
When priming or painting, be sure to cover everything you don’t want painted with a plastic or canvas drop cloth. Don’t skimp on the cheapest, thinnest plastic drop cloths, either. The thicker the plastic the more durable it is, and the better it stays in place without wadding up beneath your feet and exposing the floor or furniture beneath. If you’re painting a large room, I’d suggest covering the entire floor with thick plastic and sealing the seams with tape. This will provide a tough, stationary layer of protection for all the work to follow.

Another suggestion for painting a ceiling is to have someone else do the work for you. My mother pitched in and did a great job painting our ceilings, for which I’ll be eternally grateful. Go, Mom!
With the ceilings complete, we moved to the walls, using a roller cover with a shorter 3/8-inch pile to apply a stippled texture with less relief than what we used on the ceiling.
Masking for Color
When priming and painting the walls, we used painter’s tape to mask off all areas where one color met another, such as window or door trim, accent walls, etc. Applying tape is one of my least favorite aspects of painting, but what makes it worse is to find out after the fact that you did a poor job of taping, and the result is paint bleeding where you don’t want it.

For this project we used two interesting taping products that help ensure success. The first is Frog Tap (www.frogtape.com), which is a specially formulated painter’s tape that forms a chemical bond with the wall surface. Using Paintblock technology, Frog Tape is a patented crepe tape that forms a micro barrier along the edges of the paint when it comes in contact with latex paint. Unlike standard masking tape, which can easily lose its adhesion, the edge barrier of the Frog tape prevents bleeding for crisp, clean paint lines.

Another product operates on a similar principle. It’s called Tape-Seal, which is a clear acrylic gel. With this product you can use a standard economical grade of painter’s tape by sealing the edge of the tape with the gel. To use, apply Tape-Seal with a dry paint brush at the edge of the tape, covering the edge of the tape and the surface you are about to paint. The Tape-Seal will bleed under the tape, which creates the seal. Once it is dry to the touch (10 to 15 minutes), simply paint right on top of it with your colored paint. The sealed barrier prevents the paint from bleeding under the tape, leaving a clean, sharp paint line.
Both products did their job very well. With Tape-Seal, an 8-ounce jar of gel goes a very long way—approximately 1,200 linear feet or 6 rolls of standard painter’s tape. The rolls of Frog Tape are more expensive than standard masking tape but also eliminate the step of adding the sealer. My only gripe about either product is that once I ran out of my samples, I couldn’t find replacement products of either brand in my area. Hopefully, distribution of both products will spread down here in Alabama.
Cutting the Borders
Before painting the entire wall, I always “cut in” the edges where the color will change, such as where the wall meets the ceiling, window trim, etc. By painting a border around the wall, you can apply paint with a roller, meeting that painted border for full coverage without trying inch the roller all the way into the corner (which will inevitably smudge paint all over the trim or ceiling that you’re trying to avoid).
The professional way to cut in is to draw a straight line that separates two colors using only a paint brush, with no masking tape or other aid. However, this takes some serious skill with a brush. According to some paint experts, it’s best for these professionals to cut in while breathing out or holding their breath. If that sounds a bit too surgical, then do what I did—mask off the line with tape.

Rolling, Rolling, Rolling
When rolling paint onto a wall, fill the tray no more than 1/3 full. Load the entire surface of your roller cover with paint, rolling it slowly back and forth so the cover absorbs. Use the tray’s grid to prevent overloading. When painting walls, start at the top and work downward. I generally roll a large “W” pattern in a space about 3 by 3 feet. Then fill in between the gaps, blending into your initial strokes and spreading the paint evenly. Don’t use too much paint on your roller, and don’t concentrate coverage too much in one area. Too much paint results in unsightly runs that you will have to sand down and start over. When rolling, always work from the unpainted into the painted surface. Repeat the process when your start a new area.
One new product that simplifies the rolling process is the PaintStick from Black and Decker (www.blackanddecker.com). This paint rolling system utilizes its handle like a huge syringe plunger. The system includes a cap for your paint can with a straw that reaches into the paint. Simply mount the handle of the PaintStick onto the straw and pull out the rear plunger in the handle. The PaintStick sucks the paint right up into the handle, completely eliminating the need (and mess) of a paint tray. To apply the paint, just press the handle, which forces the paint into a special perforated roller for easy application. An added feature of the PaintStick is that the handle can retract for use in tight spaces or extend for high, hard-to-reach areas.
Touching Up Trim
Window and door casing, baseboards, chair rails, crown molding—most homes have a lot of trim that needs attention. There’s a no special science to painting these areas, but in the long run you’ll appreciate selecting a high-quality brush in lieu of a cheapo variety. Thinner, narrow brushes work best for trim. An angular sash brush is particularly handy for close-up trim work. And most homeowners prefer a high gloss or semi-gloss paint finish on the trim for a little extra shine and durability.

If, however, you’re replacing trim during your paint job, I’d highly recommend painting the new trim prior to installing it. Doing so will spare you task of taping, reduce the likelihood of getting paint in unwanted areas, and limit the time you spend uncomfortably on your knees (i.e., painting baseboards in place).
After painting the trim, the inescapable chore of cleanup was the last phase of this whole-house paint job. It was a lot of work, but well worth the effort, as we had brightened the home with new, stylish colors and eliminated the grime of nicotine damage. Now, onto the next project…
SIDE NOTE 1
Pro Tip for Brushes
Although a paintbrush is a fairly simple tool, many DIY’ers don’t use them as they were intended. When you see someone load a paintbrush, they usually dip the brush up to the metal band (ferrule) and then scrape the excess off on the lip of the can. This is a poor way to load a brush, causing paint to build up both on the brush and the sides of the can. When the built-up paint dries it turns into little chunks of hard paint that fall back into the fresh paint and end up as lumps on the wall. Here’s the right way: First, dip the brush 1 to 2 inches into the paint. Then, gently tap the brush on the side of the can, first one side and then the other. The excess paint will stay in the can and leave you with a fully loaded brush for field painting or cutting in.
SIDE NOTE 2
Pro Tip for Rollers
One often overlooked step in a painting project is prepping the roller cover. All synthetic covers require some form of preconditioning to improve their performance. Before use in latex paints, rinse the cover with a faucet or garden hose, then spin it to remove excess water. Before using oil-base paints, the cover should be lubricated in the solvent used to thin the paint. Mohair covers should also be preconditioned in the solvent used for thinning. Preconditioning prevents the lack of paint release caused by the paint attaching to the fibers. However, lambskin roller covers have natural oils and don’t require preconditioning.
