


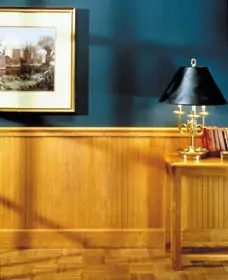
“To line with boards or paneling,” is how Mr. Webster describes wainscot. Doesn’t sound very exciting, does it? Wainscot, however, can add excitement and set the theme of your home’s decor. Wainscoting, in most instances, is finished off with a variety of moldings and is a great way of creating a true, “custom millwork” look to your home.
You can actually create wainscoting by cutting wall paneling to the size of the panels you desire. This is a good, economical method of wainscoting if you simply finish off the paneling with a chair rail at the top. If you desire a more traditional wainscot design, with panels inset in stiles, you’ll need to either use solid wood or wainscot panels.
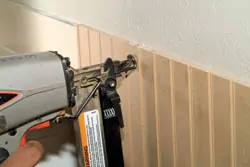
Note: For a step-by-step look at installing bead-board wainscoting, click right HERE.
Choosing
Georgia-Pacific offers precut wainscot panels 32 inches high and 48 inches wide for traditional chair-rail designs. The panels are available in a wide variety of panel styles and wood grains including; American Oak, Arcadian Oak, Honey Oak, Nordic Pine, Bedford Village, Ann Arbor Birch, Rustic Honey Oak, Rustic Unfinished Oak, Unfinished Natural Birch, Unfinished Oak, White Ice Beaded and Ready to Paint. The panels install easily and can quickly change a dull and drab room interior into a fashionable living space.
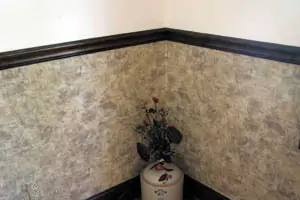
One of the “hottest” new styles these days is an old design, three-quarter walls. Plain walls can take on character with the texture and architectural interest of three-quarter wall decorative panels. For example, Bedford Village beaded decorative wall covering makes the space reminiscent of beach cottages or old-fashioned porches.
Georgia-Pacific also offers an extensive line of moldings to add just the right accent to your wainscot panels. Georgia-Pacific offers a full line of high-quality softwood, hardwood and medium-density fiberboard lengths, sculpted in various decorative styles including: crown, picture, base and base cap, chair rail, door and window trim, as well as many others. The company’s complimentary Combination Molding Designs brochure shows how molding profiles can easily be combined. The booklet offers a basic introduction to molding profiles along with projects designed at the easy, moderate and advanced levels.
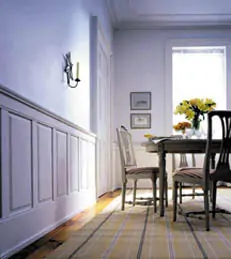
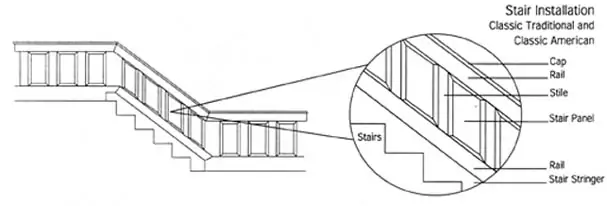
New England Classic from Pacific Columns offers a complete panel system that celebrates the historical American Arts and Crafts, Mission and Shaker architectural styles with its Classic American Panel System. With 27 sizes of flat panels and corresponding stiles, the system combines with New England Classic FramePaks to create a broad range of panel heights, from traditional wainscot to full-wall heights. Stair PanelSet also allows you to continue the panel treatment up stairs. The system features either select grade-A sliced veneer or decorative film laminated to a stable engineered wood core. Veneers include oak, maple, cherry as well as a paint-grade finish that is available ready-to-finish or factory-finished.
New England Classic has a Free Design Service which helps with the daunting chore of selecting materials and creating a design. Just provide the room and/or stair measurements, and using their design service, they will output a CAD drawing complete with materials list.
Other wainscot products include the PGM Products Manor House Wainscot, primed for easy painting and easy to install, with the flexibility to create your own design and style.
One of the most unusual wainscot options is the AXYLON product line from Brooklyn Technologies, L.L.C. This indoor/outdoor wainscot combines the strength and good looks of the finest hardwoods with the durability and maintenance-free advantages of synthetic materials. AXYLON will not rot or warp and is available in white pine, oak, mahogany and walnut. It has a permanent finish that is easily cleaned with soap and water. It’s great for bathroom walls, mudrooms and laundry rooms, damp basements or garages, around porches and decks, in sunrooms and patios, family rooms and dens, cabanas and sheds.
Installation
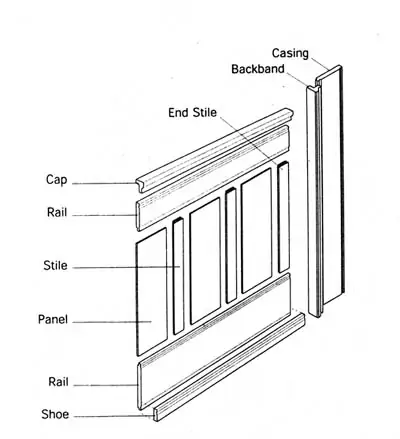
A typical chair-rail design consists of the panels, stiles between the panels, a top and bottom rail, base shoe and end cap for the top rail. In addition, matching casings are used to finish around doors and windows.
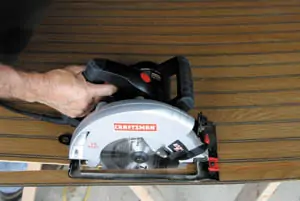
You’ll need a combination square, tape measure, level, utility knife, clamps, hammer, chop saw, table or radial arm saw, or circular saw (or a hand saw and miter box, and coping saw). A cordless drill/driver, dividers, jig saw and pneumatic nailer can also be handy. You’ll also need construction adhesive, wood glue, 8d and 4d finish nails, wood filler and wood shims.
Following is some general information for using precut panels and a rail system from Pacific Column. Complete installation information is available from their website.
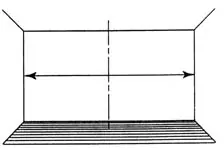
The first step is to lay out the wall. For a Classic Traditional design, locate the center of the wall, and lean one of the panels against the wall with the center of the panel aligned with the center line of the wall. Take a 3-inch stile and lean it against the wall next to the center panel. Make sure the stile overlaps the panel by the amount of the notch. Take another panel and fit against the stile and then take another stile and fit against the panel. Repeat until you reach the corner at one side of the wall.
When you reach the corner, the last piece to be installed must be a 3- or a 10-inch stile, not a raised panel. If the last piece ends up as a raised panel, go back to the center of the room and substitute a stile for the panel in the center. This will make the first piece either a three- or 10-inch stile. Trim it to fit. Once you have done this, you’ve established the layout of the panels and stiles.
When laying out a wall with windows, assemble the parts for under the windows first. In most instances, a single panel should be turned on its side and centered below the window. A 10-inch stile should then be cut to the proper width to fit between the panel and the bottom of the window, allowing for the bottom rail width. A Classic American and Classic Beadboard layout from Pacific Column is somewhat different. With this system either the panels or end stiles may be cut to match the length of the wall. Under windows use the Classic Traditional layout, except rather than using a 10-inch-wide stile, trim one or more panels so that a 3-inch-wide stile may be used at each corner of the window and below the windowsill. A 10-inch-wide stile can also be trimmed for below the windowsill.
Classic Beadwork paneling does not require a layout. Simply start at one end of a wall and lay in the panels, cutting around windows, doors and corners. For outside corners start your panels there.
 —
—
Proper preparation of the wall is important for a quality installation. Remove all existing baseboard, moldings and other trim that will interfere with the paneling. Use a long, straight piece of lumber or level to check for unevenness of the walls. Sand or scrape off any high spots. Apply a thin coat of compound to extremely low spots, or shims can be tacked on the wall behind the panels during installation. Then locate and mark the wall studs. Using a level or plumb bob, create a plumb line from the height of the wainscot down to the floor centered on each stud location. Pacific Columns also suggests the components be conditioned in their final environment for at least two to three days prior to installation.
Since floors are rarely level and flat, locate the high point of the floor. Then, using a level and a long straight board, mark a level line starting at the high point. Place the bottom rail slightly above the floor. If the floor slopes more than 1/2 inch, place the rail directly down on the high point. Shim the bottom rail up as you go around the room.
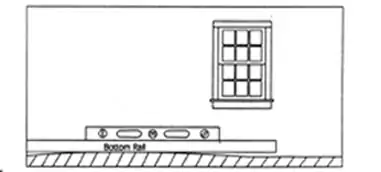
Miter the bottom rail where it meets at the corners, or when joining pieces to create the needed length. Position the mitered end of the rail in a corner. Then attach to the wall along the two “nailing grooves” with 8d finish nails in predrilled holes, or with the air nailer, making sure the rail remains level. Make sure the nails are angled downward so they won’t interfere with the slot where the panels and rails will fit. If attaching several rails, join with a 45-degree scarf joint. It’s a good idea to tack-nail the rails in place first to make sure everything aligns. Then finish-nail once you’re satisfied.

Install the stiles and paneling starting at one end. Rip the first stile that will go into the corner to the width determined by your layout. Apply a few dabs of construction adhesive to the corners on the back of each panel and stile as you install them. Use a block of wood and a hammer to seat the panels and stiles together and down in the rails. Press the panels and rails securely in place following the instructions with the adhesive.
Next, install the top rail. Miter the ends as needed. Make sure the slot on the top rail is resting down over the panels and over the lip of the stiles. Nail the top rail in place along the upper and lower nailing grooves.
Glue the cap pieces in place with construction adhesive. If necessary, nail it along the lower edge in a few places, at least 2 inches from the ends, using 4d finish nails. Predrill the holes with a small-diameter drill bit, but not all the way through. Make any miter cuts needed to join at the corners, or scarf joints to make up long runs.

Attach the base shoe molding to the bottom rail using 4d finish nails. Be sure to predrill first. Let this piece of trim “follow” the floor and overlap the bottom rail. If the room is to be carpeted, install carpeting before the shoe. For best results, stagger the joints of the cap, rail and shoe moldings. The inside corners are best handled with a simple butt joint with two stiles overlapping. Optional CasingPaks are available for windows and doors.
You can create higher paneled rooms, for instance three-quarters, by simply stacking layers of rail, stiles and panels. If you go all the way to the ceiling, finish off with a crown molding at the top.
The Next Step – Stairs
Stair installations are easy using the Stair PanelSets. Choose either a 4- or 8-inch bottom rail for the walls meeting the stairs and mark its height on the wall at the top and bottom of the bottom step and on the landing. Cut the bottom rail to fit the stair stringer and install. Install the bottom floor rail in the upper floor. Position a slanting holding rail against the stair stringer and bottom wall rail, mark and cut the angles. Install the slanted rail on the stair stringer’s top edge. Mark the center lines of a panel, and from the intersection, measure up and down 10 1/8 inches. Through these points draw lines at the angle of the stairs and trim panels. Draw two stair-angle lines 20 1/4 inches apart on a stile and cut along the two lines. Cut dadoes in the ends so that the exposed length is 19 1/2 inches.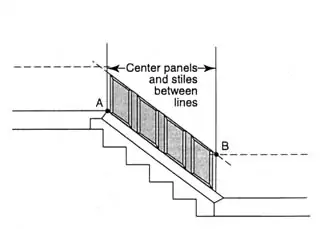
Using panels as guides, draw horizontal and inclined lines on the wall showing panel heights. Locate points A and B and draw vertical lines at points A and B. Lay out panels and stiles so that there are equal gaps between the end panels and lines A and B. At the top and bottom of the stairs, mark and trim 10-inch stair stiles to make the transitions between the regular panels and the inclined stair panels. After trimming the stiles, dado the fresh cuts. After positioning all panels and stiles, cut the top rails and slide in place. Predrill holes in the nailing groove at the wall studs and fasten with 8d finish nails. Cut caps and fasten to the top rails with adhesive and a few 4d finish nails.
Fill and finish-off all nail holes. If the materials are factory-finished, use the material included to conceal fastener holes. For unfinished materials, fill all nail holes with matching stainable wood filler. Sand smooth, taking care not to sand through the veneer. Apply stain, sealer and finish coats.
Dressing up your interior and adding interest with wainscot panels and molding is the perfect Extreme How-To chore.
Editor’s Note: All product names mentioned in this article are registered trademarks of their respective manufacturers. All illustrations used in this article are Copyright New England Classic, and are used with the permission of New England Classic. Any unauthorized reproduction is prohibited.
