

Retired art teacher Marsha Graham loves the southwestern look of the ceramic tile floors in her Arizona home and wanted something similar in her Oregon residence. However, she wasn’t convinced that Oregon’s wet and cold climate and tile floors would get along that well. That’s how she settled on a laminate floor with a tile pattern.
In addition to being softer and warmer, the laminate floor would cost less, install faster, and maintain easier than the tile floor in her desert home. With a preference for making art over cleaning and sealing grout, Graham could look forward to years of easy care with her new floor.
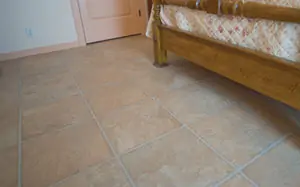
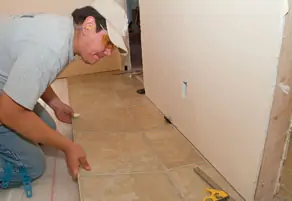
Homeowners Dallas and Marsha Graham installed tile pattern laminate throughout the first floor, including this bedroom.
Laminate flooring is made of several layers. At the core is the thickest layer, which is a high-density fiberboard. Under the core is a back layer that adds stability and acts as a moisture barrier, which is very important to prevent cupping.
Above the core is a pattern layer, which is essentially a photograph of almost any material you would use for a floor surface, usually hardwoods, stone or tile. Covering the pattern layer is a protective wear layer, many of which incorporate aluminum oxide for added durability.
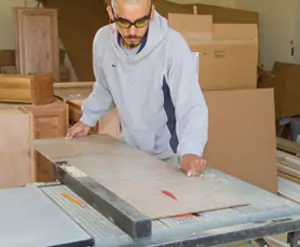
You can use conventional woodworking tools on this flooring, although it’s a bit hard on the blades.
You can use standard wood cutting saws to cut laminate flooring, but the very things that make the newest flooring so tough are also hard on saw blades. Be prepared to sharpen or replace the blades when you are finished.
We used a portable table saw and our Dewalt 12-inch sliding compound miter saw (because it can reach all the way across the boards) to make most of our cuts. On both the table saw and the miter saw, the teeth enter the material from the top, which minimizes chipping. You can use your circular saw equipped with a carbide blade, but we recommend cutting from the back of the piece, especially if you have a net fit that will not be covered by base boards, such as against a shower stall or patio door.
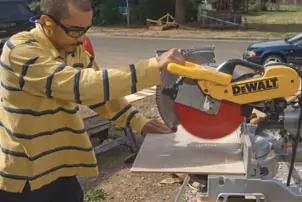
Our Dewalt 12-inch sliding compound miter saw can reach all the way across to cut the pieces to length.
Make sure the subfloor is flat and free of nail heads, has no sizable holes and is clean. Because laminate floors float (are not fastened directly to the sub floor), they tend to bridge over low areas, which can leave a sinking feeling when walking on these areas. It’s best to get things flat within 3/16 inch or so over an area that can be tested with a 6-foot level.
Next, roll out an approved foam pad underlayment. This padding acts as a vapor barrier, smoothes out minor subfloor imperfections, insulates and dampens noise.
Each row steps back one tile so the head seams are offset while keeping the simulated grout lines in line with each other.
In the end, it doesn’t matter which direction tile pattern laminate floor boards are laid because the pattern components are square. So, do whatever makes the most sense to get the rectangular boards into place. Orienting the long side of the boards down a hallway, for example, could mean fewer cuts.
Also, read the instructions for your particular product when deciding which direction to work the floor. Many of the non-glue laminate floor systems require a specific order of installation such as left to right and top to bottom.
The flooring pieces tip in at an angle until the tongue and groove match up.
With wood-grain laminate floor patterns, you can use random lengths to begin and end each row of flooring as long as the seams don’t land too close to each other. This is not so with a tile pattern laminate floor. All of the grout lines must line up in both directions just like real tile.
Unlike real tile, however, each of these laminate pieces has multiple printed tiles in the pattern of each board. This adds a little more challenge to the layout, because you have to think in terms of making your cuts and overlaps based on where the printed grout lines fall.
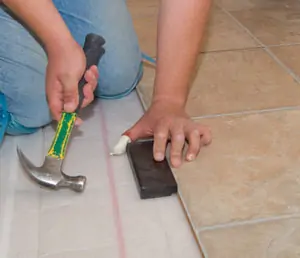
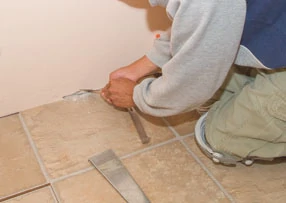
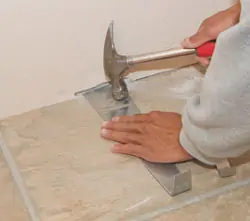
Tap the joint together with a hammer and block.
You want to think “brick pattern” to off-set the joints of the boards while thinking “tile pattern” to keep the grout lines in line. This will all make a lot more sense when you open a box of flooring and get started.
Lessons from Ceramic
Another consideration with a tile pattern versus a wood-grain pattern is how the vertical lines in the layout fit the room. Before laying real ceramic tile it’s a good idea to position a row of tiles across the room to see how they will fit. Rarely will full tiles fit the room exactly so you must decide what size of cuts to have on the perimeters of the room.
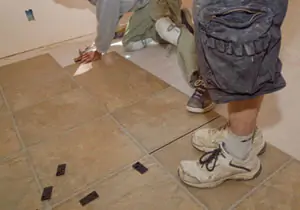
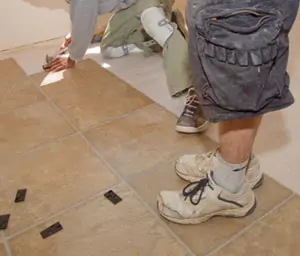
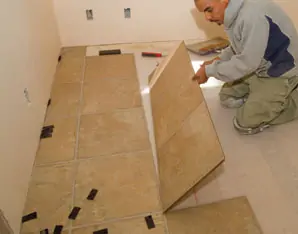
You can usually find someone on the crew who’s willing to just stand there and add weight to the flooring so it doesn’t move too much when attaching the next piece.
In a room with an open wall on one side and lots of cabinets or furniture on the opposite wall, it may make sense to start with a full tile on the wall that will be seen. In other situations it may be best to split the difference so the tiles are cut about the same on both ends of the room. This can be particularly important when the layout involves a hallway where a thin cut of tile along one wall can look like a fat mistake.
You should also check the room for square, measuring to see if opposite walls are parallel. If you need to make a tapered cut along a particular wall, it’s better to do so with the largest tiles possible. In other words, don’t leave a thin row of cut tiles on a wall that is out of square. The farther you can get the initial grout line from the wall, the better.
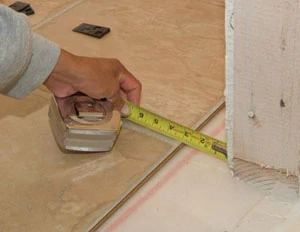
Measure from a point that corresponds with an edge on the piece to be cut. Keep in mind that you will have door jambs, casing and base to cover the gaps to the walls, so don’t cut too tightly.
If you have a long floor transition between rooms, such as tile-to-carpet, it’s best to plan your layout so there are full tiles along that transition. You can either adjust the floor break location, or start the room with a row of cut boards along the wall opposite of the floor break so the layout works on full tiles.
All of these ceramic tile considerations apply with a tile pattern laminate floor as well, so take your time when deciding where to start that first full piece of material.
Lock and Load
Of course, once a row gets started it’s just a matter of adding full boards until another full one won’t fit. Measure the remaining distance to the wall and cut the final piece in the row from the end of the board that matches your snap-together tongue-and-groove pattern. The off-fall from this cut board will probably work (when trimmed to match a grout line on the previous row) on the other side of the room to start a new row.
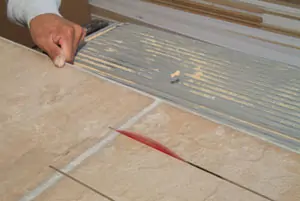
You can run the table saw blade right up to the layout line.
Again, follow the product’s instructions for tipping and locking the pieces into place. Line up a piece to be installed so the head joint just clears, slip the tongue and groove together and put the piece flat on the floor. Use the tapping block to tighten the joint along the long edge of the board. Also, use the tapping block to lock the head joint seam together.
This is where the tile pattern is different from wood-grain patterns. In the process of locking in the head joint, you may shift the rows so the tile joints no longer align. It can help to have someone stand on the adjacent board or place a wedge at the end of the row against the wall.
Custom Cuts
When it’s time to make a cut, be sure that you are measuring from a point that corresponds with an edge on the piece to be cut. Turn the piece to be cut so the tongues and grooves are oriented like the pieces already installed.
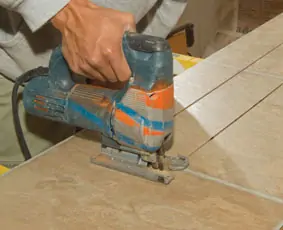
We used a jigsaw to finish these notch-type cuts.
Don’t be shy about making pencil marks on the flooring. It’s easy to clean pencil lines off of the laminate surface so you can mark clearly where you want to begin and end cuts.
Don’t try to fit the floor too tightly inside the wall lines. Take advantage of the thickness of the baseboard material. You should have at least 1/4 inch of tolerance all the way around where the edges will be covered by door jambs (in new construction), casing or base.
There is no wait to move onto a no-glue laminate floor. When you’re done, it’s ready. Oh yeah, there is that install-the-baseboard thing, which will be followed by some spackle, caulk and paint touch-up. Then you’ll be ready to move onto your next project.


You may need to go to the end of a row and shift it back over to re-align the grout pattern.
Realignment
Locking the head seams together pushed this row of flooring boards under the drywall and misaligned the tile joints in the printed pattern. To fix this, cut out some drywall so you can slip the pull bar over the edge of the board to bring the row back in line. This shifting of the rows to keep the joint patterns in line is a constant challenge of working with tile pattern laminate flooring.
If you really want to get tricky, you can plan the new row to get knocked over a bit at each head joint. Figure about 1/8 inch per joint and start the first board offset a bit to the right. By the time you reach the right end you’ve gained a little with each board, but you’ll still need to make a slight adjustment to get the grout pattern to line up.
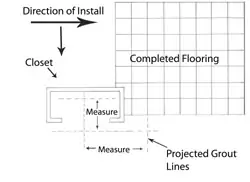
Closet Connection
Our project had three closets that had to be installed from the rear of the closet out to join the main room. To accomplish this we projected the grout line grid beyond the leading edge of the flooring in the main room and measured over to the closet area and back into the closet to determine where the grout lines would line up in both directions.
In most cases you will need to cut the back left piece to get the closet started on pattern with the rest of the floor. Additional boards can then be cut to align with the first board in the closet as you work your way out.
If a closet’s door opening faces the oncoming material (i.e. the natural flow of the install takes you into a closet), no special provisions will need to be made because of the orientation of the closet.
Materials:
• Laminate flooring
• Flooring underlayment pad
• Pull bar
• Tapping block
• Wood cutting saws
— table saw
— jigsaw
— circular saw
• Carpenter-equipped tool belt
— hammer
— tape
— pencils
— combo square
— utility knife
• Safety and comfort gear
— safety glasses
— ear plugs
— knee pads
