

By Matt Weber
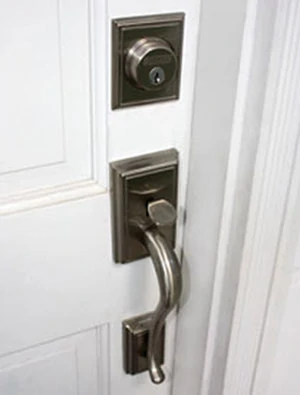
First Impressions with a new handle-set.
They say you never get a second chance to make a first impression, and a home’s entryway is the focal point that any visitor will notice first. Whereas a simple doorknob often goes overlooked due to its small size, a handle-set is designed to highlight the decorative appeal of the door hardware. Upgrading from a simple knob design, or replacing a worn-out handle with a more modern style, can spruce up an entryway for a whole new look.
Installation of a new door handle-set can be a quick and simple project, especially if you’re installing in precut knob holes. However, in some cases the precut holes are actually located too low for comfortable use of a latch handle, so compare the hole’s height with the recommended installation height of a handle-set; a knob may be more appropriate for some precut doors.

If the holes aren’t precut, then you will need to cut the holes using a hole saw, a spade bit and a powered drill. Aside from that, the only tools required are a Philip’s head screwdriver, hammer, tape measure, wood chisel and a smaller drill bit for drilling the handle’s lower through-bolt.

The methods of installation shown here are specific to the Addison style handle-set from Schlage (www.schlage.com). However, the procedure will be similar for other manufacturers’ handle-sets. The Addison handle-set is available with a variety of interior knobs and levers, and comes in several finishes, from satin nickel and aged bronze to bright chrome and matte black.

In with the New
For this project we replaced an old handle-set that was more than 20 years old and falling apart. The old handle had an integrated key lock, but the new Schlage unit did not. This meant the door had an extra key hole bored into it that would have to be filled with putty or Bondo. (If it’s not one thing, it’s another, right?)

The existing knob hole did conveniently fit the new handle, but it was necessary to drill a new hole for the handle-set’s separate deadbolt. Naturally, you want to line up the holes on top of one another, and Schlage conveniently includes a paper template in the package that helps to locate the knob holes.

Before drilling the deadbolt hole, double-check your manufacturer’s instructions for the recommended diameter, because they can vary somewhat. Schlage recommends a 2-1/8-inch hole for the Addison handle-set, and our 18-volt Bosch drill easily powered through the wood stock.

For the deadbolt, it was also necessary to use a 1-inch spade bit to drill the bolt hole in the edge of the door, as well as for the strike plate in the door jamb. And, anytime you’re cutting new knob holes, you’ll also have to cut mortises for the faceplates of the latch and deadbolt. This is done by tracing the faceplate perimeter with a pencil and using a wood chisel and hammer to chip out a recessed area just deep enough to set the faceplate flush with the wood surface.

Another handy feature of the Schlage model is that it also features a patented through-bolt at the bottom of the handle that slides up and down. So, if you’re replacing an older handle-set you probably won’t have to drill a new hole for the new through-bolt. However, the old latch didn’t utilize a through-bolt—only a short screw that didn’t completely penetrate the door—so we had to drill it through.

Once the door is drilled, installation is a simple job. Mount the latch and deadbolt into the mortises with two screws each. Then, install the handle-set according to the instructions, aligning the spindle with the latch. Add the interior lever, rotating the chassis tabs so it slips through the latch and easily joins the handle. Two screws are all that’s required to fasten the handles together.

Finish the handle-set by installing the lower through-bolt, which comes with a cover cap to conceal the interior bolt head for a finished appearance.

The deadbolt housing installs in a similar simple fashion, requiring only two bolts to join the halves over the deadbolt.

When installing the strike plate, the deadbolt striker comes with two long, 3-inch screws to drive into the door jamb. This design provides extra holding power for the deadbolt.
And, that’s the last step to this fairly straightforward project. Of course, it never hurts to repaint the door, or in our case, fill a big, ugly key hole. Once that was finished, the door boasted an updated look to welcome the neighbors.
