


Bring fresh air to the Crawl Space.
By Clint C. Thomas, Esq. Photography by Zoe Thomas
Homes are usually built one of three ways. They are either constructed on a slab foundation, on a block knee wall providing a crawl space or on top of a full basement. The first method and the latter method are not concerned with venting issues or pesky animals looking for a warm home in the winter. Houses that are constructed on a crawl space face both of these problems.
A crawl space allows the homeowner access to the underside of his home and provides a convenient place to run all of the ground-floor plumbing, electrical and HVAC lines. However, there are also negatives associated with crawl spaces. A crawl space must have a point of ingress and egress, but it should also be secure so that the neighbor’s worrisome cat or the midnight prowling raccoon don’t decide to take up residence in your HVAC ductwork. In addition, a crawl space should be constructed so that it can be closed off to the outside air in the winter months to keep out freezing air. Otherwise, pipes could freeze, and your home will be harder to heat.
It would seem simple to just simply block up every hole in the crawl space to keep animals and cold air out, but this is not the case. A crawl space needs to be able to breathe to reduce the build-up of moisture, especially in the warm seasons of the year. Remember, water is probably a house’s number one enemy. If too much moisture builds up under a house it can cause mold and eventually lead to rot. In addition, termites enjoy warm, moist and stagnant air when searching for dead wood. Proper foundation venting will help to reduce the possibility of a termite attack.


In order to combat these problems on a crawl space, it is a good idea to have a working door that can be used for ingress and egress along with multiple vents strategically positioned around the perimeter. Vents come in various types, but I prefer ones that can be open and closed depending upon the time of year and the outside temperature.
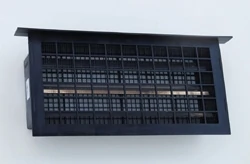
Witten makes an automatic vent that will close itself at 40 degrees Fahrenheit and open itself at 70 degrees Fahrenheit. The Witten vents have a plastic grid on one side and wire screen on the other with louvers in between to help keep out creepy-crawly things.
Many building codes recommend one square foot of ventilation for every 150 square feet of crawl space. For homes that have polyethylene on the ground inside the crawl space the ratio changes to one square foot of ventilation for every 500 square feet of crawl space. Vents should be placed on all sides of a house to allow maximum air circulation in the crawl space. As illustrated by the changing ratio above, another very effective way to reduce moisture under a house and inside a house is to lay a 6-mil thick sheet of plastic on the ground in the crawl space. This serves as a moisture barrier and coupled with an adequate number of vents will make a healthy crawl space.
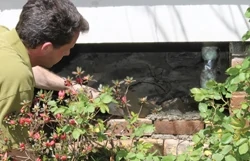
I installed one row of bricks at a time. I placed the foundation vent in the middle of the section of brick and simply cemented it into place. The most difficult part of the masonry job was installing the top couple of rows above the vent because of the tight space.I recently had to install several of these vents to my house because the brick work around my front porch had deteriorated with age, and several of the bricks had been knocked out. I began this project by removing all of the bricks that were between the brick posts that supported the deck so I could re-mortar all of them. These set directly on top of a narrow cement strip that served as a foundation point. Let me add a word of caution here: The bricks that I removed were not load-bearing. They had been installed at some time in the past to fill in between the brick support columns. Before beginning any type of work like this, determine whether or not you are working with a load-bearing structure, and if it is, then be sure to support that portion of the house before you begin the work.
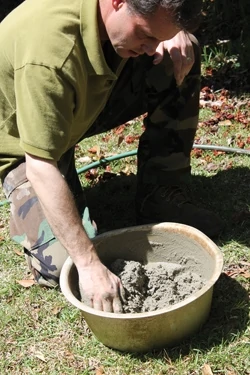
Once all of the bricks were removed I then ran a heavy-duty putty knife along the cement foundation to clean off any loose mortar in order to have a smooth surface to work with. With the help of my son, Sterling, we mixed up small amounts of Sakrete at a time in an old wash pan. I worried that a wheel-barrel load would dry out too much before I could use it, since we were working in direct sunlight. The small size of the pan caused me to have to mix the cement literally by hand. I recommend wearing gloves to keep your hands from drying out.
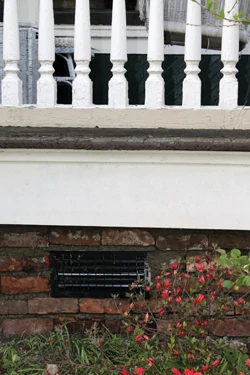
I applied the mortar with a brick mason’s trowel and installed one row of bricks at a time. I placed the foundation vent in the middle of the section of brick and simply cemented it into place.
The most difficult part of the masonry job was installing the top couple of rows above the vent because of the tight space. The wooden skirt that surrounds the outside of the porch served as an impediment. I had to butter each brick and then maneuver them up and behind the skirt to the top couple of rows of this section of brick. The tricky part was getting the brick into place without knocking off the wet mortar. Because of the limited room in which to work, I had to push some of the wet cement into the ends of the upper-most rows with my fingers since I couldn’t get a trowel close to it.
My house was built in the late 1800’s, and in order to retain its historic character, I purposely did not fill-in and smooth out the grout lines of my brick with a striking tool. I’m sure that the original brick masons did smooth their work, but over time some of the grout lines have eroded and worn away. In order to keep from having a brand new brick wall next to an old looking brick wall, I attempted to replicate the look of the natural wear that the original brick showed.
Foundation venting can be as simple as turning a cinder-block on its side so the interior holes serve as a breeze-way between the outside air and the crawlspace. However, quick-fix methods such as this do not perform at the same level as professionally designed vents. As I said earlier, vents should be able to open and close, either automatically or manually, as the air temperature dictates and should be impervious to unwanted animals. A cinder-block turned sideways does neither of these. How many times have we all seen holes stuffed with newspaper to keep out the cold air, only to find that same newspaper pushed out a few days later because a cat or a squirrel wanted a warm place to sleep for the night. Therefore, invest for the long term and use specialty vents. Admittedly, foundation vents lack the charm of new wallpaper or ornate moulding, but they are a necessary item on every house, so don’t cut corners just because their only purpose is a practical one.
