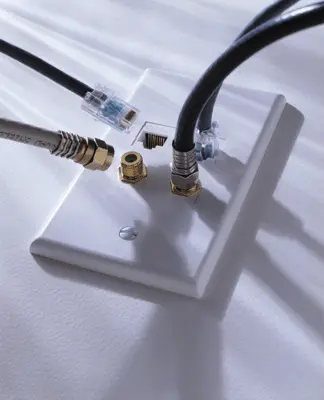
From whole-house audio to camera-equipped security systems, a comprehensive structured wiring system in your home can accommodate a long list of modern-day amenities.
Imagine a house full of theme music, where every room carries the same tune as you move about the home. Imagine never missing a moment of the DVD your family is watching, because the video feeds throughout the house, allowing you to watch it while you make a sandwich in the kitchen. In today’s techno-savvy world, the benefits of structured wiring in the home range from computer networking to elaborate home-automation systems. A comprehensive structured wiring system provides the infrastructure to create a well-organized communications network from room to room, and floor to floor. The structured approach when installed during new construction eliminates the need to retrofit a coaxial cable through a finished wall, or cut open the wallboard to relocate a Category 5e cable. Instead, true structured wiring often involves installing a bundle of wires, sometimes with two 4-pair Cat 5e cables, two coaxial cables and even multi-mode optical fibers.
Sounds complicated? Well, in many respects, it is. But it is likely a shrewd move when building a new house and it allows the homeowner to customize their wiring design to suit their needs for today, and the future.
Bundles of Opportunity
A bundle of wires routed to many different rooms may sound like a pricey investment, but the wire itself is relatively inexpensive. And it doesn’t compare to the cost, time and inconvenience of opening walls to pull wires after construction is completed. Retrofit installation, however, is a very doable project if the rooms are already drywalled and painted. After all, in older homes, old, worn or obsolete wiring becomes a safety issue.
“Safety tops the list, especially for older homes, but relatively new homes also can benefit from upgraded wiring.” says Bill Black, vice president for wire and cable at the Copper Development Association (CDA). “So many changes have occurred in electrical codes, technology and lifestyles in recent years that any room or home undergoing remodeling is a candidate for rewiring.”
And the many benefits offered by structured wiring may be tempting enough to reach for the drywall saw and install a new network, even if there are no other plans to remodel. The different wires in a bundle accommodate different applications. For example, a single coax cable can provide cable channels, satellite signals, as well as closed-circuit channels for outdoor security cameras.
Category 5e cable, or Cat 5 as it’s commonly called, is used for networking and telecommunications. Cat 5 cable contains four pairs of twisted wires that can support data well in excess of 100 Megabits per second.
“Cat 5 is the most commonly used cable in residential applications,” says Jimmy Green, head installer for The Systems Shop. The Systems Shop installs structured wiring in homes and businesses, and specializes in stereo and entertainment applications. “Cat 5 can accommodate computer networks, telephone, whole-house audio and more. It features 8 conductors, which makes it a great cable for multi-tasking,” says Green.
Network Overview
A structured wiring network begins at a central distribution panel. All outside services tie in to the distribution panel, including cable TV, telephone lines, etc. The distribution panel allows the homeowner to select what services are available for each outlet throughout the house. So a jack used for a phone line today can easily be used for a computer-network jack tomorrow.

The exterior services terminate at a network interface device typically located on an outside wall of the home. This provides a demarcation point for service personnel to locate the outside lines. The network interface is connected to the distribution panel through at least one 4-pair Cat 5 cable.
The distribution panel contains all the necessary equipment to support the various networks. It terminates external services to the internal networks, and it allows easy connection of outlets to the services. The distribution box may contain an amplifier, and the cables coming out of the box distribute the signals.
From this central panel, branches of cable extend to different rooms of the house. Cable runs should not exceed 300 feet in order to keep a strong signal. The cable runs of Cat 5 wiring should terminate to modular 8-pin jacks; coaxial cables have different, coaxial connectors. Make sure the category ratings for the cables and connectors match. From the wall jacks, various applications can tie-in based on what amenities are desired in each room.
Installation Overview
The Copper Development Association suggests adhering to a 7-step guideline for installation of a structured wiring network:
1. Define the job. Determine what services are desired in the home and which rooms will have specific services. Remember to plan for the future; provide additional lines to the rooms where you may one day choose to add a service. You want to define the wiring plan based on convenience, flexibility, productivity and accessibility.
2. Mark the plans. Use a copy of the house floor plan to mark the locations of outlets, denote wire and outlet types and any other information pertinent to the wiring design. Also make a list of all materials, including cable, panels, outlets, connectors, etc.
3. Develop a wiring schedule. To define the cable run, walk through the house assessing the amount and type of cable required and making note of any special considerations for rough-in requirements. Number your wire runs to keep things organized. Note all sources and destinations. Transfer this information to your layout plans, and use this as a check-off list during installation.
4. Mark the locations on the site. Walk through the house and mark the wall according to the actual locations for wire runs, outlets and devices. Adhesive labels might be preferred for remodeling jobs.
5. Pre-wire and test. Locate the mud rings (jack brackets designed to be flush with the drywall), route the wire and provide service loops of cable at the outlet locations. Mark the wire runs with ID tags and test the current for each run.
6. Trim out the system. Attach the connectors and the wall plates to the mud rings. Also, configure and connect the distribution panel, and then give each cable run a final test.
7. Document the system. Be sure to note the locations and types of wires, including hidden extra wires that have been installed to provide the flexibility of adding other services in the future.
Use a Star Wiring Pattern
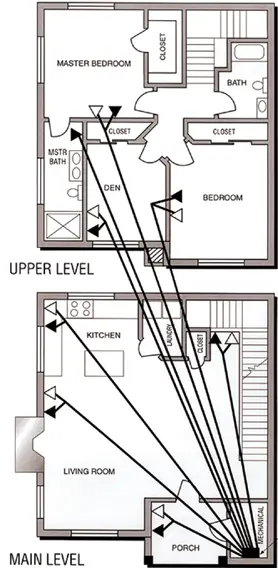
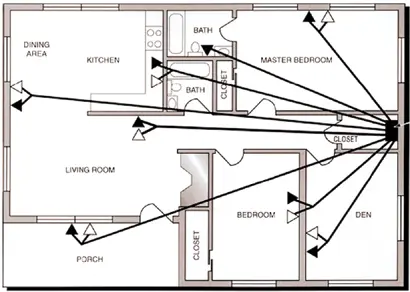
Seasoned professional installers use a Star Wiring Pattern. With star wiring, each outlet (jack) has its own individual “home run” of cabling extending back to the central distribution panel. There are three major advantages of this:
Flexibility: All changes in distribution of services can be quickly and easily made at the distribution panel. Each outlet can be treated independently of all others. (In loop, also known as “daisy chain” wiring – where a number of outlets are tied together in a series – outlets cannot be treated independently).
Isolation of Problems: When an interruption takes place (for example, a nail through a wall damages a cable) troubleshooting becomes much easier.
Quality of Signal: Each additional connection point is a potential source of interference and other problems that can cause a loss of signal quality.
Having an extra outlet or two in some rooms, particularly home offices and entertainment centers, is a wise move, since you can’t anticipate future room use or furniture arrangements. This should be accomplished with home runs to the additional outlets.
Installation Tips
One of the first steps when installing a structured wiring network is to locate the distribution panel. Choose a spot that is centrally located in an air-conditioned environment. The distribution location should allow easy access to the panel as well as wire run accessibility. Avoid installing the box near electrical panels. Most distribution boxes are designed to be mounted between the studs in the wall space, or mounted on the surface of the wall.
Also, be sure to invest in the right tools for the job. Good tools will repay themselves in saved time and labor many times over. You’ll need wire strippers, a drill, a staple gun with cable staples, a punch-down tool for Cat 5 jacks, crimping tools for plugs and pressure clamps for coaxial cable. Remodelers will require drywall saws, stud finders, flexible drill bits, flexible fiberglass rods, and a number of other tools to open the walls and pull new wires.
During the pre-wire phase of installation, go over absolutely everything in the wiring plan. During the walkthrough of the house, make sure all information has been properly transferred from the blueprints and marked appropriately on the house.
Perform the rough-in work for the distribution cables, outlets, in-wall speaker brackets or whatever else you’re tying into the system.
“For outlets such as volume controls, remove the rear of the brackets,” says Green. “The wiring can often get caught up in the cramped space of the box, but with the back removed, you’re allowed more room and freedom to work behind the face of the box.” It is important to maintain a radius of about 10 times the cable diameter with structured wiring, which is difficult with wiring crammed in a box.
The next step is to prepare the wire runs, and label and test each run. When running the structured wire, remain as far away from electrical lines as possible, notes Green. “When we’re running wire, we stay at least 18 inches away from the electrical if at all possible. And we try not to let our cable stay parallel with electrical lines for more than 2 feet,” he says. “We do this so you never pick up any interference from electrical, which can happen to your cable, your phone and especially in the case of audio.”
Crossing electrical lines at an intersection is usually not a problem. Try to cross electrical lines at 90 degrees, and keep 2 inches of separation between the lines at the intersection. And never run wires through the same hole as electrical lines; drill a new hole.
Also, be careful when routing the lines throughout the house and securing them in place. “When running through studs we usually drill a 3⁄4- or 1-inch hole so the wires are not cramped or hard to pull through,” says Green. “Also, don’t pinch or crimp the wires, especially with Cat 5 cable, because you could easily break the conductors.”
Once tested, protect the pre-wire setup until the trim-out phase.
Making Connections
To apply an 8-pin modular RJ-45 jack for Cat 5 cable, first strip about 2 inches of jacket off the cable and separate each wiring pair. Starting with the blue and blue/white pair, untwist the wires down to the jacket. Keep the jacket and connectors as close together as possible. Apply the blue and blue/white wires to the appropriately labeled contacts on the jack. Next, do the same to the orange and orange/white pairs; then the green, green/white pairs; and then the brown, brown/white pairs. Use the punch-down tool to punch each wire into its appropriate contact. Cut off the excess leads and snap on the contact covers.
To configure an RJ-45 plug for Cat 5 cable, first strip 1 or 2 inches of insulation off the line. Untwist the wire pairs. Then readjust and flatten the pairs so the order of the pairs is in the same order as the contacts (according to color). While holding the wires with your fingers, trim the pairs to 1 1⁄2 inch. Apply the trimmed pairs to the RJ-45 plug. The plug has a series of plastic channels to guide the wires and copper contact pins that will crimp down to connect the wires. Insert the wires all the way until they are underneath the copper contacts. Then use the crimp tool to connect.
For coaxial cable, F-style plugs and jacks are typically preferred for residential applications. “We recommend RG-6 with a solid-copper center conductor, rather than copper-clad aluminum or steel,” says Black of CDA. “That’s so the cable can be used at a later date to power a remote device, such as a camera.”
First, strip the coax cable with a stripping tool adjusted for the size of cable being used. Leave 3⁄8 inch of the center conductor showing, and leave 1⁄4 inch of foil. Fold back the plastic sleeve and foil, and apply a barrel-type connector. The insulation surrounding the center wire should insert flush into the connector. At this point, 1⁄16 inch of the center conductor should protrude from the connector. Use the pressure clamping tool to secure the connector.
The Bottom Line
More and more of today’s homes are being wired for the information age. Home networking technology isn’t going to be a passing trend; the benefits of structured wiring will only increase in the future. Consider installing a network for your home and reap the benefits of home automation, whole-house entertainment and many more amenities.
However, keep in mind that the space constraints of a magazine are limited, and this is by no means a comprehensive overview of structured wiring installation. There are several other options and details, such as self-amplified volume controls, speaker patch cables and balun devices for using Cat 5 cable for audio — just to name a few. This is just a quick look at the basics of what is involved with a home wiring system. For more in-depth information, including helpful tutorials and even interactive CD-ROMs, contact the Copper Development Association at copper.org
Side Note 1
Let’s Get Specific
When installing communications wiring in new residencies, follow these five simple principles to provide the most modern and flexible voice, data and video services:
• Use Cat 5 (or better) UTP copper wiring.
• Use RG-6 coaxial cable.
• Wire every room.
• Use a star wiring pattern.
• Use 8-pin modular jacks.
Side Note 2
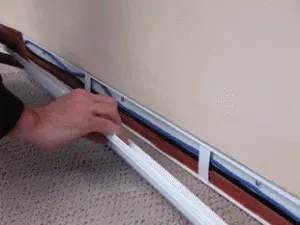
Retrofitting Structured Wiring? Try WireTracks
Remodeling jobs where new wiring is being installed can require considerable demolition to existing walls. Fortunately there are products available that will help provide structured channeling for wiring in new and existing homes. These systems enable people to invisibly upgrade wiring at any time. If set up properly, new homeowners will be able to run wiring from a central wiring closet to almost any location in the house. This is accomplished through the use of standard conduit and WireTracks wiring channels. WireTracks are removable wiring channels that install behind baseboard molding, in plane with the wallboard. The baseboard molding attaches to the channel cover and they become an integrated unit that can be removed and reattached at any time.


