

Save money by installing a tile countertop yourself.
By Matt Weber
Available in a wide range of patterns, colors and prices, porcelain and ceramic tile make a durable countertop that can be installed by the handy do-it-yourselfer to save considerably on installation costs. By mixing and matching various colors and sizes, tile can also be installed in a variety of patterns complete with borders and accents to enhance the décor.
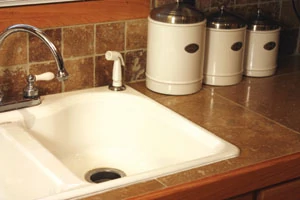
A tile installation can be fairly simple or complex, but with this particular countertop application I wanted to minimize my number of grout lines for a nearly slab-like appearance. Using larger tiles for the countertop surface kept the layout fairly simple and straightforward. On the project shown I used 18-inch tiles for the countertop surface with 4-inch tumbled marble tile for the backsplash, all installed with a square, uniform layout. Regardless of the type and size of tile you select, the installation instructions that follow remain largely the same.
Prep Steps
Shop carefully for tile and don’t be afraid to ask for samples to take home and compare to your interior décor. My wife and I had two very different criteria for our countertop. Shanna was all about the look. I was interested in easy installation, low maintenance and the longevity of the finished project. And, we were both interested in saving money.
Lucky for us, we moved across the street from a professional tile installer, Frank Cantey, a super-nice guy who had a selection of tiles leftover from previous jobs. Shanna was partial to earth tones to complement the porcelain floor tile and the neutral kitchen color scheme. I was partial to easy installation. I liked the idea that large tiles would equate to fewer grout joints (less to clean, less worry of cracks), as well as the prospect of fewer tiles to install. I reasoned that the larger the size of the tile, the fewer tiles I would have to ensure are completely level for a flat countertop. Frank had a perfect fit, a selection of 18-inch tiles in brown tones with a natural, mottled appearance, which he kindly donated to our project.
We wanted to differentiate the backsplash to spice up the décor, so we bought the smaller tumbled marble tiles at out local Lowe’s store. The marble had a naturally warm and random color scheme similar to the countertop tile, but unlike the large tiles, the smaller ones weren’t polished. And, the face of the marble tiles featured many irregular pits and cavities, which we knew would drink up the colored grout for a really neat, cohesive look we had seen modeled at a local tile store.
Once you’ve selected your tile, gather all materials and tools on site. For materials, you’ll need the tile, tile adhesive, tile backerboard, plastic spacers, grout (tinted to your preference) and tile sealer (depending on your type of tile). Along the edge of this countertop I installed custom-made oak trim. In some cases, you may opt for edge tiles, which are usually rounded with a bullnose to prevent chipping. For tools, I recommend a tile saw with a diamond blade, tile nippers, a utility knife, hand level, power drill and paddle attachment to mix the mortar, a notched trowel, a rubber float, and a bucket and sponge for cleanup.

Out with the Old
If there’s any old tile on the countertop, you’ll need to remove it, as well as any sinks, stoves or other obstacles in your way. (If possible, don’t try to tile “around” the obstacles—it’ll look unprofessional). On counters that won’t be exposed to water, you can install the tile directly to the plywood. If installing over bare plywood in a moisture-prone area, first cover it with a moisture-resistant membrane such as 15-pound felt paper or 4-mil polyethylene sheeting.

The kitchen countertop shown in this article was originally covered in plastic laminate over a plywood subsurface. I left the laminate in place to serve as my moisture membrane. I then beefed up the countertop by laminating some Hardibacker cement board over the surface, which adds extra strength and provided a good surface to which the tile adhesive can securely bond.

I measured and marked the cement board to match the countertop and cut it to fit. You can cut cement board by scoring it with a utility knife along a straight edge, then snapping it at the score line. Or, you can use a cutting tool like the Excalibur powered shears, which greatly speeds up the process. The Excalibur Building Board Cutter achieves a straight, dust-free cut with no ragged edges (www.excaliburtools.com). It’s the most accurate cement-board cutting tool I’ve ever used. I advise against cutting cement board with a powered circ saw with a diamond blade, because it generates a lot of cement dust, which is hazardous to breathe.


Next, I used 1-1/4-inch deck screws to secure the cement board to the countertop, driving the screws through the designated fastener holes printed on the Hardibacker. (Note: Depending on how your counter is built, it may be advisable to reinforce its construction from below by screwing wood strips along the perimeter and crosspieces over the cabinets to support the extra weight of the tile.)
I then laid out a dry run of tiles and spacers. A rule of thumb is to arrange the layout so the last partial tile of each row measures at least half the width of the tile (rather than a skinny, awkward-looking tile at the end of each row). Adjust the layout to your preference, accounting for grout joints, any overhangs or edge treatments, and trying to minimize the number of cuts. Always place full tiles at the front of the counter with the partial tiles running along the backsplash.
Once you’re satisfied with the dry run, you may find it useful to mark layout lines, especially if using trim tiles along the exposed edges. In the project shown, I simply followed the edge of the countertop, setting the tiles 1/8 inch away from the edge of the countertop. This 1/8-inch edge joint matched the 1/8-inch grout joints created by the plastic spacers I placed between each tile.

In with the New
Mix the tile adhesive according to the manufacturer’s instructions. I used MAPEI’s Ulraflex 2 polymer-modified mortar and whipped it up with water until it neared “cake frosting” workability. Use a notched trowel to spread enough adhesive to lay several tiles along the front row. Lay your key tiles first, such as an end tile or centered tile, to serve as a starting point. Press the tile in place and twist it slightly to set it into the adhesive. Use plastic tile spacers at each joint and corner of the tile for uniform grout lines. Spread more adhesive as necessary, combing it with the notched trowel for an even bed height. Continue laying rows of full tile, working as far toward the backsplash as you can without cutting partial tiles. Frequently use a straightedge or hand level to check the flatness of the tiles and adjust them as needed. Use a framing square along the grout lines to make sure the installation is properly aligned. As you progress from row to row, use a screwdriver to remove any adhesive from the tile joints before it hardens.


For a square installation, you should be able to cut all the partial the same size, but it’s a good idea to check periodically that this will work. To mark a cut for a partial tile, set one tile over an installed full tile, allowing space for grout seams, and mark the overhang line accordingly. The most productive way to cut tile is using a wet saw with a diamond blade, such as the Ridgid model shown (www.ridgid.com). The water pump of a wet saw provides a continuous cooling spray to the blade during cutting, which reduces heat for longer blade life. For cutouts or smaller tile, a smaller tile saw or spiral saw with tile bit can be used. To make intersecting cuts in tile, begin the two cuts with the circular diamond blade, but finish the cut with tile nippers to prevent over-cutting.

For the most part, the backsplash was installed in exactly the same manner, only it took longer because of the smaller size and greater number of tiles involved. Because of the various color tones, I did arrange a dry run of tiles, laid flat on the countertop (protected by cardboard) so I could mix and match the varied tones to my liking. But other than evenly distributing the colors, it was a very simple layout, starting from the bottom row and working upward to the partials on the top row.


One note about the backsplash installation: Count on adding outlet extensions. In my case, I realized that once the tile is installed, the electrical outlets would be too far recessed into the backsplash to replace the plastic faceplates. Hardware stores typically sell extensions for plastic outlet boxes for these exact situations. To install, first disconnect the power supply and then unscrew the outlet. The plastic extension is basically just a rectangular plastic “ring” that fits over the face of existing box. Just thread the outlet through the extension, screw the extension to the box, then screw the outlet to the extension in the same manner you would with a standard electrical box.
Final Stretch
Next came the edging, which I ripped from some 1-by oak lumber leftover from a previous project. I ripped each piece roughly 3-1/2 inches wide and routed a bullnose on the top of each by running them through my router table with a roundover bit. I then stained and sealed each piece before measuring, mitering and fastening each trim stick with finish nails into the plywood edge of the counter. For a finished look, fill the nail holes with stainable putty, let it dry, sand it flush and stain the putty to match.

If you have the right tools, the edging is fairly easy to make, but remember to rout the oak in several passes, because router bits have a tendency to burn hardwoods when under too much stress. I did, however, run into trouble where the countertop edging met the oven/stove combo. The lip of the stove was too narrow to cover the oak trim. I couldn’t alter the construction of the stove, so I altered the edging by carefully measuring and marking a notch that would fit behind the plastic lip of the stove. To do so, I used the new 12-volt Max Multi-X from Bosch (www.boschtools.com). This cordless oscillating tool can be fitted with a number of accessories, such as the plunge cut blade shown in the photo. This made it easy to jamb the Multi-X blade into the cutline with accurate control and no over-cutting. The resulting notch was a success, and I could fit the stove into the countertop with no problem.


Before grouting, use painter’s tape to mask off the edging, the adjoining walls and cabinetry, as well as anything else you want to protect from the grout.

To minimize cleanup and keep a consistent color scheme, I grouted the backsplash first and the countertop immediately after. To complement the earth tones of the tile, I used MAPEI’s Opticolor grout with a “mushroom” tint (www.mapei.com). Opticolor is a stain-free grout that has better color uniformity and durability than cement grouts. Plus, no sealer is required. It will also clean to the original color and contains antimicrobial protection for mold and mildew resistance.

Mix the two-part Opticolor in a bucket according to the instructions. Use a rubber float to scoop up the grout and work it into the tile joints. Work the float on a diagonal to press the grout deep into the joints. You’ll need to make several passes to ensure complete coverage and eliminate air bubbles. As the grout becomes firm, use a damp sponge to remove the excess from the tile surface. Keep a bucket of clean water nearby to frequently rinse the sponge. A sponge made with an abrasive pad on one side will make it easier to scrub loose the stubborn grout from the face of the tile. Cleaning the excess grout will take several passes to completely eliminate the haze.

As mentioned, Opticolor requires no sealing, but sealing is recommended for many other types of grout. For the countertop shown, I brushed tile sealer over the entire countertop and backsplash—to protect the tile, not the grout.

I was pleased with the finished product. The neutral colors of the tile blended well with the kitchen, and I was surprisingly able to stain the oak trim to a nearly exact match as the oak cabinets. This kitchen is now ready for cookin’.
