

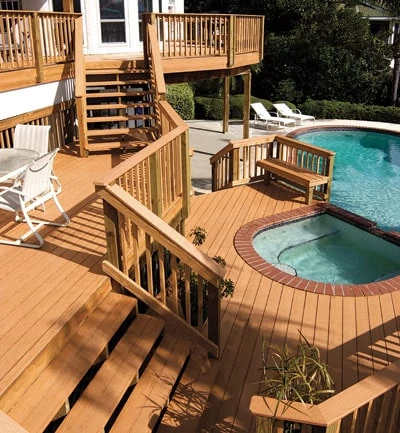
Attention to Detail: Add both form and function to the outdoor living space.
Details create a deck’s personality. The manner in which the deck is trimmed—railings, steps, seating benches, flower planters, and multi-levels—can all create a one-of-a-kind deck.

As with any deck project, the first step is to create a design to suit your house or deck situation. Sketch the deck on graph paper with 1/4-inch square equaling one foot. Measure your deck and draw it on the paper, adding the details to scale on the paper. In the case of a new deck, you’ll probably design the details as you build the deck. Or you may wish to add details to an existing deck. In either case, the scale drawing will help plan traffic patterns, help determine size and the number of details you wish to include. Following are some details you may wish to add.


Steps
Steps are often not necessarily a detail, but a necessity. As with any kind of “stair” they should be designed to be safe, sturdy and long-lasting. Steps commonly consist of 2-by-10 or 2-by-12 stringers, cut in a saw-tooth pattern, to which the step boards are attached. These days, you can purchase precut stringers of various lengths at most building supply dealers and big box stores. With the deck height measurement in hand you can determine the precut length you need for your deck. The stringers are attached to the deck header at the top of the steps and usually rest on a concrete pad at their bottom edges. An alternative is to set a post in place on either side of the stringers. The post serves as a railing support and the stringers are fastened to it. Minimum width of the steps should be 30 inches. This is just wide enough to allow two people to pass. The width of the steps can, however, be as long as you wish, but they must be supported by a stringer at least every 30-inches apart.

You can also lay out your own step stringers, but it’s a bit harder to do. Normal step width or “depth” is usually 10 to 11 inches wide, with step height of about 7 inches. For deck steps, doubled, treated 2-by-6s are common. First step is to determine the total rise and run. To do this, measure from the ground to the top of the deck (rise) and from the edge of the deck to where the steps should end (run). Then divide the rise by 7 to determine the number of risers, and divide the total run by 10 to determine the number of treads.
on the opposite.
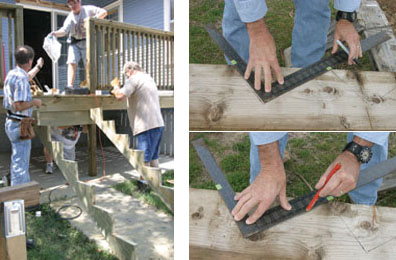
The thickness of the step treads must be taken into consideration for the first and last steps. Subtract the thickness from the bottom and add the thickness to the top. Position the square on the 2 x 10 or 2 x 12 at the marked points, and scribe the step. Then continue marking the remaining steps along the stringer.
Next, mark off the riser height on one leg of a framing square and the width of the tread on the opposite leg. Position the square on the 2-by-12 with the marked points on the edge and scribe the step layout. Tread height must be taken into account on the top and bottom steps. Add the step thickness to the top and subtract if from the bottom. Cut the stringer and position it in place to make sure it fits properly. Then use it as a pattern to cut the other stringers needed.
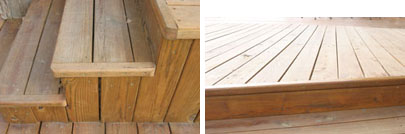
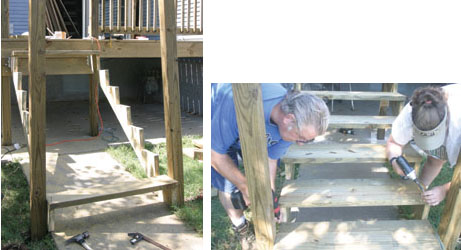
Set the bottom of the stringers on the concrete support. Attach the stringers to the header with metal hangers, or bolt to the sides of a joist. Anchor the bottom of the stringers in place to the concrete with angle irons or lag screws in expansion bolts. Fasten the treads in place, with the “bark” side of the wood facing up. If the step edges are exposed, you can cover the cut edges with a rounded piece of stock. Rip a 1-1/2- by-1-1/2-inch piece, and then use a router to round the top and bottom edges of the finish piece. Cut rounds on each end and fasten over the steps. To further finish off, you can countersink the screw holes, add matching wooden plugs fitted in place, then sand smooth.
Railings
Low-to-the-ground decks may not need railings, but in most instances railings not only provide safety, but add to the design of the deck as well. All but the lowest of steps should have railings to safeguard against accidents. Even a short set of two or three steps should have a railing from 30 to 40 inches in height. Railings may simply consist of a hand rail at the top, or you may wish to add balusters. The latter adds more safety. Check with local safety code rulings on construction of railings and balusters (deck construction should also follow local safety codes)
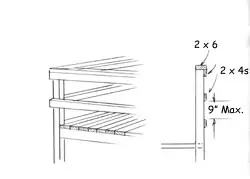
Any number of different railing designs is available. We show three of the more common. The first two utilize the deck support posts to hold the railings. These are quite simple to construct. During deck construction, make sure to leave the posts high enough for the railings. In many instances the tops of the posts will be uneven after setting. Once the deck is constructed, measure from the deck surface to mark and cut off the posts at an even level. You may wish to leave the posts slightly higher than the top railing and cut their tops at a 45 degree angle to finish off, or use post caps.
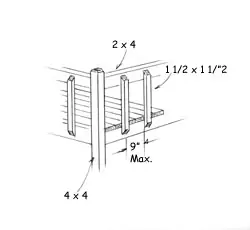
The railings can use three designs to fill in between the posts. Horizontal top and center rails; a horizontal top and bottom rail and balusters; or a horizontal top rail with the balusters anchored to the deck headers and joists. Pressure-treated precut balusters are also available these days. Or you can rip your own. The top rail can be a single piece or doubled with the lower one on edge and the top piece overlapping it.
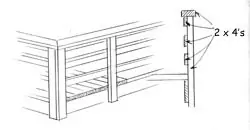
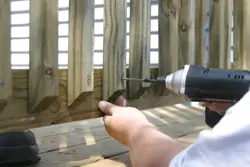
Another type of deck railing consists of support posts bolted to the deck headers and joist, and the horizontals fastened to them. You can finish off support post tops with purchased newel post ornaments. Or you can make them yourself if you have a bandsaw capable of cutting through a 4-by-4.
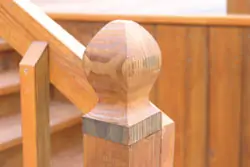
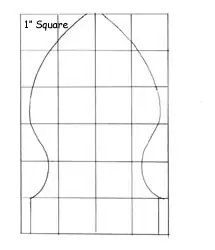
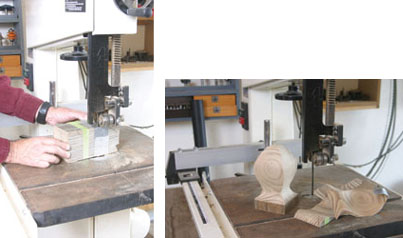
Newel ornaments are easy and fun to make. Enlarge the squared drawing shown and create a pattern. Transfer the pattern to one side of a 4-by-4 block and cut to shape. Then tape the cut pieces back in place. Transfer the pattern to an adjoining side and make these cuts. The ornament is held in place with exterior, waterproof glue with a wooden dowel inserted in the ornament and down into the post. You can also make turned post ornaments and balusters if you prefer. Exposed areas where steps lead from one level to another, or even down to the ground, can be finished off in several ways, including lattice work. One neat method is to create vertical “siding” using 5/4-inch treated deck boards.

Planters
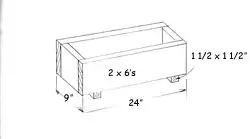
Adding planters of the same material to the deck also helps tie the entire design together and also is a great way of using up end scrap pieces from the deck construction. Planters can be as simple or ornate as you wish. The simplest method is to fasten together a square or rectangular box of 2-by-6’s. Add a 5/4-inch bottom, and drill holes for drainage. Then add “feet” so the water that drains out won’t collect on the deck.
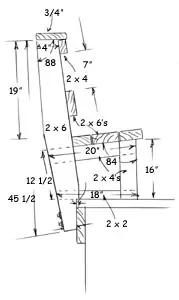
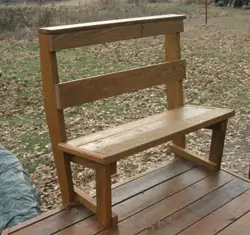
Benches
Benches made of the same material to match the deck can help tie the design together. Benches can be portable or can create permanent seating areas. One popular method is to construct the benches as part of the railing system. In this case, the railings may be vertical or slightly angled backwards. The latter provides a more comfortable back rest. In this case the railings and bench are created separate from the deck and then fastened in place. The rear support posts are cut from 2-by-6’s with their back edges angled. The support posts are fastened to the joists or the header with lag bolts. These should be positioned a minimum of 6 feet apart. Seat supports are created and anchored to the support posts and deck supports or to the deck with wood screws. The seat boards are then cut and added as well as the top and center rail and a cap rail. The cut ends of the seat boards can also be trimmed off with a rounded wood piece.
Deck details can be a great way of finishing off your deck and making a personal statement. And, adding details is fun and can be taken step-by-step until you complete the project.
Be sure to search our site for tons more articles on building and remodeling decks!
