Bathroom Remodeling for the Do-It-Yourselfer

By Matt Weber

Careful planning, labor-saving products and elbow grease are the keys to success for a DIY bathroom remodel.

Bathroom upgrades rank among the top three home remodeling projects, favored because they add “livability” to one of the most often used rooms of the house.

The upstairs bathroom of our project house had seen a few recent touch-ups, such as a new mirror frame, faucet and light fixture, and a tiled shower surround that was painted with epoxy. However, the ‘70s-era floor tile was still mustard yellow with stained grout joints and paint splotches from previous projects. The homeowners had painted the bathroom walls with a silver-toned reflective paint, but later decided that the color was too drab and kept the room dim. The toilet was old and wasted water, and the faux-granite laminate countertop wasn’t fooling anyone. A lot of work needed to be done, and here’s how we did it.

A long-handled tile scraper from Hyde Tools was a handy tool for removing the base-trim tile.
I used an oscillating tool with a carbide blade to cut the tile base trim away from the tile shower surround. Score the tile with a razor where it meets the drywall so it can be removed without tearing the paper face of the wallboard.


Working outward from my initial cuts, I used a short-handled Hyde tile scraper to break loose the tiles from the old mortar bed.
I opened the tile floor by cutting a square with an 18V Ryobi wet saw.


The old mortar bed stayed mostly intact during tile removal, so I made a few minor repairs with some concrete patch and used the old bed as my subfloor.
To speed up the removal process, I attached a scraper blade from Spyder Products to my recip saw, and the old tiles went flying.

Labor-saving Materials

When planning a remodel of any sort, familiarize yourself with the latest building products available, which often boast features that can save considerable labor on the job. Three of the major phases of this job relied on work-saving products.

First, we selected interlocking SnapStone tile for the flooring. This floating floor system consists of genuine porcelain tile bonded to a rubberized grid. As a floating floor, this tile system requires no mortar application, which saves significant labor and materials by eliminating that messy and time-consuming phase of a typical tile job. Plus, the interlocking edges of the tile maintain consisting spacing and straight grout joints, eliminating the need for spacers and reducing layout mistakes.

For straight cuts in tile, I used a wet saw. However, for irregular or oddly shaped cuts, I used a Rotozip equipped with a special tile-cutting bit.
When laying out a tile floor, center the grid to eliminate small, fractional tiles at the perimeter of the floor.
Shown is a close-up view of the SnapStone interlocking tabs, which maintain consistent joint spacing and eliminate the need for plastic spacers.
The SnapStone floating tile floor requires no mortar to adhere it in place. The interlocking edges can be joined with a hammer and rubber block, similar to installing laminate floor boards.


As you apply the grout, use a scrub pad, sponge and clean bucket of water to remove excess grout as you go.
SnapStone requires a flexible grout available from the tile manufacturer that prevents cracking in the grout joints.

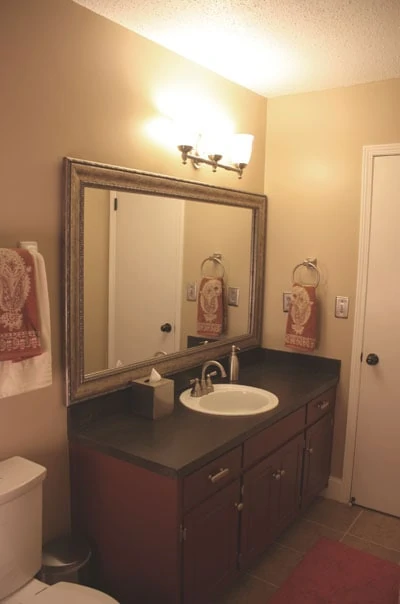
Second, I used a new countertop coating system from Rust-Oleum. Rather than removing and replacing the countertop, I used the new Countertop Transformations kit to create a striking new look while the countertop remained in place. The system requires sanding, rolling an adhesive base coat, spreading decorative plastic chips, and then sanding the chips to a smooth continuous surface. Finish up with a protective top coat, and you have a glossy new countertop with a contemporary stone-like appearance.

The next step was the application of an adhesive base coat.
The Countertop Transformation kit from Rust-Oleum required me to scuff-sand the existing countertop surface.
Next, liberally coat the adhesive with decorative chips. The chips are applied just like when using a seed spreader. (The spreader is included with the kit.)
Roll on a protective top coat for a glossy finish to your new countertop.
Once the glue has dried, sand the chips smooth with a diamond-embedded abrasive pad.

Third, I painted the bathroom cabinets with another Rust-Oleum product called Cabinet Transformations. I’ve repainted cabinets several times in the past, and the traditional method involves a mountain of prep work to remove the old finish by sanding or using a chemical stripper. Paint removal can be grueling, hours-long work, which is why I was eager to try this new paint system that claimed to require no intensive prep work. Rather than using a stripper, the cabinets are simply prepped with a scrub pad and a deglossing agent, which agitates the existing finish for better adhesion of the new paint. Follow the deglosser with a bond coat to give the cabinets its base color. After the bond coat dries, you can apply an optional decorative glaze or go directly to a protective top coat.

Paint the cabinet surface with the colored bond coat.
When it came to the cabinets, the Cabinet Transformation kit allowed me to skip all the sanding/stripping prep work in favor of applying a liquid deglosser. This method proved to be a big time and labor saver.
Finish painting the cabinets with a protective top coat. We then replaced the cabinet hardware with modern knobs, pulls and hinges, all with a brushed-nickel finish.
For more depth and character, add the optional decorative glaze coat.


I had used SnapStone tile in the past, loved the product and came back for more. This was my introduction to the Rust-Oleum products, but I was happy with the labor-saving performance and showroom results of both the countertop and cabinet systems.


Plan and Prepare

When remodeling a bathroom, be sure to take time to weigh your design elements. Use flooring samples and paint swatches to develop a color scheme. We painted large swaths of color on the wall for a visual comparison with the flooring we intended to use. Rushing into a color scheme can end with regret, as was the case with the previous paint job in this bathroom. Painting the walls and trim may be the easiest phase of a bathroom remodel, but it also has the most visual impact and provides the backdrop for every other feature of the room.


For bathrooms, apply a quality latex- or water-based paint formulated to prevent mold and mildew. Choose a satin or semi-gloss finish to reduce water spots. We painted the walls and trim with Sherwin-Williams’ low-odor/zero-VOC Harmony family of paints.
When planning your remodel, don’t be afraid to throw a little paint on the wall to get a visual feel for your color options.

When planning, be sure to “war-game” each phase of the project and gather all necessary tools and materials on site before beginning. A bathroom remodel can be very intrusive to a household, and everyone involved will appreciate as few work-stopping trips to the hardware store as possible.

When selecting any new bathroom appliance to install, consider its long-term performance. For example, the faucet that had previously been installed was designed to conserve water. We stuck to the same criteria when selecting the new toilet. This house was located in the metro area of Birmingham, Alabama—home to some of the highest sewer/water rates in the nation. Water conservation is a big concern, so we selected a new American Standard model with H2Option Dual Flush technology. The flush feature allows the choice between a 1-gallon “mini” flush or a standard 1.6-gallon flush. Featuring a two-button actuator on top of the tank, the Dual Flush toilet allows the user to choose the most appropriate water-saving flush every time, which will cut utility costs for years to come.

The toilet installation was a straightforward pull-and-replace procedure, beginning with the all-important wax ring.
This particular tile required its center to be removed to install it over the toilet drain. I made the cut with a Rotozip.
The new American Standard toilet with H2Option Dual Flush technology allows the user to choose the most appropriate water-saving flush every time.

The bathroom’s trim work is another area where proper planning matters. This particular bathroom belonged to a one-year old boy who loves to kick and splash at bath time, which transfers several pints of water from the tub to the floor. For this reason we decided that the new bathroom floor trim—baseboards and shoe moulding—would be made from PVC. The plastic material won’t swell or rot from the presence of moisture, nor will it contribute to mold or mildew growth. I fabricated my own baseboards from 1-by-6 PVC stock manufactured by Fypon by shaping a decorative profile along the top edge with a router. For shoe trim at the base of the tub, I used preformed PVC cove moulding. (When sealing the trim joints, be sure to select a Kitchen/Bath Caulk that contains a mildewcide.)

I installed custom-routed baseboards made from Fypon PVC, which will withstand exposure to moisture much better than wood.
The custom-made door transition moulding was stained to match the hardwoods of the adjoining rooms.
I installed custom-routed baseboards made from Fypon PVC, which will withstand exposure to moisture much better than wood.


An Eye on Amenities

Little things can add up to lot of impact in bathroom décor. In addition to the major paint, trim and flooring refurbishments, we gave this bathroom close attention to detail. We replaced the old, spring-style door stops with rigid stops that had a rubbed-bronze finish to match the door knobs. We also used metal spray paint to color the floor’s heating registers to match the door hardware.

Additionally, we added a towel ring to the wall, which holds a hand towel for a clutter-free countertop. We replaced the cabinet hardware with new brushed-nickel knobs, pulls and hinges, and we purchased a soap dispenser and tissue box with the same matching finish as the towel ring and cabinet hardware.

Finally, we fabricated some oak door transitions that were stained to match the hardwood flooring in the adjoining rooms.

A common visual theme among the small items of a bathroom gives the space an overall sense of cohesion, which is crucial for a sharp-looking interior décor.

Hot Product

Armstrong Clark wood stain
Armstrong-Clark Wood Stains

Armstrong-Clark’s deck and siding wood stain has nondrying conditioning oils that separate from the drying side of the formula. These oils penetrate deep into the deck or siding wood fiber where the wood’s natural oils used to be. This process rejuvenates the wood. The drying oils stay at the surface, lock in the conditioning oils […]

Read More >>