


Insulation has come a long way from the mud and grass “chinking” and crack fillers of our early ancestors. These days a wide range of insulation products and applications are available to totally envelope and insulate a building. Why insulate? The main reasons are obvious—keep out the cold or the heat, provide energy savings and, of course, lower energy usage and bills. Insulation also provides a more comfortable home because a more constant temperature is maintained. Insulation absorbs sound, reducing the noise from appliances, conversation, radio, television and other audio sources through walls. Insulation can also provide a healthier home as it retards the growth of potentially hazardous mildew and mold in your ceilings and walls caused by trapped moisture. And modern advances in products such as Johns Manville Fiberglass Insulation go one step further, promoting better air quality because the material is Formaldehyde-free.
Heat, a form of energy, always moves from higher to lower temperatures. In the hot summer, heat moves to the cooler indoors. In the cold winter, heat moves to the colder outdoors, transmitted through walls, ceilings and roofs. Insulation creates a thermal barrier that provides resistance to this movement. It’s simple—the more you insulate, the more you save in energy, provide a more comfortable home and add to the life of your house.
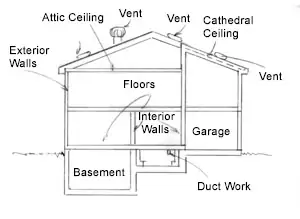
Most homes consist of conditioned or heated areas and unheated areas such as a garage, crawlspace and attic. All exterior walls that separate conditioned and unconditioned spaces should be insulated to create a thermal envelope around heated areas and provide a boundary between the heated and unheated spaces. This also includes knee walls that open up into attics or garages. For a total thermal barrier you should also insulate basement floors, walls, slabs, crawlspaces, attics and cathedral ceilings. Interior walls and floors can be insulated for sound control.
Total Insulating System
These days, products are designed for each specific use. For the most energy-efficiency, a combination of products can be used, creating a total insulating system. The Owens Corning Insulation System consists of many products, all working together throughout the building to deliver year-round energy savings and comfort. This includes products for insulating the foundation walls, crawlspace (underfloor), heated crawlspace, under a slab, basement walls, floors, heating and cooling HVAC ducts, exterior walls, interior walls, finished or unfinished attics, and cathedral ceilings. The system reduces heating and cooling costs, reduces air infiltration and controls moisture.
Normal, everyday living can put from 5 to 10 pounds of moisture into the home each day. In the winter months this moisture can accumulate and condense on the cold inner sides of exterior surfaces. This can cause paint to blister, form stains on drywall ceilings and walls, even damage the building’s structure. Vapor barriers can help control the amount of moisture passing through insulation and collecting inside exterior walls, ceilings and floors.
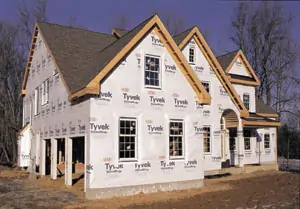
(Photo courtesy Louisiana-Pacific)
First Things First
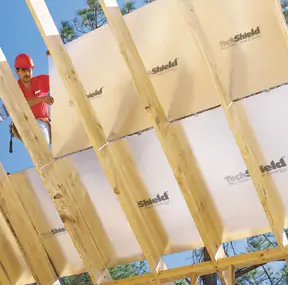
The first step in insulation begins with house construction, utilizing insulation-board sheathing where code rules allow and are applicable. For example, TechShield sheathing from Louisiana-Pacific is made of a thin, durable sheet of aluminum overlay laminated to OSB. The overlay serves as a radiant barrier that minimizes heat gain and loss. The TechShield sheathing panels also have channels that allow trapped moisture to escape without affecting radiant-barrier performance.
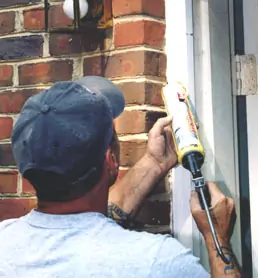
In addition, for new house construction, or when residing, a house-wrap vapor barrier should be used. Dupont Tyvek DrainWrap is an excellent choice, as it offers a unique combination of a weather-resistant barrier with a drainage system. The vertical grooves help drain away water quickly, yet the product has a breathable structure that allows moisture to pass through for quicker drying of walls, thus preventing mildew and mold. All cracks and openings around doors and windows, and where piping or wires enter the house, should be well caulked with DAP SIDE Winder Siding and Window Sealant and/or sealed with foam sealants such as Dow Great Stuff Window and Door Insulation.
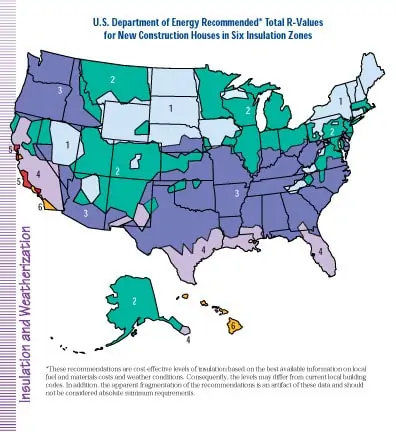
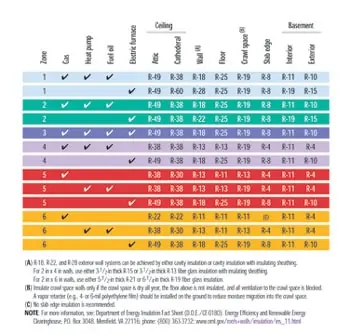
Insulation is available in a wide range of products, some do-it-yourself, some dealer-installed. All insulation products are based on R-values or thermal resistance. Products with higher R-values provide more insulation. Different portions of the country have different R-value needs. The first step is to determine the recommended R-value by the U.S. Department of Energy for your region. Or, check with your local building supplier as to the R-values needed for your home and area. You can also check out the companies mentioned in this article for specific info on the R-values of their different products.
The most commonly used do-it-yourself products are the fiberglass batts or rolls. Rolls are long, continuous lengths of insulation rolled up that are measured and cut to fit specific areas. They’re best for insulating long runs in crawl spaces and attics. Batts are pre-cut lengths available for 8- and 9-foot walls. They’re fast and easy to install because they don’t require cutting. In most instances of whole-house insulation, you’ll need some of each.
Batts or rolls may come unfaced or faced. Some include a vapor barrier on one side and a Kraft paper wrap on the opposite. These are commonly used in crawlspaces. Foil-face or paper-faced batts or rolls have one side covered with those materials and both can be used in walls, attics and sidewalls. Unfaced fiberglass batts do not have a covering and are more economical, but don’t provide moisture control. They are commonly used in unheated attics.
Installing batt insulation during new construction is a fairly easy do-it-yourself project. The first step is purchasing the correct insulation. The walls may be framed with 2-by-4 or 2-by-6 studs. Two-by-6 studs allow for more insulation because of their extra depth. Depending on local codes or the desired R-value for the wall, Owens Corning suggests using 5-1/2-inch thick R-21. The choices for 2-by-4 stud walls are R-15 and R-13, both of which are 3-1/2 inches thick. For standard height walls, use pre-cut batts rather than continuous rolls. Each piece of insulation is manufactured to the size of the typical stud framing, which is usually built on 16 or 24 inches on center, and about 92 inches high. These cut-to-size batts make the job go faster and easier.
The insulation should fit snugly against the studs and completely fill the cavity to the top and bottom plates. Cut batt insulation to fit snugly around obstructions, such as electrical boxes, plumbing and plumbing vent lines. When using Kraft-faced batts with flanges, staple the flanges every 8 to 12 inches. The tabs or flanges should be stapled to the inside of the studs, which prevents screw or nail pops in finished drywall. Stapling to the inside of the studs also creates about an inch of dead air space between the paper face of the batt and the wallboard, which helps prevent moisture, mold and mildew from developing on the back of the wall covering. Owens Corning FastBatt insulation does not have stapling flanges.
Note: Never leave faced insulation exposed. The facings on Kraft-and-foil insulation will burn and must be installed with substantial contact with an approved ceiling, wall or construction material to help prevent the spread of fire in the wall, ceiling or floor cavities. Unfaced fiberglass is non-combustible.
Addressing the Attic
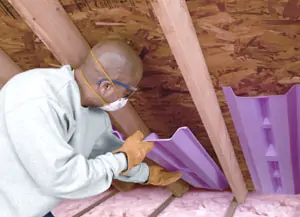
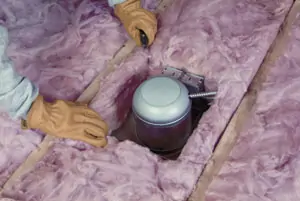
Properly insulating an attic is extremely important. In case the attic is unfinished, lay walk boards across the joists and provide a temporary light. Batt, roll or loose-fill insulation can be used to fill the voids between the ceiling joists. The attic insulation does not have to be fastened in place as gravity will keep it down. If the batts have a vapor barrier, it should be placed face-down toward the heated rooms below. Leave the batts or rolls in the package wrapper until you get the package into the attic. When you open the package the batts will expand a great deal. Place the batts or cut the rolls to fit down between the ceiling joists, leaving a bit of space at the outer walls for air flow. Make all the long runs first and then cut the shorter pieces. Where pieces are joined, butt them together tightly and tape the vapor barrier joints with foil-faced construction tape. Carefully fit around electrical wiring, making sure you don’t disturb or loosen the wiring. All insulation must be kept at least three-inches away from recessed light fixtures unless they are indicated with a mark (IC) or Insulated Ceiling. Fill any spaces between the chimney and wood framing with noncombustible insulating materials such as batts without facings. Insulation should also not be placed directly around a flue, but again leaving at least 3 inches all around the flue. You will not need insulation installed between the rafters, if the ceiling is insulated. The exception is in cathedral ceilings and in some cases of attics that are finished off with knee walls.
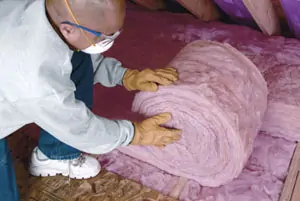
Working with Fiberglass Insulation
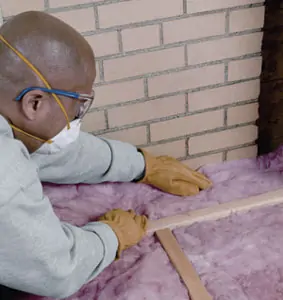
Fiberglass insulation consists of tiny strands of fiberglass, and some of the particles will come off and drift through the air as the material is installed. This can cause a serious irritation. Many years ago I worked as a laborer for a construction company building commercial buildings. We constructed a low-roofed, long motel, and one of my jobs was to insulate the attic portion. The batts had to be pulled some distance through the attic and installation was tight. I ended up with serious irritation under my arms and knees that required a doctor’s visit. Always wear long pants and a long-sleeve shirt that can be fastened tightly at the wrists and collar. A plastic rain coat, or these days a Tyvek overall, is the best bet. Wear safety glasses, gloves, a tight-fitting cap and a respirator. Work for only 10 to 15 minutes at a time, and then get back out into the fresh air for a few minutes.
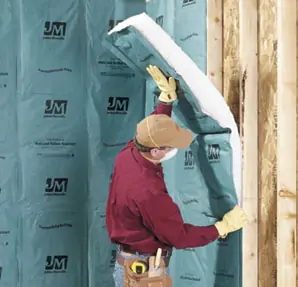
Rigid Foam Sheathing
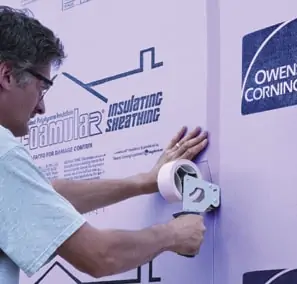
Another type of do-it-yourself insulation is rigid foam sheathing, such as Johns Manville AP Foil-Faced sheathing. Made of polyisocyanurate foam, it provides R values up to 22.8. Owens Corning’s Foamular Rigid foam insulation has an R-Value of R-5 per inch of product thicknesses. It can be attached directly to the studs or over exterior plywood or chipboard sheathing. To achieve an R-19 wall system, add the Foamular RL-5, plus a 2-by-4 wall cavity filled with R-13 fiberglass insulation. Exterior siding and drywall typically add an R-value of R-1. Taking it one step further, you can side with insulated vinyl siding. Mitten Vinyl Siding InsulPlank foam-backed siding is made with a tough polymer exterior and “true flat” design that lays straight, laps tight and never needs painting. The foam backing also increases the R value.
Apply the rigid foam vertically (parallel to the studs), attaching to studs with collar-head nails. These are nails with large plastic washers already attached to the nails. Nail length must be sufficient so the nails penetrate studs by 1 inch. Space nails every 8 inches on each stud covered. The material is easily cut to fit around windows and doors and other construction obstacles, but measure carefully to avoid leaving uninsulated spaces. Once the installation is complete, seal all joints with Owens Corning Bil-R-Tape construction tape to prevent air infiltration. Note: since Foamular is a non-structural material, it must be installed over adequately braced framing in accordance with local building codes.
Owens Corning Foamular insulation may also be added to your basement walls, foundation walls, even under a slab. Before insulating a basement or foundation, check for water leakage and fix any problems. All leaks should be sealed on the exterior surface. The band joists should be caulked and sealed to prevent air infiltration at the construction joints and around all penetrations such as plumbing, electrical and HVAC and dryer vents. Three different methods can be used. (1) You can construct stud frames at the interior of the foundation walls and fill the cavities with fiberglass insulation. (2) You can install Owens Corning Insulpink foam insulation board or Basement Blanket. Or, (3) you can use the Owens Corning Basement Finishing System, which requires no additional paneling or drywall.
Another area that should have insulation in a crawlspace is the duct work. Cover these with Johns Manville Duct Wrap.
Blown-in Insulation
Another type of insulation is loose or blown-in, which has several benefits—the major one being complete uniform coverage, even in hard-to-reach areas. This can be a dealer or do-it-yourself installation. You can rent machines to blow in the insulation from building suppliers such as Lowe’s. Cocoon Blow-In Attic insulation costs less than other types, is itch-free and easy to apply. Cocoon settles into voids and gaps, producing a monolithic, blanket-like thermal barrier. There is no cutting, stuffing or fitting. Simply place the machine outside and haul the hose into your attic. This is a two-person job, with one person in the attic applying the insulation and a second person outside feeding the Cocoon materials into the machine.
In the attic, locate any recessed lights, furnace flues, heating vents, chimneys and other sources of heat, and install barriers around heat sources with clearances of at least 3 inches from the heat source. Heat trapped by any type of insulation can be a fire hazard. Determine the desired installed thickness of the insulation and mark the rafters as a guideline to be used during application. Create a barrier around the attic access hole. Soffit baffles should be used in soffits and proper ventilation provided in the eaves. Outside, turn on the machine and feed the bags of Cocoon material into the machine. Inside the attic, begin in the corner furthest from the attic access and work back. Be careful to step on top of and not between the ceiling joists. Fill to the correct thickness for your required R-value.
A number of companies, including Certainteed and Block The Heat, offer dealer-installed, blown-in insulation. According to the folks at Block The Heat, if you can see the tops of your ceiling joists inside the attic, you probably don’t have enough attic insulation. You probably only have about 5 inches of insulation. You should add insulation to increase the level to 10 to 15 inches. The company installs both fiberglass and cellulose insulation. Current building codes suggest an R-value of 38 to 49, depending on whether you have gas or electric heat. This is basically 15 to 18 inches of blown fiberglass or 10 to 12 inches of blown cellulose.
Radiant Barriers
Reflective radiant barriers can also add to insulation efficiency. Horizon Energy Systems Thermal Control Membrane consists of three layers of double-sided membrane with a patented separation system that has been proven to outperform all other reflective insulation products. It can be used in attics, wall systems (behind the wallboard with taped seams in cold climates like a vapor barrier), or just roll out over your attic insulation (in warm climates). New homes wrapped with TCM and have it in the attic must reduce the capacity of the HVAC systems by at least 40 percent.
Block The Heat has both a Radiant Barrier Spray and a Radiant Barrier Foil. The spray reflects about 75 percent of the heat and the foil about 97 percent. Foil is the best radiant barrier and the most cost-effective. However, in many attics, installing foil can be very difficult. And, paying someone to install foil can get expensive ($.75 to $2.00) per foot. The company’s Spray-On Radiant Heat Barrier is essentially a “liquid foil” that is only available through commercial contractors.
Spray Foam Insulation
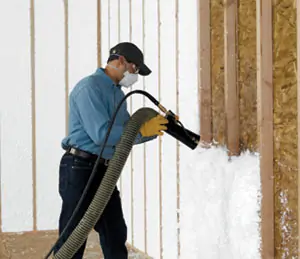
Spray-in-place, expanding foam insulation has become increasingly popular in new construction. It installs fast and seals, soundproofs and insulates. Most products are dealer-installed. Icynene spray formula is a 1/2- pound, density-free rise, open-celled material supplied by independent Icynene licensed dealers. It is an effective “breathing” air barrier that can adjust with the building. Convective air movement inside cavities is virtually eliminated, providing more uniform temperatures throughout the building. Icynene is applied by spraying liquid components onto an open wall, crawlspace or ceiling surface. There the liquid expands 100:1 in just seconds to provide a flexible foam blanket of millions of tiny air cells, filling building cavities and sealing cracks and crevices. Excess material is easily trimmed off, leaving a surface ready for drywall or other finish.
For those interested in “green building”, BioBased Insulation is also a spray-in-place insulation made from soybean oil, an annually renewable resource, replacing petroleum ingredients. BioBased Insulation is a thermo set plastic foam that is by its nature inert. BioBased Insulation will not support mold growth and is not a food source for rodents, Insect or vermin. BioBased Insulation is custom applied into place, disallowing it to sag or settle over time like conventional insulation.
For the DIY homeowner, Tiger Foam Insulation Kits come complete with gun and hose assembly, extra nozzle tips, and require no outside power source or additional machinery to apply. These portable and disposable foam insulation kits are easy to use, even for first timers. Tiger foam Insulation is a quick-curing, disposable, two-component foam manufactured using environmentally friendly blowing agents and fire-retardant chemicals. It does not contain CFCs, VOCs, Formaldehyde or PENTA-ADEs. It’s available in two formulas—Fast Rise E-84 Fire-Rated Surface Spray and a Slow Rise, Low-Pressure Cavity Fill Formula.
Ventilation is Key
Along with proper insulation it’s also important to provide proper ventilation. Ventilating creates a positive air flow that allows the house to breathe and prevents the build-up of moisture. The attic should have eave vents along with gable and/or roof vents. At least two vents are required to create an air flow—in one and out the other. Owens Corning suggests 1 square foot of free vent area per 300 square feet of attic floor when a vapor retarder is used. In situations where no vapor retarder is used, 1 square foot of free vent area should be provided for each 150 square feet of attic floor area. You will also need at least two crawlspace vents to create a positive air flow. One square foot of free vent area is recommended for every 1,500 square feet of floor area covered with a polyethylene vapor retarder (every 150 square feet if there is no vapor). In crawlspaces that are unheated and/or have a dirt floor, it is also recommended the floor be covered with a polyethylene vapor retarder. All vents should be screened to keep out insects.
Sources:
Block The Heat
www.blocktheheat.comCertainteed
www.certainteed.com
Cocoon Blow-In Attic Insulation
www.cocooninsulation.com
Dow Great Stuff Window & Door Insulation
www.dowcorning.com
Dupont Tyvek
www.dupont.com
www.tyvek.com
Johns Manville
www.jm.com
Louisiana-Pacific
www.lpcorp.com
Mitten Vinyl Siding
www.mittenvinyl.com
Owens Corning
www.owenscorning.com
Tiger Foam
www.tigerfoam.com
