

By Monte Burch
Tubular skylights bring natural light indoors.
Roof mounted skylights have been used for many years to bring the sun into our buildings, and a wide range of skylights are available. These days, tubular skylights can capture more sun than traditional skylights, even for small areas, and also provide more versatility. These units are also a basic do-it-yourself project and are available in a wide range of sizes and brands, such as Velux, Solatube, Sun-Dome, Sun Pipe and Sun-Tek.
While many skylights are more complicated, you can install a sun tube, such as the Sun-Tek Sun Tube shown in this article, in less than an afternoon. Instructions and everything you need come with the kit, including special leak-proof roof sealant. Sun-Tek’s tubes consist of three parts, a sun-dome for the roof, a tube to channel the light, and a diffusing system to disperse the light evenly.
As many have discovered, a simple skylight is often not the answer. It can provide light, but the light intensity changes with the amount and direction of the sun. You can have a “hotspot” of light on bright sunny days. Sun tubes eliminate this problem, providing evenly dispersed light throughout the area. And, they can also be used to direct light down through an attic and into a small area, such as a narrow hallway, even a dressing closet. They can also be used to provide natural light in a bathroom, and still maintain privacy.

A Close Look at the Tube
The Sun-Tek’s tubular skylights are available as single units, with tube sizes of 10, 14 and 21 inches and with tube length ranging from 10 to 30 feet, depending on the unit chosen. They can illuminate an area of 150 to 450 square feet. The one-piece seamless construction of the tube creates a completely leak-proof unit, and the exterior dome is made of super-tough polycarbonate that is impervious to hail and tree branches. The dome blocks 99-percent of damaging UV rays, so it is easy on carpeting and furniture. The tube is made of reflective aluminum to enhance reflectivity. Each unit comes with two elbows (15 inches in length when straightened) and one straight piece. Straight connectors are 22 inches long. In most instances additional straight connectors are needed. Also included in each kit is the diffuser lens, one tube of STS 1000 Sun-Tek butyl sealant, 10 yards of generic duct tape, and a galvanized steel (22-inch gauge) roof collar that can be used by the homeowner in the event they cut the roof opening too large. Extension connectors are available, as well as light kits that allow you to use the units for night-time lighting.
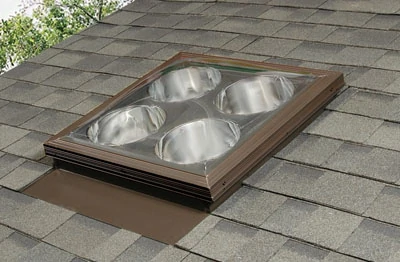
The company also offers multiple-tube units, called Sun-Tek Spyder Systems, which are available with two or four tubes and a single dome skylight. These are more complicated to layout and design, as well as to install. However, they do allow for much more dispersal of light by spreading out the tubes and diffuser. For instance the Model Quad 10-inch provides four tubes, each with light capabilities of 150 square feet.
We chose a Model Quad 10-inch, Spyder System for installation in a woodworking shop. The installation is somewhat different, in that the shop ceiling had not yet been installed. This not only made it easier to install the skylight, but permitted easier photography. We installed a Curb Mount Aluminum Skylight which required construction of a curb, as well as standard roof-flashing steps. Self-flashing models are also available.


Installation
The model we choose requires a 22-1/2-by-22-1/2-inch cutout, which allowed it to fit between our 24-inch spaced roof trusses. First step in this type of installation is to determine the location of the skylight as well as the tube lenses. Then mark the location of the cutout and drive wood screws up through the roof and asphalt shingles from the inside or underside of the roof. Up on the roof; use the protruding screws and a chalk line to outline the cut-out. Then make the cut-out with a reciprocating saw.


We used pressure-treated 2-by-4’s for construction of the curb. It’s a good idea to construct the curb, and then test the sun port and skylight for fit before installing it on the roof. The curb is made to fit with its inside edges flush with the cut-out. Place the curb over the cut-out and mark around the outside edges. Then remove the shingles down to the roofing felt using a sharp utility or roofer’s knife.
For the installation shown, on-site flashing is added. This begins with a flashing along the bottom edge, a piece of flashing placed under each shingle and lapping up the sides, then a top flashing. Flashing must be anchored to the curb with roofing nails, and the entire assembly must be well caulked with a good roofing sealant.


Place a bead of roof sealant on the upper edges of the curb and fit the sun port down over it, then fasten in place with roofing nails. Place another bead of caulk over the outer edge of the sun-port and place the skylight down over it. Then fasten the skylight in place with screws provided through the holes in the sides and into the curb.
Back off the roof and in the attic, position the sun tubes in place. Pieces of duct tape can be used to hold them temporarily together until you get them arranged as desired. Then mark locations for the ceiling holes and cut them. Once you have the tubes arranged to meet the holes, fasten the tubes, elbows and sunport drops together using the sheet metal screws provided. Then wrap with the duct tape provided. Final step is to install the diffuser lenses.
Capturing the sun is fun and easy with the tubular skylight systems. You can easily install them yourself to bring in the sun and brighten your home interior anywhere you please.


